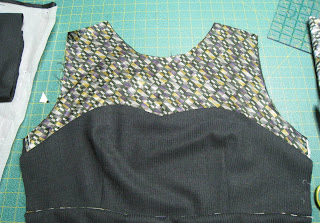
I'm almost finished... just need to construct the skirt lining, do some inner hand sewing on the lining, and hem. In the meantime, I thought I'd give a rundown on how I attached the yoke front to the bodice front. Basically, if you've sewn a princess seam, the technique is the same, otherwise known as the Right Side Together method (RST). That's my name for it anyway.
1. Stay stitch each piece just inside the 5/8" seam line. Do this for the lining, too, if you're lining.
2. Clip the yoke front seam allowance (SA) almost to the stitching, about 3 times on each curved section. Clip the bodice front and lining at the center.
3. On a flat surface, pin, RST with the yoke on top.
4. You can baste first, or just go for it and stitch. Slowly. If you are lining, then sandwich the bodice front/yoke front/lining, and stitch again. Important: DO NOT sew your lining all the way to the side seams, but stop about 3" from each side.
5. Cut some wedges from the seam allowance of the bodice front and lining to help it lay nice and flat.
6. Check your stitching. I needed to do a bit of ripping and resewing. It happens.
7. Press and admire!
Piping note: I used my invisible zipper foot and it worked out so well. The cording I used is super thin (I know that's the technical name). I think it's crochet thread, but I've had it at least 22 years, and used it to make piping for Peter Pan collars for Laura's smocked dresses when she was a baby. OK, I'm rambling.


oh! This is going to be so lovely! I really love the color combo!
ReplyDeleteLooking absolutely wonderful! This is going to be one amazing dress.
ReplyDelete