
Wednesday, March 31, 2010
Lusciousness
The fabric arrived today for my MOB dress! It's a gorgeous silk shantung from Gorgeous Fabrics in Bright Green. I love it, and love the way it feels and swishes, and drapes. I'm headed to Hancocks tomorrow to get the pattern (Buttericks are 99 cents... what could be better?).
 I'm pretty sure that the picture doesn't do it justice. Do you want to know which pattern I've chosen? Or should it be a surprise? Not sure I can keep this a secret!
Tuesday, March 30, 2010
It's a Mom's Life
All sewing came to a drastic halt Saturday evening when it was decided that I needed to head north to care for the sick college boy Kyle. Yep, a mother's work is never done, so they say. We had found out Friday evening that he had taken himself to the ER in the morning for a severe sore throat, trouble swallowing, etc. Saturday, he was still pretty sick and could not seem to find food that he could tolerate swallowing. I arrived in Nashville around 10 pm, moved him into the Marriott and proceeded to feed him 2 Wendy's frostys and half a cheeseburger.
Sunday, I headed to the grocery and got some hotel friendly (i.e., there was no fridge in our room) smooth food. I rarely go to Starbucks, but to my delight, they had oatmeal on their menu which was just perfect for a sore throat. Kyle spent the afternoon sleeping, and I did his laundry in the hotel washer and dryer. Let me just say that hotel washer and dryers are really more suited to a load of socks and delicates than a college boy's sheets and towels (germ filled, I'm sure), and even boxers and t-shirts to get him through the next week.
Yesterday, we checked out, and went to the University Health Center for his follow up appointment, where the doctor seemed confident that he has mono (in spite of a negative "quick" test). Prescriptions and Smoothie King were now on our agenda, and one more night in a hotel vs. a noisy, germy dorm. This time, we found that the Hilton Garden Inn had a fridge and a microwave in each room, so that's where we went. We had some time before check in though, and while Kyle napped in his dorm room (now disinfected to the best of my ability, with clean sheets), I searched out a local fabric store for entertainment.
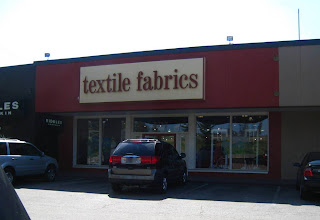 In spite of the pedestrian name, this fabric store was really quite nice. Very organized, with loads of gorgeous cottons for quilting and children (not primarily a quilting shop though), and some beautiful wools, silks, jerseys and bridal fabric. All very pricey. Lots of trendy patterns besides the Big 4, but no Burda magazine, something I am now on a sort of quest for. I just want to buy one. From a newstand, fabric store, anywhere. To see if I like it, and might want to subscribe. You would think one might find one in Atlanta, but so far, no dice.
I'm going back to Atlanta today, and will have lots of sewing that I have to do for my Etsy shop, in addition to those little flower girl dresses that must be at least cut out by the weekend. Time to get back to my Sewing Life!
Sunday, I headed to the grocery and got some hotel friendly (i.e., there was no fridge in our room) smooth food. I rarely go to Starbucks, but to my delight, they had oatmeal on their menu which was just perfect for a sore throat. Kyle spent the afternoon sleeping, and I did his laundry in the hotel washer and dryer. Let me just say that hotel washer and dryers are really more suited to a load of socks and delicates than a college boy's sheets and towels (germ filled, I'm sure), and even boxers and t-shirts to get him through the next week.
Yesterday, we checked out, and went to the University Health Center for his follow up appointment, where the doctor seemed confident that he has mono (in spite of a negative "quick" test). Prescriptions and Smoothie King were now on our agenda, and one more night in a hotel vs. a noisy, germy dorm. This time, we found that the Hilton Garden Inn had a fridge and a microwave in each room, so that's where we went. We had some time before check in though, and while Kyle napped in his dorm room (now disinfected to the best of my ability, with clean sheets), I searched out a local fabric store for entertainment.

I'm going back to Atlanta today, and will have lots of sewing that I have to do for my Etsy shop, in addition to those little flower girl dresses that must be at least cut out by the weekend. Time to get back to my Sewing Life!
Saturday, March 27, 2010
Up Next

Laura found a great deal on gorgeous purple satin dresses at the Limited of all places, so the bridesmaids dresses are RTW and amazingly need no alterations. Or so these girls tell her. I hope that's true, but I've let go of the worrying about it. Especially for the one who said her dress is a little tight, but it will be fine.
You tell by the picture, then, that I'm making the flower girl dresses. Yes, there are 2 flower girls. I'm making view B, which is the 3-tiered pink one in the picture. The base fabric is the lavender/lilac taffeta, and the flowy bit is the flowy organza you see there. I'm going to make the sash pictured on the long dress in the dark purple to tie them in with the bridesmaids. The pattern has the base fabric as a lining in the bodice, but I don't want the seams to show, so I'm treated these 2 as one, and will use a pink cotton batiste to line. Then there is the underskirt to which you attach the tiers to, plus a lining for the skirt, which they make out of the same fabric. Two layers of taffeta in June in Atlanta will be too much... too stiff and too hot, so again with the batiste lining.
I'm doing a test wash and dry right now of the taffeta, as the care instructions say hand wash and line dry, but I'd love for the whole dress to be machine washable, so I'll see how that goes. I ordered the batiste and the extra yard of the organza I'll need only yesterday (originally thought there would only be one flower girl, and we had chosen a different, younger looking pattern), so I can't really get started, but once that all arrives, then it will be all systems go! Deadline for this is April 16 when we head to Tennessee. That's where the little girls live (and fiance Thomas is from) and we'll be attending a party there that weekend. I want to deliver the dresses then.
No problem, right? I hope not. I bought the 2mm rolled hem presser foot today to assist with the hemming of all those tiers. That should be fun. And I think I'm going to do hand-picked zippers. I've never done a zipper by hand, but how hard can it be?
Did I mention I'm making my MOB dress too? I'll let y'all know when I'm officially declared insane! Oh, and Uncle Thomas, no showing this picture to anyone involved with Flower Girl 1 or Flower Girl 2. I want it to be a surprise.
Thursday, March 25, 2010
Just a Quickie -- Butterick 5466
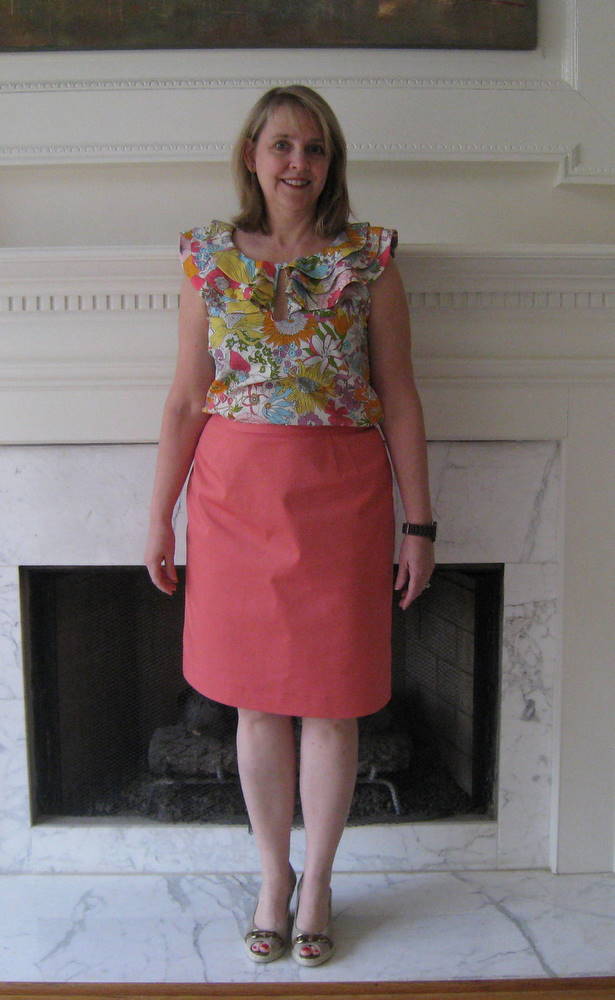
I've been determined to make this skirt for the past couple of weeks, and finally did today. I'll put the review up on Pattern Review later tonight, but wanted to share some pictures.
 I really like this outfit. The top is one of the Liberty collection at Target. I think this is wedding shower appropriate, or future son-in-law graduation appropriate, so I can see several places where I might wear it. Same material as the other dress I just finished... this was my extra and I used it ALL. I had to piece the waistband, but no one but me and y'all will even know, and nobody will even care!
One thing I've decided is that while a full length mirror is a necessity, everyone should take some digital photos of themselves in their outfits and see what they really look like. For example,

 I love this cardigan, and while it matches, it just makes that ruffled collar stand out and look kind of clownish. The cardigan, shirt, skinny belt look is great. But not on me. (Ignore the fact that the shirt is wrinkled.) I just don't have one of those waists that needs emphasizing.
Anyway, the skirt is super easy to make, and I will definitely be using this pattern again and again.
One thing I've decided is that while a full length mirror is a necessity, everyone should take some digital photos of themselves in their outfits and see what they really look like. For example,


Anyway, the skirt is super easy to make, and I will definitely be using this pattern again and again.
Wednesday, March 24, 2010
Handmade Treasures and More
Well, folks, I have not touched my sewing machine since last week! I came down with a stomach bug Friday night/Saturday morning (why do these things always strike in the middle of the night?), and was down for the count the entire weekend. Monday, I was out of bed, but only barely, because I had a show to go to on Tuesday. A show? You know, the crafty kind, where a group of (in this case) stay at home moms that make stuff (or rep product lines) get together and try to sell it. This was my first, and not terribly successful for me, but not really for too many others there either. Very low attendance. One of the casualties of my illness was a practice set up, and you can tell by my cluttered and unattractive table, a practice would have helped.
 On to prettier things.
Since I have nothing to show sewing-wise, I thought I would share a little bit about the woman who initially taught me to sew, my grandmother, the late Wilma Lawton. On a visit to her house in Seabrook, Texas when I was 12, I made a vest and skirt outfit for my upcoming confirmation. I still remember how she made me rip off the patch pocket and start over because the stitching wasn't perfect. I've named my seam ripper "Wilma" in her honor! One of these days when I'm visiting my mom, I'll try to dig up a picture of that outfit. (My mom has also had a huge influence on my sewing. I'll do a post on her sometime in the future.)
 There's Wilma, and there was probably nothing she couldn't make (although I don't think she ever made any quilts). She made many, many of her own garments, and if she were here today, I would love to sit her down and talk about sewing, style and fashion through the decades. Sadly, she passed away in 1996. Besides sewing, she loved to try new crafts. Many of these were needle-oriented, as in some form of embroidery. I have several of her pieces, and want to share two with you.
I don't know what the technique for the first is called, so please share that with me, if you do. It is some sort of cross stitch on a needlepoint canvas type of thing, with other embroidery stitches, and ribbon and seed pearl work.
 She made this small one for me, and I believe she made another small one for my sister. My mother has a much larger piece, and they are all done in these beautiful, muted colors.
Wilma had a way with yarn as well, and enjoyed knitting and crocheting. I confess that she did not pass any of those skills to me, but my mother is quite talented at knitting. I have this lovely pillow that she made, and I believe the "lace" is a crocheted piece done with cotton thread. I'm not entirely sure, so if you what it's called, I would love to know.

The pillow has had quite a bit of wear, which you can see along the piping around the edges, but I love it, and think of her whenever I pass by.
I do have several other things she made, but wanted to share these two with you today.

Since I have nothing to show sewing-wise, I thought I would share a little bit about the woman who initially taught me to sew, my grandmother, the late Wilma Lawton. On a visit to her house in Seabrook, Texas when I was 12, I made a vest and skirt outfit for my upcoming confirmation. I still remember how she made me rip off the patch pocket and start over because the stitching wasn't perfect. I've named my seam ripper "Wilma" in her honor! One of these days when I'm visiting my mom, I'll try to dig up a picture of that outfit. (My mom has also had a huge influence on my sewing. I'll do a post on her sometime in the future.)

I don't know what the technique for the first is called, so please share that with me, if you do. It is some sort of cross stitch on a needlepoint canvas type of thing, with other embroidery stitches, and ribbon and seed pearl work.

Wilma had a way with yarn as well, and enjoyed knitting and crocheting. I confess that she did not pass any of those skills to me, but my mother is quite talented at knitting. I have this lovely pillow that she made, and I believe the "lace" is a crocheted piece done with cotton thread. I'm not entirely sure, so if you what it's called, I would love to know.

The pillow has had quite a bit of wear, which you can see along the piping around the edges, but I love it, and think of her whenever I pass by.
I do have several other things she made, but wanted to share these two with you today.
Friday, March 19, 2010
Rooibos Dress Finished

I've had this dress finished for a couple of days, but am just getting around to posting. This pattern goes together easily, though I did have to make a couple of alterations to the bodice, most notably narrowing the "straps" as they are particularly wideset in the pattern, and lengthening the bodice above the midriff. Lengthening the bodice resulted in a higher neckline, so I had to adjust that, too. The result of the narrowing changed the look of the little collar, and not for the better I think. Oh, and I moved the darts more toward the center.

The fabric is a fine line twill that is 97% cotton and 3% lycra. It sews beautifully, but it also wrinkles very easily. That part could be annoying. The contrast fabric is the same. In reading some of the reviews on Pattern Review, some people were not happy with their little collar staying down. I starched mine, and ironed, and it seems to be stuck down well without tacking.
I traced the pattern because I also went from a size 8 for the bodice, to a 12 at the midriff and below. I think that really I should have stayed at the 8 for the midriff, and then moved out to a 10, because it is supposed to be a bit closer fitted. While I like the style as it, closer fitted would be a bit more flattering. I think it's bordering on early pregnancy, and for someone my age, that's not a good look. You can tell from the back view that I needed the larger size, though. I tissue fitted (is that a verb?) the skirt part, and need to remember that tissue doesn't stretch.

One other change I made to the back bodice was to lengthen and narrow the darts in the back. This was in direct response to a review on Pattern Review, so thanks to that reviewer. No pokey outie darts here. A note on the pattern instructions: there is never an instruction to finish the lower edge of the facing pieces. I serged all the seams to finish them, and did the same to the facing.
Ordinarily, I prefer a blind stitched hem, but I just machine stitched this one, and am pleased with the appearance. Almost forgot... I lengthened the skirt pattern by 1-1/2" before cutting out, and only had a 5/8" hem. It's really short the way it's printed, and that's also not a good look for me.
It's going to be a great summer dress, and if I find some great buttons, I might add those to the bodice, but I'm fine with it as is. If I make it again, I'll do some narrowing at the midriff, and maybe change the neckline, but keep the rest of the changes I made. I think it would be really cute to do it in 2 colors so it looks like a high waisted skirt, and a top.
Monday, March 15, 2010
Piping Tips
I'm almost done with the Rooibos dress by Colette Patterns, and it has really sewn up nicely. It's classified as an Intermediate skill level pattern, and one of the things that makes it so is the piping detail. It's optional, so if you're a beginning sewer, or have never sewn with piping, leaving it off will make it doable. If you want to try it though, there aren't any instructions on how to make piping (you can buy it pre-made).
I like to make my own, however, and it really is easy. First, I measured around the neckline and the tops of the pockets, and figured out I needed around 53". I used a cotton crochet thread, which makes a lovely "baby" piping, and figured I would need to cut 1-1/2" strips to give me enough to fold over and have a 5/8" seam allowance. It's important to cut bias strips so that it will curve easily. You will need to connect your strips with a 1/4" seam allowance. If you've never made bias strips for binding or piping, I suggest googling a bias strip tutorial for more complete instructions.
 Using your zipper foot, encase your piping cord/thread in the bias strip. Here you can see my crochet thread to get an idea about how thin it really is. I didn't completely follow the suggestions for the piping in the pattern. First, I didn't baste it to the neckline. I just pinned. Baste if you're more comfortable with that. Second, I started at the shoulder seam rather than the center back. I think the connection will be less noticeable on my shoulder.
 I pulled out and cut off about an inch of the cording, and folded over the end, and this is my starting end. I started sewing about an inch from that folded end so that as I come around to finish, the other end will be tucked in here, and will look like it's a continuous piece.
 In the picture above, you can see that as you reach the corners of the collar, you will need to do some serious notching and clipping. If I make this again, I plan to change the neckline and will probably leave off the collar. If I do use the collar, I would start the piping and the far right point continuing around the back and ending before the collar, leaving it unpiped. I think the piped collar doesn't look as sharp as I would like it to.

 The picture on the left shows right before the sewing is ended (I don't sew over the pins if I can help it, contrary to what the picture shows). Finally, you can see how I tuck that loose end into the folded over end. Once finished, it will look like a seam.
When you're finished sewing, turn the seam allowance to the back and check to see what it looks like. You want the piping to be flush to the fashion fabric without any stitching showing. I wasn't 100% happy with my collar points, so I flipped the bodice over, and, sewing from the other side so I could see the contrasting thread easier, I forced the needle as close to the piping as I could get it, without sewing through it.
 Can you see the ridge of piping to the left of the stitching? To make it even easier to see and sew close, I ran my fingernail next to the piping to make the ridge more prominent. Ripping out the other stitching is unnecessary.
If you are new to piping, but still want to give it a try, just pipe the top edges of the pockets. There are a slight curve, but it will give you a good try at a new skill. The piping is a great detail, and takes your sewing to the next level.
I like to make my own, however, and it really is easy. First, I measured around the neckline and the tops of the pockets, and figured out I needed around 53". I used a cotton crochet thread, which makes a lovely "baby" piping, and figured I would need to cut 1-1/2" strips to give me enough to fold over and have a 5/8" seam allowance. It's important to cut bias strips so that it will curve easily. You will need to connect your strips with a 1/4" seam allowance. If you've never made bias strips for binding or piping, I suggest googling a bias strip tutorial for more complete instructions.


When you're finished sewing, turn the seam allowance to the back and check to see what it looks like. You want the piping to be flush to the fashion fabric without any stitching showing. I wasn't 100% happy with my collar points, so I flipped the bodice over, and, sewing from the other side so I could see the contrasting thread easier, I forced the needle as close to the piping as I could get it, without sewing through it.

If you are new to piping, but still want to give it a try, just pipe the top edges of the pockets. There are a slight curve, but it will give you a good try at a new skill. The piping is a great detail, and takes your sewing to the next level.
Thursday, March 11, 2010
Don't Let This Happen To You, Part 2

Some cutting out observations: a couple of commenters said the rotary cutter is the only way to go. I definitely agreed. One of them said definitely use the larger cutter. Since I had one, this time I gave it a try. I didn't love using the larger one, and think I'll save it for the longer, straighter lines. I just felt like I had more control with the smaller one, AND, the blades are cheaper, so that's good.
So, what the monkey happened? I was transferring the marks, and, you guessed it... grabbed the wrong thing, and didn't notice until I peeled back the tissue and said, "what the monkey?" [or something like that].


And then, an hour or so later. Don't let this happen to you:

Wednesday, March 10, 2010
Size Matters
Well, folks, Butterick 5353 is finally finished. What? You thought I was going to talk about something else?
 What I want to say about size is... when it comes to patterns, if they are at all fitted at the top, then buy the size that matches your bust measurement. If I had done that, then this dress that took way longer than it should have, would have been done last week! I spent countless hours fussing and fitting and fitting and fussing, and in the end, it still doesn't fit quite like I want it to. Besides that, I changed the bodice up so much during the fitting, that I lost a bit of the original design.
Ah well, here are a few more pictures:


 The up close pictures show (faintly, I know) the top stitch detailing around the neck band and waist band. I debated on doing it at all because of the busy print, but decided that it did add something. Amazingly, that was the first thing Roland noticed. I just want to point out that the wrinkly bit just above my waist in the back is total due to my fussing and fitting. If I make this pattern again, I will definitely go buy my correct bust size, and work the top into the larger hips.
Finally, I need some help! I'm not sure which shoes look the best, or if I need to go shopping. Take a look at what I have, and then answer the poll. And thanks!


Ah well, here are a few more pictures:


Finally, I need some help! I'm not sure which shoes look the best, or if I need to go shopping. Take a look at what I have, and then answer the poll. And thanks!


Tuesday, March 9, 2010
Don't Let This Happen to You
I've admitted it before, but although I've been sewing since there were dinosaurs, I've only put in one invisible zipper. This pink dress (aka the dress that is taking forever, but shouldn't really) has an invisible zipper and I tackled it today. It took way longer than was really necessary.
Try #1: Looked great, but the waistband seams didn't match up very well, and one side didn't seem sewn close enough to the zipper teeth.
Fix: Resew the one side, making sure the teeth were properly in the groove of my zipper foot. Ponder ripping out the other side to make the seams match up better.
OK. I just couldn't stand it, and I ripped it out and redid it. But:

I'm not sure if you can tell in the picture, but the resewn side is twisted, and while it appears to be sewn on correctly, when you get down to the pull you, um, can't close the zipper. There is no fix for this but to rip it out again. First, you must go eat lunch. Walking away helps.

Now it's right. Untwisted and resewn. The moral of this story: When sewing the second side of an invisible zipper, make sure it's flat all the way down and does not get twisted.
Friday, March 5, 2010
Gingher vs. Olfa

So, if you read my little rant yesterday about the evils of cutting out pattern pieces, you may have noticed that a couple of my commenters mentioned that they cut things out with their rotary cutters. *slapping forehead with hand* Of course! Why not? It's not like I had to rush out and buy a rotary cutter for this little picture. I'VE OWNED ONE SINCE 1982!! That was the year I made my first quilt.
The problem is that my mind had compartmentalized these sewing tools. Olfa cutters = making quilts. Using scissors = making everything else. It's high time I got with the program, and since I hadn't yet cut out the lining to the glorious pink dress, I did it this morning. With the rotary cutter. The results? Fabulous!
So, as I write my little sewing posts, I hope that nobody hesitates to give me tips. It may seem that I've been sewing forever and should know all the little tricks, but apparently... I don't.
I've been battling a cold, so projects are moving along very slowly, but I did also manage to get 2 monograms stitched out. I love monograms. They are so classic and elegant, and the brides that chose these have great taste:


Thursday, March 4, 2010
A Necessary Evil

There you have it. You can't sew without taking this step. Well, I can think of a couple things that don't take any real pieces or cutting out, but most of the fun, challenging things I want to make require the layout and the cutting. It's time consuming, tedious and not really fun. And, if your scissors are dull, then multiply that all by 20. So there. It's done now, and tomorrow I can finally start sewing.
Oh, after I cut out the lining.
Does your chosen craft have any step that you hate to do, but have to, so you just grin and bear it? Please share. Misery loves company!
And perhaps I should go get my scissors sharpened...
Monday, March 1, 2010
Having a Fit over Fit
I've mentioned this book before, Fit for Real People, by Pati Palmer and Marta Alto, and I'm mentioning it again because it really has SO much great information for fitting patterns. I used to be a size where I could take a few measurements, pick a pattern, and go. Sadly, those days are over, and this book is helping. I'm ready to make this Butterick pattern.


 It's really not that bad, but I'm going to do just a teeny bit more tweaking, including making it about an inch longer. I won't tell my friend that helped me though. I think she's decided I have lost my mind. Tomorrow, I'm cutting it out!

But I purchased it before I had ready the book. Here was my mistake. I bought the pattern to fit my waist and hip which is completely contrary to the book's advice. "Buy to fit your top and alter the bottom." OR "Buy two patterns if necessary." When you see the hatchet job I did to the top pieces, you'll see that I should have just gone and bought the smaller pattern and saved myself tons of time. Here's the evidence:

And the sad thing is, I need to add just a bit more length to the whole darn thing. I discovered that after making a muslin. Unnecessary according to Pati and Marta, but I had chopped and taped so much, I decided I had better do just that.
 It's really not that bad, but I'm going to do just a teeny bit more tweaking, including making it about an inch longer. I won't tell my friend that helped me though. I think she's decided I have lost my mind. Tomorrow, I'm cutting it out!
Subscribe to:
Posts (Atom)