Saturday, April 30, 2011

Another Skirt, Another Top

Yesterday was a banner sewing day for me, with almost 2 pieces completely finished from conception to end. The only thing I didn't finish was hemming the top, and darn it, my family was hungry and I didn't want to be left behind when they headed out to our favorite Thai restaurant.
Some details:
Top: organic cotton jersey, fabric.com, Butterick 4789
Skirt: cotton sateen (?) probably from fabric.com last year, mostly self drafted with assistance from Sherry of pattern ~ scissors ~ cloth. The link goes to her Miranda skirt pattern.
Resin necklace: Earlybird Creations
Leather bangle bracelets: Amy Fine Design

I like the top, but there is a tendency for the front to have a gap at the wrap area. Looks ok in the picture, so, whew! Also, the fabric is a wee bit flimsy. I like my tees to have fabric with a bit more heft. Oh, and the front wrap part also likes to have kind of a weird poof just under the bust in the middle. I'm thinking it must look worse looking down at it. I didn't put in the back darts. This picture explains why.
Yeah. I actually like it better tucked in, but to Psycho Sue... yep, my right hip is higher. Pretty obvious in this picture. I've been dealing with it since puberty, but any hem planning is purely by chance. Anyway, I think tucked in with the belt would be the best look. At least with this top.

As for the skirt, I wanted to sew the pleats down, and actually I did, but something went horribly wrong with my math, and it was not a good look. The waistband is a bit stiff for my taste, and possibly a bit too wide, but I'll fix that with the next skirt.  Also, the stiffness of the waistband kind of makes it stand up awkwardly. More zipper woes here, and I'm totally blaming Sherry* and her RTW ideas of using a 3/8" seam allowance, which is what I used. I just needed the extra width of a 5/8" allowance to properly do the lapped zipper I was planning. Alas, it was not meant to be, but the busy print pretty much hides the zipper and its top stitching.

Oh, and yes, before you say anything, I like the length with this style. Plus, just wait til you see the top I really have planned to wear with it. Um, it's still in the planning stages though.

*Sherry, if you happen to read this, you are amazing, and have the best tutorials!! Double checking the math on your pleat placement is priceless advice that I failed to heed, and cursing ensued. For that I blame the U.S. insistence on inches, etc., and the sewing world's insistence on eighths.

Thursday, April 28, 2011

Crescent Skirt -- Finished

Well, I realize I'm supposed to be "sewing along", but I'm kind of in a rush, so I just forged ahead. I'll be making more crescent skirts, because I really like this pattern, and the sew along might just catch up with me. Hmmm, that sounds a little braggy, but I have been sewing for awhile. And, even more importantly, I'm going out of town next Friday for 9 days, and that means no sewing. Well, maybe no sewing.

OK, crescent skirt. I made one major-ish change after the muslin, and two small-ish. The small-ish changes were going down one size (that always makes a girl happy, right?), and using view B instead of view C. The major-ish change was to make the center front and back "points" on the yoke less pronounced. Like so:
Not sure how much you can tell from that picture, but I shortened the fronts and backs 1/2", and curved out that bottom seam line, and then added the 1/2" to the center front and back skirt pieces. Worked like a charm. It's not all that noticeable in the finished skirt. Actually, most of the details aren't noticeable because the print is too busy. The fabric is a rayon shirting from fabric.com.

Straight up, I've stolen Patty's signature superhero pose because, frankly, I think it's awesome, it makes my arms look great, and gives me more waist definition to an otherwise kind of rectangular figure. The pattern is extremely well drafted, and the instructions great until... well... the zipper insertion is kind of confusing. In theory, I got it. In practice, it didn't seem that hard. But, it just didn't come out how I wanted it to. In the end, I "made it work" because I didn't want to start over (read, I wanted to finish it today, and I had a headache). I'll definitely be at least following along when Tasia gets to the zipper during the sew along. Or, I'll just put it in my own way.
It really is centered, but I apparently have issues when getting dressed. I don't think the zipper is actually supposed to show, but this one does, and I'm really glad it's only a 7" zipper (oops another change, but I have a ton of 7" zippers).

A skirt confession: last year, I hated every skirt I made, and I had an irrational fear of them being too tight. Consequently, none of them really fit right. This one though, fits greats and has pockets! Great pockets!
Don't I look happy (headache and all)?

What do you think of the shoes? Unless you like them, I don't really want to know, but I bought them in the mid-90s in Spain, and I'm thinking they still work today. The heel is a little chunky, but it works for me. And they're patent leather. And comfy to boot.

Tuesday, April 26, 2011

Musday

I wanted to drop off some pictures of a couple of different muslins I'm working on. I'm right on schedule for the crescent skirt sewalong, as today was the fitting of the muslin. Initially, I identified 2 problems with my skirt (or maybe it's my body). First, I made view C, which is the longest, but I think it's too long. Easy fix there, and I remeasured with view B. Not sure I'll go quite that short, or somewhere in between. Feel free to speak your mind about this.

The second problem was the length of the waistband/yoke. I have what I suppose is called a low rise in that the length between waist and crotch is on the short side. Of course, with a skirt, that isn't really a factor (like it will be with the jeans sew along), but I was feeling like the waistband point ended at an awkward spot. I made a tuck all around, shortening it by about 3/4" just to see how I liked it. If successful, I was going to more precisely adjust each pattern piece. But take a look:
A picture is worth a thousand words here, and I think the original waistband looks better on the hips. I think I'll soften the center "point", shaving off a bit and rounding it to eliminate the pointing at an awkward spot feeling. Otherwise, I'll leave those pieces "as is".  What do y'all think of the length? I think the shorter look is better. It's a little loose, too, so I may go down a size. The only other change is that I'm using a 7" zipper as I have quite a lot of them, and they work just fine.

The other muslin I made today is the bodice of the Colette Pattern crepe dress. I think a few tweaks will make it work great. When tracing, I started with the 8 at the shoulders, angling down to the 12. The shoulder area is still a touch wide, so the 6 might even be better. I'm going to review some of Gertie's fitting tips from when she did her sew along earlier this year, too. A couple of other complaints... there is a bit too much fabric under the bust. An easy fix taking some of that extra up in the darts. The side darts are too high, but just a smidge. The back is simply too long, so a swayback adjustment is in order there. Because it's a wrap dress, I feel like there is some leeway with the back, and I don't want to overfit, and not have enough to wrap around the caboose.

Sunday, April 24, 2011

Upgrading Vogue 8640

First, Happy Easter! This picture was taken Easter morning, 1988. We had gone to the sunrise service at church, and since we were up early, and dressed up, we took a trek into DC for some photos by the blooming cherry blossoms. Easter must have been early-ish that year.

OK, back to 8640. If you're a beginner, or even an advanced beginner, and you've bought this pattern thinking, "wow! I can make a pencil skirt and lined jacket, and Vogue says it's Very Easy!" You would be right! This pattern lives up to its name. I'm afraid if you make the jacket "as is" in the pattern instructions, you might be a little disappointed with the results. I haven't made the skirt yet, so my upgrading is just for the jacket.

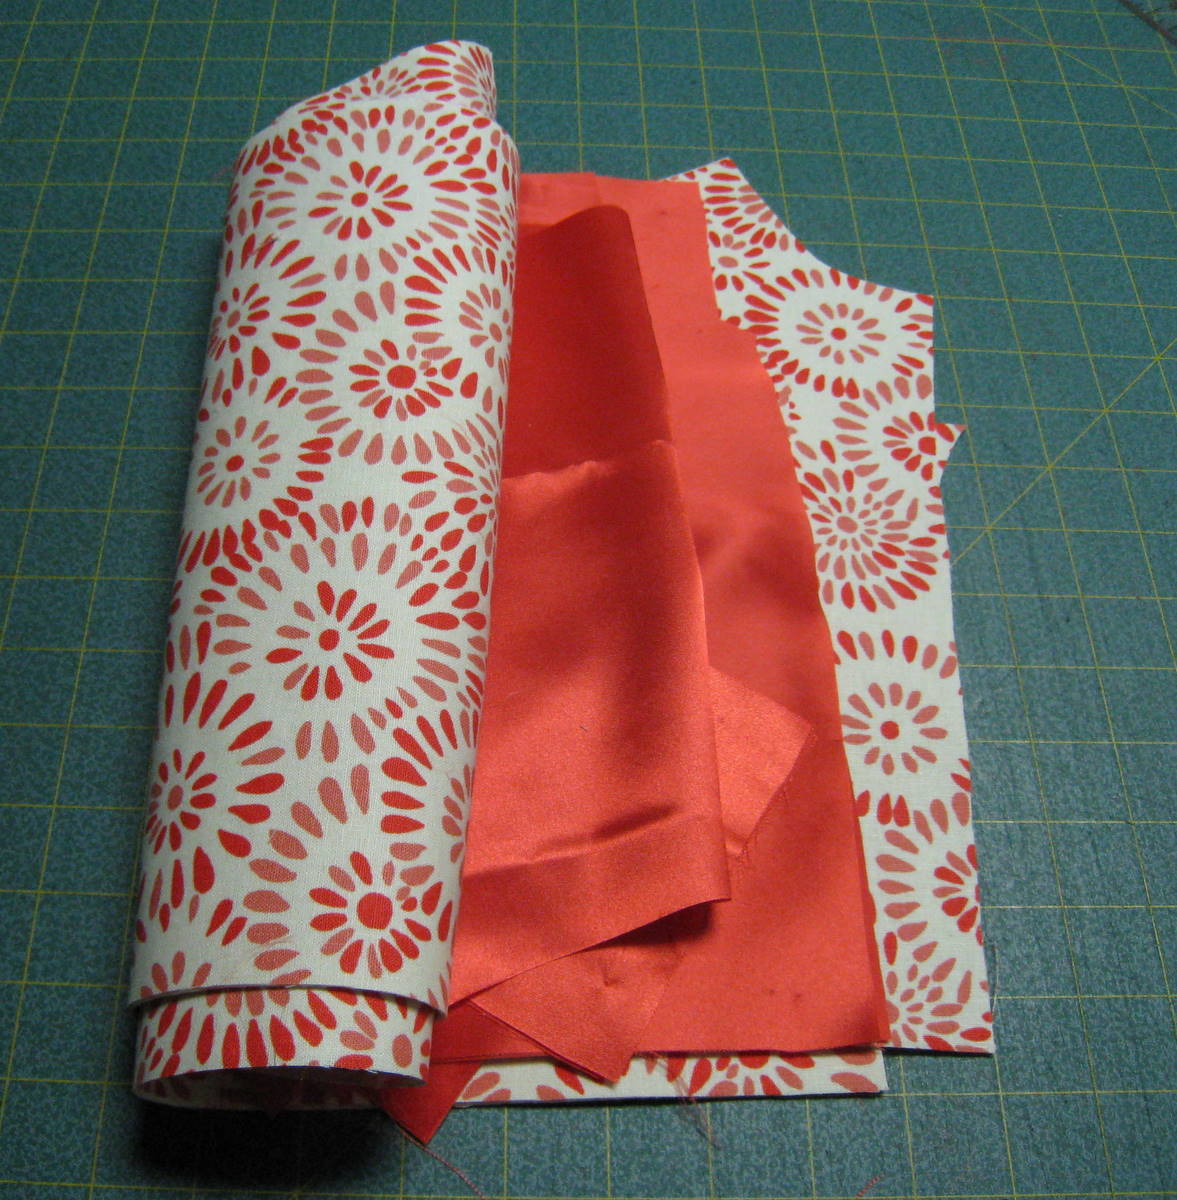
Upgrade #1: you do need to choose fabric that has a little body, or the jacket will be floppy. My fabric is a cotton/linen blend, and while it has some body, I chose to interface 98% of it. The pattern itself calls for no interfacing. I block fused the whole shebang except for the color. I used pro-tailor deluxe fusible interfacing from Fashion Sewing Supply for the body, and before I cut out the pieces, I simply fused the interfacing to the fabric. For the collar, I used pro-weft fusible interfacing, which is more lightweight, and I only interfaced from the center back to the large circle on the pattern piece. Basically, where the collar ends and the ties begin. I also used pro-weft on the me-drafted facings.

There are only 22 steps in the sewing of the jacket, so even with my changes it goes quickly.

Upgrade #2: bound buttonholes. Step #22 indicates you apply snaps. Snaps seemed kind of low rent to me, so I opted for buttons. You could do regular buttonholes, and then that would stay at step #22. If you go for bound buttonholes, they're done first, on the upper front piece (piece 2). I sewed the buttons on, and finished the back of the buttonholes around pattern step #9, when I was doing the lining.
Upgrade #3: topstitching. You can see in the above pic that I topstitched about 1/4" above the seamline between the upper and lower pieces. I also topstitched down the center back. I'm contemplating doing it down the center front edges, and maybe around the hemline and the sleeve hem, but I can add that anytime. I used a silk finish embroidery thread that is slightly darker than the oatmeal-y background color. It's subtle, and shows up better in person than in the pictures.
Upgrade #4: Add front facings and a real hem to the jacket body and sleeves. Here's where Vogue makes it super easy, but also super easy to look sloppy. They have you make the jacket and the lining from all the same pieces, put them right sides together, and stitch around all the edges except the neckline, which allows you to turn it right side out. You are instructed at the end (steps 19 and 21) to topstitch the front opening and lower edges of the jacket and of the sleeve. But you know, unless you get that done perfectly, the odds of an inexperienced sewist having lining dip out and show could be pretty good. BUT, with the hems, and facing, you eliminate that problem. The facings also make your buttonholes more stable.

For the facing, I simply decided how wide I wanted it to be, added a 3/8" seam allowance, and then cut off that much on the lining front pieces (don't forget a seam allowance on your lining pieces). I didn't want a seam in the facing, so it's the length of the jacket, plus the hem. Um, things did get a little wonky on my facing, you'll see it in the picture, but no one will really know but me.

For the hems, I added 1-1/4" to the bottom edge of the body, and 1" to the hem edge of the sleeve, and subtracted that amount from the lining, making sure I still had seam allowances that worked. Regardless of whether you add the hem on the sleeve or not, you will still have to slipstitch the lining to the sleeve at the hem.

And that's it! For the skirt, to upgrade you could use an invisible zipper, line, and possibly underline depending on your fabric, and a button at the top of the waistband in the back would be a cute tie in to the jacket.

And no, I didn't wear the jacket to church today, because other than the dress I wore in the previous post, I don't really have anything that matches it, and, well, it's really hot here today. Almost summer like.

Friday, April 22, 2011

RTW Jacket Finished! Vogue 8640

This has been a crazy week for me, in more ways than one. Nevertheless, I managed to do a bit of sewing, but still not as much as I wanted. I finally decided to wrap up the RTW jacket, especially since mine is not the tailored type of jacket that Sherry is doing her amazing tutorials for.

I did use some of the techniques, but finally, just needed to finish. Tonight, just the pictures. I'll do a more detailed post on how I made a Very Easy Very Vogue pattern not quite so VEVV. I know. Who makes a pattern harder? It wasn't so much that I made it harder, but I just gave it details that make it feel (if not look) more like RTW, and less like homemade.

Anyway. Pictures.

(Underneath, my Colette Patterns Rooibos dress that sort of matches.)

With the detail of the print, you can't really see the details of the pattern. I think in person some of the details are more noticeable.

Sunday, April 17, 2011

One Last Top -- Vogue 8151

I meant to have this top done by Friday, and actually did have it cut out Friday afternoon, with plans to have an evening sew-a-thon when Mother Nature decided to have other ideas. Power went off at our house Friday around 7:30-ish, and by the time it came back on at 10:30 I was ready for bed.

Ah, well, I did make it yesterday, but not in time to take pictures before family demands. Excuses, excuses. Here it is:
I'm trying out a Patty Snug Bug superwoman pose. I like it! (the pose). Yes, the fabric really is that neon, as well. It's a Michael Miller interlock knit from fabric.com, and it is so soft! This Vogue 8151 pattern wasn't in my queue, but it was in my stash. I've had some wool jersey that was in a queue in my head until suddenly it was spring. Y'all know how that goes.

Anyway, back to the pattern. I made it have short sleeves, obviously, and cut out size C which was the largest in the envelope, and matched my measurements. I did a quick and dirty tissue fit, declared it good to go, and whacked away. I want to LOVE this top, but there are some nitpicky fit issues that make me only love it. Not that the general public will be able to tell, but I'll confess to you, so you can proceed accordingly should you choose to make this.

#1. The shoulders are just too darn wide. It wouldn't have mattered much if I had even gone down to the size A, because they were all basically the same. Next time, I'll have to scoop some off at the shoulder/sleeve line.
#2. I should have cut out the size B. Even though there are 1" seam allowances figured in for knit differences, it really should be snugger for the ruching to work right, and it's a little baggy on me (just a little), and I used every bit of the 1" SA and more.

Which brings me to #3. Apparently, I can't get it through my thick head that wraps, even faux crossover type wraps like this one, might need some adjusting. Thankfully, in the instructions, it guides you to baste the sides first for fitting. Yes, basting is WAY easier to pick out of knit. To achieve a wee bit of modesty, you can see in the above pic that I simply pulled the front piece out further than the back to tighten it up. I did it on both sides. Clearly, when I make this again, I'll do that adjustment prior to cutting out.

Finally, and this is not really a fit thing, just an annoying thing, the ruching on the sides is made with 1/4" elastic stretched between two small circles and zigzagged onto the seam allowance. Well, this particular interlock knit is a bit hefty, and the elastic just isn't enough to accomplish the goal. I tried with both regular and clear elastic, and ended up using 2 pieces of elastic per side, and it still isn't really gathered like in the picture. Not being as gathered meant I folded up 2 inches for the hem instead of the recommended 1 inch.

All of that sounds like I'm dissatisfied, but really, I'm not. Just a few things I'll pay more attention to the next time I use this pattern.


Onto bottoms!! (and my RTW jacket... mustn't forget that!)

Thursday, April 14, 2011

Bits and Pieces

Just want to clear up some old business, and get ready for the new, so let's reflect:

Over the Top Challenge officially ends tomorrow, and on the 16th we switch over to the Bottoms Up Challenge. You can go to the Over the Top blog to sign up for the Bottoms Up if you aren't already in the top challenge. Perfect timing, I say. Here's the top tally:
1 pj top, 3-1/2 tops (the 1/2 being the RTW that I hemmed) plus a bonus top for Laura = 5-1/2 tops made. I have a couple more that I hope to get done by at least the end of April, if not sooner.

The RTW jacket sew along (click on the badge for more info) is moving along. My fabric has been block fused, and the pieces cut out, ready for sewing. It's conveniently bundled as recommended:
BTW, that's a new lining. The original lining I had chosen was too sheer and you could see the print through it.
The crescent skirt sew along (click on that badge) is about to begin next Monday (deadline for anyone filing taxes in the U.S., so some of you might be really busy this weekend). I've bought fabric for at least 4 or 5 of these skirts, but this is what I'm starting with:

You're thinking... "wait! Isn't that already a skirt". Well, indeed it is. I wore this in 1978 as an overskirt to the bridesmaids dress I wore in my cousin's wedding. She's now been divorced for years. Anyway, that's vintage Liberty of London cotton that will flatten out nicely and give me plenty of fabric I think when I take off the waistband that's about 10" around. Ok, maybe not 10", but it's shockingly tiny. Look at this fun detail:
Those are buttons down the front that I'm going to incorporate into the skirt by simply sewing it closed, leaving the buttons as details. And it will look great with my new chambray top!

Moving on, I've bought 2 voiles from the Anna Marie Horner collection (which I'm lazy and didn't take photos of), and several pieces of rayon shirting from fabric.com that have washed up gorgeously. The rayons have a wonderful drape and aren't too bulky for the gathering. Oh, here is a picture of a couple of them (the red will be a dress for Laura). Danny approves.

Then there's the jeans sew along (I'm wondering if I could somehow parlay these sew alongs into a kind of profession... are there professional sew alongers. If there are I want to join.). Oops, got sidetracked. Anyway, I have my patterns, but no denim yet. I do have some notions though. The jeans buttons? 12 of those babies for $1.80 at atlantathread.com.
I'm not planning to make 12 pairs of jeans (or even 3), but I do have that option now. And plenty of topstitching thread.

This post is getting kind of long, but the next section was named by Kyle, and he calls it $#!%@% My Mom Makes. First up, is a favor for a friend who will be turning this into a pillow:

And finally, a little knitting project from Itty-Bitty Toys. I'll let the pictures speak for themselves.

Tuesday, April 12, 2011

Seeing Red -- More Tops Finished

Nope, I'm not mad, you'll see the red soon enough. Oh, what the heck... here's the first red:
This is New Look 6981, made from an organic cotton jersey knit from fabric.com. It had one "I hate it" review on Pattern Review, so I was a little worried, but I don't. Hate it, that is. In fact, in one afternoon, I actually made 2.

Why? Well, I bought 2 yards of this knit really on spec. I got these 2 tops perfectly out of the fabric, so the 2nd will go to daughter, Laura. Hope she wants a red cowl neck tee.

Some details. Both of us have really narrow shoulders, so I started with the 10 (Laura, pay no attention to these numbers) at the shoulders and necklines, front and back. As I traced down the armhole, I merged out to the 14, and then went straight 14 down the sides for Laura, and graded out to the 18 for me. The fabric is soft and kind of clingy, but I may just take in the bottom part of the sides on me, as it stands out just a bit. Holding it up for the picture, I may have to take the entire sides in for Laura. Her measurements matched the 14 perfectly though. To keep them apart as I sewed (and I made them simultaneously), when I was doing the back neckline facing, I inserted different color ribbon "tags." Laura got the black gingham one.

My right hip is a bit higher, so I think that explains the uneven looking hem. You can see better from the back how it flares out just a bit more than I would like at the hem.

But wait! There's a 3rd red top. This one is actually a RTW top from Ann Taylor that I bought last year on sale. I'm counting it as a half for the challenge though because it was too long, and I just never wanted to wear it. Since I had the coverstitch machine threaded with red, though there were no excuses. I chopped off 3 inches and rehemmed the darn thing. It's a little snug, but I'm back on Weight Watchers, so, fingers crossed, it will look better by summer.
I had kind of forgotten about it when I ordered the red jersey. Oh well. Boy, do I need a haircut.

Friday, April 8, 2011

McCalls 5522 -- Top #2 -- Done!

There were 2 button front tops in my haul from Faye's giveaway, and originally, I had planned to make the Simplicity one for this challenge. In a last minute change of thought, I went with McCalls 5522 instead. I made View B, without any sleeves.

I really had not anticipated it taking me all week, so I'm a little behind schedule in both this challenge and the RTW Jacket sew along. Hopefully, this weekend, I can make better progress. Luckily, I have a couple easier knit tops that will be next in line (and have just been added to the queue), to help that along.

This was my test photo and other than the lighting (doesn't it look sunny?), and I wanted to show off the iris behind me. I had nothing to do with them as they came with the house. Right after the self-timer went off, it started raining and my outdoor photo session came to an abrupt halt.

Back to the top... I love it! The fabric is chambray from fabric.com. This envelope had the sizes 12-20 in it, and it was perfect. I started with the 12 at the shoulders, used the size 12 line for the armscyes, ending at the size 14 line for the rest of the upper pieces. For the lower pieces, I started at the 14 line, and graded my way out to the 16 for the hips. I ended up using more like 3/8" seamlines for the lower pieces, except at the top where it connects to the upper, because while it fit, it just felt a little snug.

Inside now. The back fits pretty well. I possible should have scooped in just a bit for the sleeveless-ness look, but that's a minor quibble.

I tried to crop in up close for the topstitching which is kind of a light khaki color that I feel like blends really well, but still adds some interest. The "buttons" are really snaps that I just found for a quarter at a recent estate sale. You can really see them that well (can you click on the photo and see it larger--maybe) but they look like regular white shirt buttons. They probably didn't go on any quicker though, because there was a learning curve for getting them "installed". One button was crushed from over vigorous hammering. When they mean place it upside down on a thick fabric pad, well, they kind of mean it.

Saturday, April 2, 2011

Butterick 5328 -- Top #1 -- Done!

One down! How many more to go? But can someone please tell me, why, oh why, am I always drawn to the wrap top patterns? They always seem to end up too revealing, and this one is no exception. I did some tissue fitting, and then did a pin fitting, and all looked like it was going to work. Yeah, yeah, I know a muslin is always a solution, but time is of the essence here!

Anyway, it does still work with a tank underneath.
I do look so flat in this picture. I feel like it looks better in person. This is one of the patterns that I won with Faye's giveaway. I actually had to make a lot of changes to the pattern, so the fact that it fits this well is pretty amazing. The smallest size in the envelope is a 16. That works for the hips, but my shoulders are a 12, so I had to do the opposite of what I usually do.

The technique I used to sort of grade down to a 12 was kind of a guesstimating affair. Using the grading lines for the larger sizes as a guide, I drew inside the size 16 line to make a new size 12. That's really just clear as mud, and I didn't take any pictures. So, say there was 1/2" from the 16 to the 20, I drew 1/2" inside the 16 line to make a size 12. And then followed my new line back out to the 16 through the waistline to the hem.

Those roses look kind of weird from the back. I originally bought this fabric to make a dress, but I think it's plenty of print in just a top. It'll really look good with some white pants or a white skirt.

LinkWithin

Related Posts with Thumbnails