I know I've been scarce around here, but, like a broken record, this full time job is kicking my butt. Anyway, without any help from me aside from a little water now and then, those avocado seeds that I encouraged to take root, are all still alive and well.
I had almost given up on the little one in the middle, but it looks like it's going to pull through and give me a few leaves!
In sewing news, I have just finished a red tulle skirt to wear .to a Christmas party, pictures to come. Roland totally rolled his eyes at the floof-i-ness of the thing, and I may have to tone it down a little. And I'm making a raincoat for my mom for Christmas, at her request. I'm just waiting for the muslin I made for her to make it's way back to me so I can get started. Sewing long distance can be a challenge.
I'm so far behind in my blog reading, I may never catch up, but I do hope all is well with everyone. Have a wonderful December!
Thread runs through my life, holding it together. What keeps yours from falling apart?
Showing posts with label experiments. Show all posts
Sunday, December 1, 2013
Thursday, September 12, 2013
The Avocado Project Continues
The 3 avocado seedlings are continuing to grow. The first, Buck, has been planted and is probably almost 2 feet tall now! (I haven't actually measured... that would be too scientific of me!)
The second one, Austin 2, has finally sprouted a root.
And the 3rd seed, Austin2, is going like gangbusters. I'm going to try HGTV's method. This method instructs you to pinch off the stem about halfway when it reaches 6".
I've tried this pinching off thing twice before, but each time once the tree had already been planted. The first time was a success, though, like all things avocado, I had to be very patient and endure a summer of the stick plant. The second time resulted in death. Yeah. That wasn't really the plan. Let's hope this time it results in a bushier, less stick-like plant.
The second one, Austin 2, has finally sprouted a root.
And the 3rd seed, Austin2, is going like gangbusters. I'm going to try HGTV's method. This method instructs you to pinch off the stem about halfway when it reaches 6".
I've tried this pinching off thing twice before, but each time once the tree had already been planted. The first time was a success, though, like all things avocado, I had to be very patient and endure a summer of the stick plant. The second time resulted in death. Yeah. That wasn't really the plan. Let's hope this time it results in a bushier, less stick-like plant.
Labels:
avocado,
experiments
Tuesday, August 20, 2013
Avocado Project - Still Growing
I'm a little behind in the avocado update, and there has been some significant growing!! Buck was ready to plant when we last left the little seedlings, and look at him now:
Apologies for the lack of focus... my cell phone camera apparently doesn't view the tall, skinny stick as a worthy focal point. Apparently, according to HGTV and this post, I have actually done it wrong. I quote:
Yep, I totally missed step 4. I think I'll carry on, but perhaps for one of the Austins I will actually follow the above steps.
Ah, but what about the Austins? The first Austin is proceeding at an astonishingly glacial pace with only minimal visual markers to give us any optimism at all.
Honestly, I'm kinda ready to just chuck this one, but I'll give it a couple more weeks.
Austin2 is showing more progress, but then he started out progressing in fruito, as it were.
I've never seen one with a double root, so that's cool. And the crack is large enough that the stem development is also quite interesting. Something that would be great for kids to watch. Besides plant growth, it would be quite a lesson in patience.
Apologies for the lack of focus... my cell phone camera apparently doesn't view the tall, skinny stick as a worthy focal point. Apparently, according to HGTV and this post, I have actually done it wrong. I quote:
Here’s how to start:
- Remove the large pit (seed) from inside an avocado, rinse well, and dry (a wet seed will be slippery!).
- Push three or four toothpicks into the seed at its widest part so that you can suspend the pit over a glass of water with the pointy end sticking up. The water should cover about an inch of the seed.
- Put in a warm place and make sure to maintain the water level.
- In 2-6 weeks, roots and a stem will sprout from the seed. When the stem is about six inches long, trim it in half.
- When the stem leafs again, transplant the seedling to a pot with loose, sandy soil. Plant the seedling root down, leaving the top half of the pit sticking out of the soil.
- Give your plant frequent, light watering and keep it in a sunny place to encourage growth.
- Pinch back the newest top leaves every time the stems grow another six inches or so to encourage more growth and a fuller plant.
Yep, I totally missed step 4. I think I'll carry on, but perhaps for one of the Austins I will actually follow the above steps.
Ah, but what about the Austins? The first Austin is proceeding at an astonishingly glacial pace with only minimal visual markers to give us any optimism at all.
Honestly, I'm kinda ready to just chuck this one, but I'll give it a couple more weeks.
Austin2 is showing more progress, but then he started out progressing in fruito, as it were.
I've never seen one with a double root, so that's cool. And the crack is large enough that the stem development is also quite interesting. Something that would be great for kids to watch. Besides plant growth, it would be quite a lesson in patience.
Labels:
avocado,
experiments
Sunday, July 28, 2013
Avocado Project - Multiplying
The avocado project is continuing -- and multiplying! Before I get into what I mean by that... let's take a look at the unexciting stuff. That would be Austin.
Sadly, no visible progress. I'm not giving up on him though.
In the meantime, you may have noticed another seed in Austin's cup... that would be Austin2, and I just couldn't resist. I mean, when I recently cut into an avocado, I noticed the seed was already cracked.
Sadly, no visible progress. I'm not giving up on him though.
In the meantime, you may have noticed another seed in Austin's cup... that would be Austin2, and I just couldn't resist. I mean, when I recently cut into an avocado, I noticed the seed was already cracked.
Oooh, exciting!
But the real excitement is Buck. After almost 2 months, he's ready for planting... this will be the last time we see the root (and there is even about an inch of stem at the other end, just barely visible).
I'm planting this one in dirt today. Let's reminisce...
Labels:
avocado,
experiments
Sunday, June 30, 2013
Avocado Project -- Meet Buck and Austin
The Avocado Project continues, and there's been a new addition. As Meg mentioned in a comment, and as I've read elsewhere on the interwebs, it's quite possible that you need 2 avocado trees to produce avocados.
The first avocado seed "toothpicked" is the one on the right, and in honor of it's growing vessel, I've named it Buck. It's obviously not readily apparent, but the cup is from a high school sporting event at Westminster, a private school in the Buckhead area of Atlanta. Ah... now of course you get it.
Here's how Buck is progressing...
Hard to see, but the crack is larger, and deep in the center, there appears to be a tiny root.
The second seed was "toothpicked" 2 days ago on Friday, almost 4 weeks after the first. I'm calling it Austin. For far more obvious reasons.
Austin hasn't made much progress...
To chronicle their progress, the previous progress pictures will be consolidated into a collage.
So the progress up til now (Buck only):
The first avocado seed "toothpicked" is the one on the right, and in honor of it's growing vessel, I've named it Buck. It's obviously not readily apparent, but the cup is from a high school sporting event at Westminster, a private school in the Buckhead area of Atlanta. Ah... now of course you get it.
Here's how Buck is progressing...
Hard to see, but the crack is larger, and deep in the center, there appears to be a tiny root.
The second seed was "toothpicked" 2 days ago on Friday, almost 4 weeks after the first. I'm calling it Austin. For far more obvious reasons.
Austin hasn't made much progress...
To chronicle their progress, the previous progress pictures will be consolidated into a collage.
So the progress up til now (Buck only):
Labels:
avocado,
experiments
Saturday, July 23, 2011
Some Special Sewing
The conversation goes like this:
Laura: "Mom, can you make us a kind of waterproof cover for our metal shelf. We want to store stuff on it, on our patio, so it will need to be protected from rain."
Me: "Um, I think I could. Text me the dimensions and I'll search around for some kind of waterproof fabric, and let you know."
Off I go to my almost always go to first fabric source, fabric.com. And I find some stuff called polyurethane laminate or PUL. Here's the description from their website:
Description: PUL is a polyester/polyurethane laminated knit fabric with a laminate thickness of 1.00 mm. This fabric is waterproof, durable and has a slight crossgrain stretch. This product can be used in making diapers, changing mattress covers and applications that require waterproof fabric. CPSIA certified. Machine Wash Warm, No Chlorine Bleach, No Fabric Softeners, Dry Low Heat or Drip
It comes in lots of pretty colors, but they chose black. So 5 yards later, plus a 72" sleeping bag zipper from Atlanta Thread, I had a plan. Scroll all the way to the bottom for the finished product if you aren't interested in any of the technical mumbo jumbo.
From my last post, I may have given the impression that I never practice any new technique. That's not really true, and this project needed some practice. First, after purchasing some seam sealant from REI it had a diagram on how a tent seam looks (what one would use the sealant for apparently). Something like this:
Finally, you flip it over, and sew the final edge down. Even with the walking foot, this stuff kind of sticks and pulls. I don't have a teflon foot though, or one with little rollers. It was worse with the zipper insertion. I forgot to take pictures of that though.
I also practice how the corner would come about with a little miniature.
Not pretty, but it didn't really have to be. I made it a little bit longer than the measurements so that they could put stuff on the top shelf.
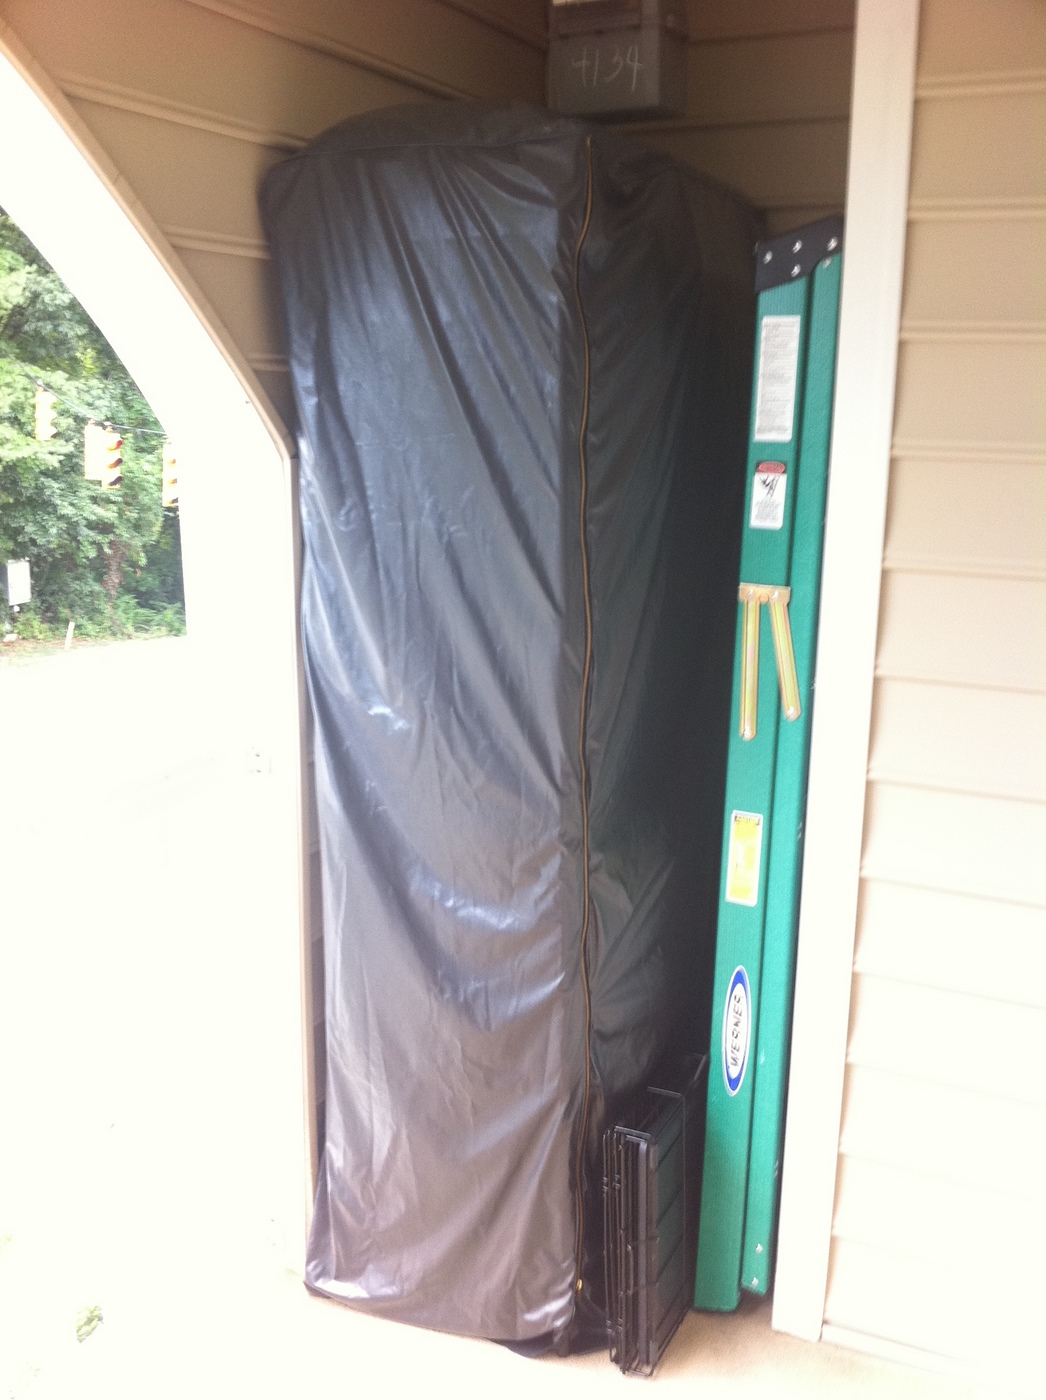
I think it looks kind of like an odd shaped body bag, but here's what Thomas had to say about it:
Spent some time outside just now to put on the cover! It fits great and have a nice amount of extra room to put some stuff on top and some bigger boxes that don't completely fit on a shelf. Should be great!
Also, it fits perfect if I don't have anything on the top shelf, but I've got some moving blankets on it now, so the corners droop just a bit.
Success!
Laura: "Mom, can you make us a kind of waterproof cover for our metal shelf. We want to store stuff on it, on our patio, so it will need to be protected from rain."
Me: "Um, I think I could. Text me the dimensions and I'll search around for some kind of waterproof fabric, and let you know."
Off I go to my almost always go to first fabric source, fabric.com. And I find some stuff called polyurethane laminate or PUL. Here's the description from their website:
Description: PUL is a polyester/polyurethane laminated knit fabric with a laminate thickness of 1.00 mm. This fabric is waterproof, durable and has a slight crossgrain stretch. This product can be used in making diapers, changing mattress covers and applications that require waterproof fabric. CPSIA certified. Machine Wash Warm, No Chlorine Bleach, No Fabric Softeners, Dry Low Heat or Drip
It comes in lots of pretty colors, but they chose black. So 5 yards later, plus a 72" sleeping bag zipper from Atlanta Thread, I had a plan. Scroll all the way to the bottom for the finished product if you aren't interested in any of the technical mumbo jumbo.
From my last post, I may have given the impression that I never practice any new technique. That's not really true, and this project needed some practice. First, after purchasing some seam sealant from REI it had a diagram on how a tent seam looks (what one would use the sealant for apparently). Something like this:
If you are still with me, here's how it all came together. Needle used, a universal, I think size 80. Regular thread. Walking foot.
First I laid the fabric all out on the floor, and drew a 1/2" seamline on one side. Then, I placed the edge of the other side, overlapping to the chalk line and taped it in place. I had a helper.
Then, it took 3 passes to get the finished seam. The first one was basted, and frankly, the tape didn't stick well, but this was the only super long seam I would need to do. The other one had the zipper.
The second pass was pulling one side over the basted side so it looks like that little drawing above. Kind of hard to describe in words, and this picture is terrible. You are encasing the basted seam.
I also practice how the corner would come about with a little miniature.
Not pretty, but it didn't really have to be. I made it a little bit longer than the measurements so that they could put stuff on the top shelf.
I think it looks kind of like an odd shaped body bag, but here's what Thomas had to say about it:
Spent some time outside just now to put on the cover! It fits great and have a nice amount of extra room to put some stuff on top and some bigger boxes that don't completely fit on a shelf. Should be great!
Also, it fits perfect if I don't have anything on the top shelf, but I've got some moving blankets on it now, so the corners droop just a bit.
Success!
Labels:
experiments,
Laura,
random,
sewing for others
Friday, February 11, 2011
Finished Object Friday -- Week 3, and Another Experiment!
I've made an executive decision on behalf of you, my readers, and have decided that my non-sewing UFOs are too mind-numbingly boring to share. Seriously. Do you really care if I manage to clean off my desk heaped with piles of paper? Or that I do my ironing from last fall? I don't really even care, and so, um, I didn't even do those chores that seem to just be hanging around to taunt and harass me.
I did manage to finish a sewing UFO though, and made 2 clutches for my shop. Now, these 2 actually are almost identical, and I've already sold 2 like them, so was in the process of making these last spring when I got sidetracked. Who knows with what. Perhaps I was afraid of an accident with teeny, tiny seed beads. And it was well that I should have been afraid, because Wednesday afternoon there were dozens of red beads stuck in my white-ish berber carpet. Nevertheless, knowing Friday was looming, I soldiered on, and finished.
It's one of my favorites, so if it never gets sold, I won't be too heartbroken.
Now for more experimental sewing. The ingredients for this experiment were the last remaining bit of baby blue interlock knit, some black foldover elastic, and my coverstitch machine, still threaded with baby blue thread.
What did I learn from this experiment? Mostly, that I still have a lot to learn about sewing with knits, elastic and the coverstitch. The hem looks awesome though! And it only took me about 45 minutes from start to finish! And yes, I might sleep in it in the heat of the summer. I slept in the tee last night, and that interlock is so super soft that I was cozy all night long. Too much info?
Finally, even though I had a friend drop in and visit most of the afternoon, I still managed to cut out the muslin bodice for my formal dress. Here's the pattern I'll be attempting:
I've already tried this once, but I have no idea if I even saved this attempt, so I'm starting fresh. Hopefully, I'll have the new attempt posted this weekend.
I did manage to finish a sewing UFO though, and made 2 clutches for my shop. Now, these 2 actually are almost identical, and I've already sold 2 like them, so was in the process of making these last spring when I got sidetracked. Who knows with what. Perhaps I was afraid of an accident with teeny, tiny seed beads. And it was well that I should have been afraid, because Wednesday afternoon there were dozens of red beads stuck in my white-ish berber carpet. Nevertheless, knowing Friday was looming, I soldiered on, and finished.
It's one of my favorites, so if it never gets sold, I won't be too heartbroken.
Now for more experimental sewing. The ingredients for this experiment were the last remaining bit of baby blue interlock knit, some black foldover elastic, and my coverstitch machine, still threaded with baby blue thread.
What did I learn from this experiment? Mostly, that I still have a lot to learn about sewing with knits, elastic and the coverstitch. The hem looks awesome though! And it only took me about 45 minutes from start to finish! And yes, I might sleep in it in the heat of the summer. I slept in the tee last night, and that interlock is so super soft that I was cozy all night long. Too much info?
Finally, even though I had a friend drop in and visit most of the afternoon, I still managed to cut out the muslin bodice for my formal dress. Here's the pattern I'll be attempting:
I've already tried this once, but I have no idea if I even saved this attempt, so I'm starting fresh. Hopefully, I'll have the new attempt posted this weekend.
Labels:
experiments,
UFOs,
Vogue
Subscribe to:
Posts (Atom)