2 lengths of lace cut 1-1/2 times longer than your thigh measurement
1 length of ribbon (I used 1/2 inch wide) cut the same length as the lace
1 piece of elastic (1/4 to 1/2 inch wide) cut the length of your thigh measurement
1 strip of silk organza (or bias tape) cut 2-1/2 inches wide by the length of your lace (to be used as a casing for your elastic)
Fold your organza strip in half lengthwise and stitch using a 1/4 inch seam allowance. You will not need to turn this, but simply fold your stitched seam allowance over onto the wider part and press:
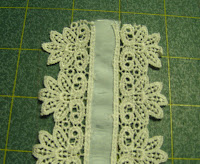
Set this aside, and get your ribbon and lace ready with all right sides facing up:
You'll stitch the lace to the ribbon, with the ribbon on top. I stitched down the middle of that lace edging, lining it up with the edge of the ribbon. Wrong sides up looks like this:
Right side up, it looks like this:
Next, you'll attach the casing to the wrong side, sewing closely to each edge of the casing. Center your casing over the ribbon, but don't worry if it's extending onto the lace. Using thread that matches your lace, you will not be able to see the stitching at all. The seam allowance of the casing is facing the ribbon.
Now you're ready to insert the elastic. Attach a safety pin to one end, and slide it on through. When the end is even with the end of the ribbon, stitch across to secure it.
Here's where it becomes a matter of comfort. Even though the elastic was the length of Laura's thigh measurement, the whole thing looked loose when I got the elastic all the way through. I ended up pulling it further, and cut off about 3 or 4 inches of the elastic, making the gathers of the garter tighter, and then stitched through the elastic at that open end. Try it on before you stitch. It's ok to leave your edges raw, because they will be hidden by your decoration.
And finally, add the decoration. I added a little "bow" and a heart shaped button that matched the one in the ring bearer pillow, right over the seam. Oh, yep, sewed those on by hand in one step.
Note to Cinquefoil: When I made the ruffled clutch, it was entirely from scratch. I made the base fabric from taffeta cut into the front and back shape for the clutch (no seam on the bottom), and attached the pleated strips which were "tubes" of silk shantung that I pleated, sewed on before sewing the side seams of the base fabric, leaving the ends free. I hand sewed the ends over the side seams once it was complete.


Beautifully done. Thanks for sharing this.
ReplyDelete