Showing posts with label sewing for others. Show all posts

Thursday, May 19, 2022

A Wedding Dress, By the Numbers: Part 3

 Just a quick post about cutting out the fabric.


While I waited for the ordered satin, silk organza and embroidered tulle to arrive, I cut out the lining, purchased at Stitch Sew Shop

Full disclosure: I work at Stitch Sew Shop in Alexandria, Virginia, but I don't get any compensation if you click through to the site.

Once the other fabric arrived, I headed to Stitch on one of my days off and proceeded to cut out the rest. 

It's a big job, with lots of yardage and large skirt pieces. I couldn't have cut it out at home. Although I'm


an employee with access to Stitch's large cutting tables, anyone can rent the workspace for $14 an hour. Just call ahead to find out available hours and make a reservation. With Covid, we are limiting it to only 2 using the workspace at one time. Also, see above disclosure. 

I don't remember exactly, but I think I cut the satin and organza on one day, and the tulle on another. 

All told, with the 4 different fabrics I would estimate that it took me at least 8 to 10 hours to cut out this dress.

Catch up on the story:

Make a Wedding Dress: Part 1

A Wedding Dress, By the Numbers: Part 2


Wednesday, May 11, 2022

A Wedding Dress, By the Numbers: Part 2

 By the Numbers Recap

The Muslin Pile Up

So, at the end of part 1, the getting started and making muslins "episode", I had spent about 5 weeks making 7 or 8 muslins. But we aren't quite ready to get down to the sewing 

Choosing and ordering the fabric came next.


Sourcing the Fabric

1: Embroidered Tulle; 2: Satin; 3: Silk Organza and 4: Bemberg Lining


 Long gone are the good ol' days when you can waltz into a fabric shop and waltz out with everything you need for a wedding gown. Here in the Washington, DC area, one of the go-to shops was G Street Fabrics which had a fabulous bridal department. They still have the bridal department, but the shop's look has more of a warehouse feel than it used to, and it's down to one location in Rockville, Maryland. Still, Laura and I took a field trip to Rockville. I wanted her to have a chance to feel the kinds of fabric that we were talking about. We made one purchase. The boning.

Moving on, we went online, and a priority was anyplace that could send swatches. We ended up concentrating on 3 online places:

1. Bridal Fabrics, located in the UK. They have gorgeous fabric with reasonable prices and ship around the world. Our biggest concern was turnaround time. Our window for sewing was tight, and while there were some definite maybes, we just didn't know if we would get everything in time.

2. NY Designer Fabrics. Also had some gorgeous fabrics but the fabric Laura loved from there had prices that were higher than what she wanted to spend.

3. Mood Fabrics won the day for 2 of the 4 fabrics (2 & 3 in the above picture) that we needed. Laura ordered so many swatches! She ended up ordering the polyester satin for $8.99 a yard and is hands down the nicest polyester satin I have ever seen and worked with. Frugal minded brides should not turn up their noses and the "polyester" aspect. It has beautiful drape and glow with none of the harsh sheen I have seen on other cheap satins. We also got the silk organza underlining there.

Laura ordered the embroidered tulle (1 in the picture) from an Etsy shop, and this was the fabric we waited most of August for it to arrive. This definitely played a role in our "can we finish the dress in time for an October 2 wedding" stress!

Locally, we purchased lining (4 in the picture) and notions from Stitch Sew Shop in Alexandria, Virginia (where I also happen to work), as well as fabric for my Mother of the Bride dress and for the flower girl dress (more on those later).

How Much Fabric?


Since I wasn't using a pattern calculations had to be done. From the muslin making, I knew the bodice would take about half a yard. But the skirt? I took to graph paper. I didn't know any other way than to draw it out to get the estimate.

We settled on 7 yards of each of the 4 fabrics, and had leftovers of everything except the embroidered tulle.

Bonus: All the fabric used is machine washable!!

A Wedding Dress, by the Numbers: Part 1


Wednesday, December 18, 2013

Bring on the Rain!

Well, I don't know about y'all, but my "sewing life" has been way less about sewing, and way more about working. But way back in June, my mom requested a raincoat. One that I make for her. One that matches some rain boots she has. I've been sewing every spare minute since Thanksgiving!

It wasn't until her visit to Atlanta in October that she chose her fabric, and well, it won't match the rain boots. I used the Amy Butler raincoat pattern that I made for myself and for Laura. She tried on mine, and while she really isn't any larger than me, she wanted it bigger, because she wants to be able to wear a sweatshirt underneath. People. She lives in Texas. It's hot there (recent ice storm notwithstanding). Oh, well... I think she'll be able to wear a sweatshirt.


Since I've already made this twice and blogged about it each time (click on the links for the posts), there's not much left to say. Gonna bullet-point it...


  • I used laminate this time. A first. Wasn't too hard, but occasionally gave me problems.
  • The sleeves were still a bitch. And not just because Mom wanted them looser and bigger.
  • My sleeves were too short. Hers are extra long because she wants to roll them up to show off the lining.

  • I used some of my previously traced pieces, and traced some from scratch, and had some weird things happen. They were fixed in the muslin stage.
  • I was nervous about making the buttons with the laminate, but they went together like a charm.
  • Don't worry about my mom seeing this ahead of Christmas... she never reads my blog. :/


And that's about it. No more sewing planned for 2013... the cutting table has been transformed into the wrapping table. If you celebrate Christmas, then you know what I'm talking about!

Happy Holidays and Happy 2014!

Saturday, July 23, 2011

Some Special Sewing

The conversation goes like this:


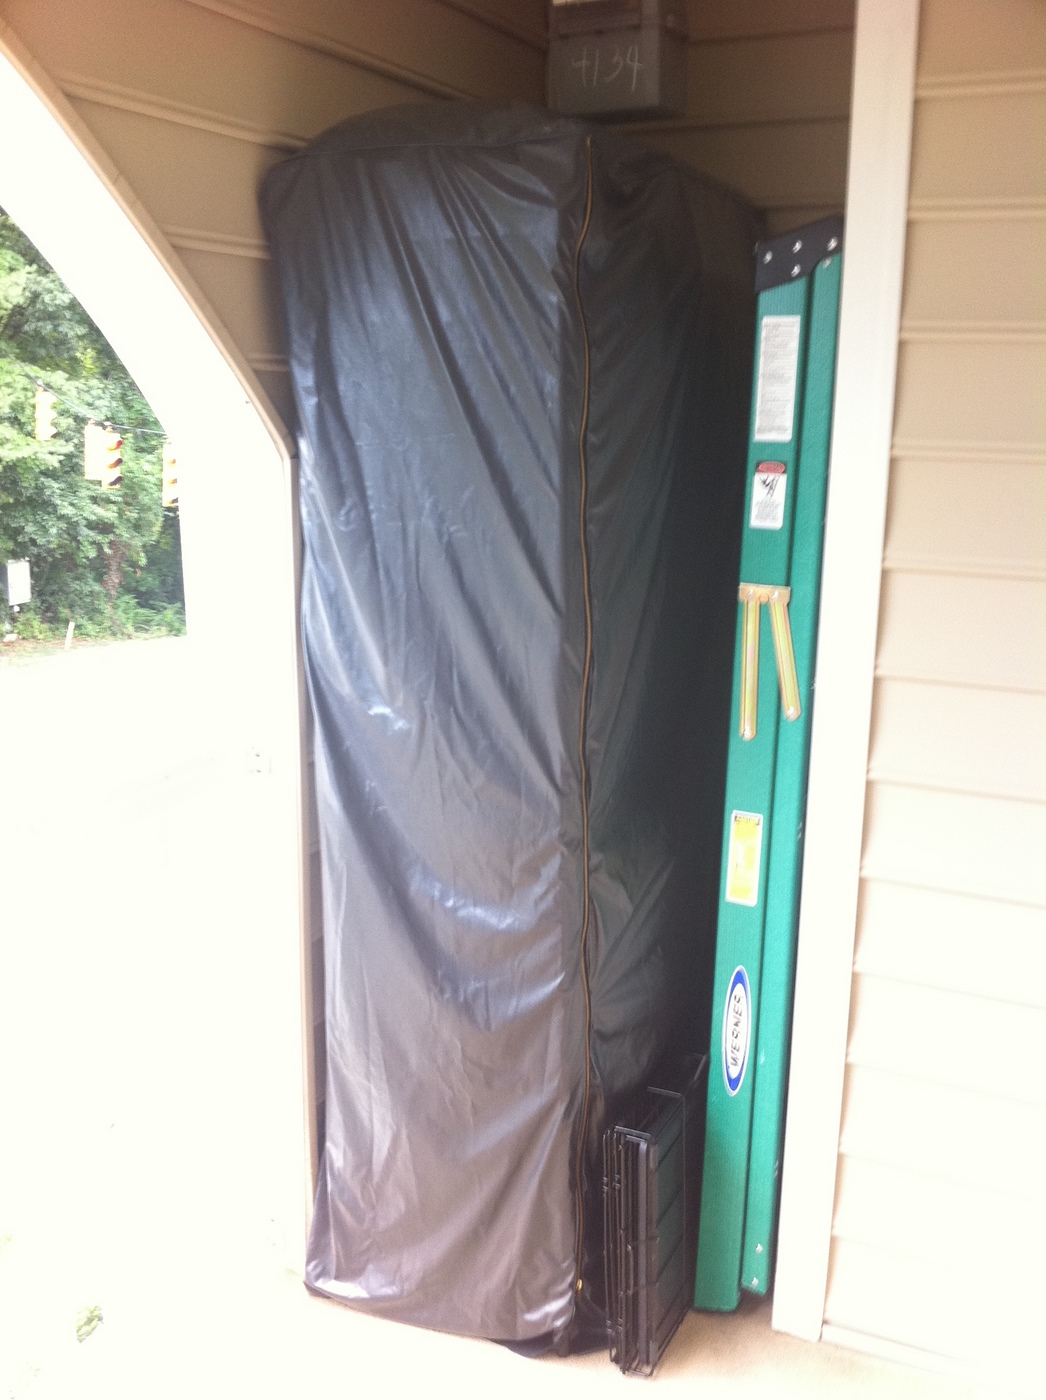
Laura: "Mom, can you make us a kind of waterproof cover for our metal shelf. We want to store stuff on it, on our patio, so it will need to be protected from rain."


Me: "Um, I think I could. Text me the dimensions and I'll search around for some kind of waterproof fabric, and let you know."


Off I go to my almost always go to first fabric source, fabric.com. And I find some stuff called polyurethane laminate or PUL. Here's the description from their website:
Description: PUL is a polyester/polyurethane laminated knit fabric with a laminate thickness of 1.00 mm. This fabric is waterproof, durable and has a slight crossgrain stretch. This product can be used in making diapers, changing mattress covers and applications that require waterproof fabric. CPSIA certified. Machine Wash Warm, No Chlorine Bleach, No Fabric Softeners, Dry Low Heat or Drip


It comes in lots of pretty colors, but they chose black. So 5 yards later, plus a 72" sleeping bag zipper from Atlanta Thread, I had a plan. Scroll all the way to the bottom for the finished product if you aren't interested in any of the technical mumbo jumbo.


From my last post, I may have given the impression that I never practice any new technique. That's not really true, and this project needed some practice. First, after purchasing some seam sealant from REI it had a diagram on how a tent seam looks (what one would use the sealant for apparently). Something like this:

If you are still with me, here's how it all came together. Needle used, a universal, I think size 80. Regular thread. Walking foot.

First I laid the fabric all out on the floor, and drew a 1/2" seamline on one side. Then, I placed the edge of the other side, overlapping to the chalk line and taped it in place. I had a helper.
Then, it took 3 passes to get the finished seam. The first one was basted, and frankly, the tape didn't stick well, but this was the only super long seam I would need to do. The other one had the zipper.
The second pass was pulling one side over the basted side so it looks like that little drawing above. Kind of hard to describe in words, and this picture is terrible. You are encasing the basted seam.

Finally, you flip it over, and sew the final edge down. Even with the walking foot, this stuff kind of sticks and pulls. I don't have a teflon foot though, or one with little rollers. It was worse with the zipper insertion. I forgot to take pictures of that though.
I also practice how the corner would come about with a little miniature.
Not pretty, but it didn't really have to be. I made it a little bit longer than the measurements so that they could put stuff on the top shelf.
I think it looks kind of like an odd shaped body bag, but here's what Thomas had to say about it:
Spent some time outside just now to put on the cover! It fits great and have a nice amount of extra room to put some stuff on top and some bigger boxes that don't completely fit on a shelf. Should be great!

Also, it fits perfect if I don't have anything on the top shelf, but I've got some moving blankets on it now, so the corners droop just a bit.


Success!

Tuesday, November 30, 2010

Singing in the Rain

First, a health update for Kyle. My cranky toddler 20 year old is MUCH better and has several asthma fighting drugs on board. Also discovered that he has an ear infection. Fun.

Now for the real fun! The rain coat is finished and I love 90% of this Amy Butler Rainy Days raincoat pattern. Everything except the sleeves which are apparently drafted for stick people. Laura is thin, and the sleeves are too snug for her. I made the medium which is actually bigger than her measurements. She's between a small and a medium, so I went up, thinking she would get enough ease to wear actual clothes under her coat. No. So, I've brought it home to rip out the hems on the sleeve and bottom and hopefully there's enough seam allowance to get a little extra room. I'm strongly considering adding a gusset to the underarm area for a bit extra room as well. But don't you want to see it? How about a video?


And some stills:


And by the way, for readers of my blog, if you use the coupon code SEWINGBLOG15 you will get 15% off either of my shops, Jenna Belle Designs or Down the Street Creations.

Monday, November 22, 2010

Raincoat Update

I've been sewing like mad, trying to finish this raincoat by tomorrow. It was going great, until I got to the sleeves, but more on that in a minute. First, a little about the topstitching. Topstitching is obviously pretty much straightforward, but one thing I do to keep the bobbin thread from showing is this:
Thread that little "finger" on your bobbin case, if you have one, and it adjusts the tension on the bobbin thread without messing with the little screw on the case.

So. I was all set to brag about how marvelous this pattern is (and I still think it's marvelous.... but) until I got to the sleeves. Thank goodness for Gertie's Lady Grey Sew Along! I used this post as a stepping stone, and modified it to work with this kind of coat/fabric.

I used a 100% cotton bias strip because I didn't need any bulk for the sleevehead. (Oh, first I skipped the gathering stitches called for in the pattern instructions. Well, not quite true. I stitched them, and then when pinning in the sleeve noticed some BIG problems.) Like Gertie says, pull on the bias strip, and push on the fashion fabric. But not too much. The goal is to utilize the bias strip like a gentle elastic, allowing it to do all the gathering work. You're trying to avoid puckers.

This worked pretty well with the lining fabric. It worked OK with the raincoat fabric, but let me tell you... I love this fabric! It repels water like nobody's business. But. There is absolutely no stretch at all, which means you just can't make it do what you want it to. I'm afraid the sleeve is not set in that perfectly. I'm hoping once the lining is in, the bulk of it all will make any imperfections in the sleeves less noticeable.


A couple more peeks:
The picture isn't that fantastic, but I wanted the harsh light so you can see the details in the black fabric.

The back view with the hood, and some of the topstitching detail.

Now, everyone keep their fingers crossed that it fits! Of course, I should have/could have made a muslin, but I wanted to give her the finished coat this holiday. With her living 3-1/2 hours away, that makes it a little more difficult when there's a time crunch. I'm feeling optimistic!

Saturday, November 20, 2010

Another Coat?

It's true! My next current project is another coat, but this one is proving to be pretty easy. I'm making Amy Butler's Rainy Day coat, and I'm making it for Laura. She's young, she's hip, she's trendy conservative. I thought she might opt for a funky laminate print, but no. She chose black. A high end, raincoating fabric from Gorgeous Fabrics, but black.

She's applying to graduate schools, and everywhere she's applying is in a much colder climate than she currently lives in, so I decided to add some warmth to this raincoat by quilting the body lining with this:
I've done a bit of machine quilting in the past, and this really isn't difficult. There are a couple of ways to go about it. The easiest way is to simply pre-quilt your fabric before you cut it out, but where is the fun in that? No, I cut out my lining pieces, and then proceeded to quilt them.

Some tips. You want to have your batting a bit larger than your pattern piece because it tends to draw up just a bit as you quilt. I'm only using batting and the lining without a third layer, as the edge of the lining is folded into the hem. Then there are the darts, front and back. I didn't want the extra bulk from stitching the darts in the batting, so I just cut them out and "sutured" them together. Like this:

This keeps the 3 dimensionality effect caused by the darts, but eliminates any bulk. Then I marked my quilting lines, and "basted" the pieces together with quilter's safety pins. These little pins are purposely bent to make them easy to use. To mark the fabric, I used a 24" long quilter's ruler, and marked diagonal lines every 2" using a chalk pen. I'm not sure the exact name, but it's like a little pen, with a chalk compartment and a little wheel on the bottom where the chalk comes out.

Are you just dying to see the lining fabric? Here it is, a Joel Dewberry home dec fabric from fabric.com that is a wonderful weight 100% cotton.
Make sure you mark before you pin, or it can be a real nuisance. Because this is lining, and will only be seen in limited amounts, I didn't obsess over the distortion caused from the darts, or the mistakes that I made. Especially the line that was marked 3" apart. Egads! Doing the machine quilting can become kind of zen like as I just made my way over the fabric, stopping just into the seam allowance (which was marked). I want to be able to trim away the batting easily in the SA.

Another cool tool I used was some quilter's gloves that have rubberized tips that help you guide your fabric. It's amazing how slick cotton can feel as you try to manuver it. (Ignore the dirty fingertips, please.) I think rubber gloves might work just as well. And almost forgot to mention, but if you have one, a walking foot makes this job so easy, and really does minimize the drawing up and "crawling" that one fabric can do over another one.


Tomorrow I plan to cut out the outside raincoating fabric, and could possibly have it finished by Monday or Tuesday! I'll be seeing her over the Thanksgiving holiday, so it would be great to deliver it in person.

Wednesday, August 4, 2010

Toaster Cover

I've taken a little break from the shirt dress to make a custom toaster cover for a friend. This has given me the opportunity to try out a new finishing idea that will work on tote bags and purses as well as the toaster cover. OK, it's not a new idea as the purse designer interviewed on Pattern Review mentioned that her designs are finished with French seams, and I thought, hey, that would work with this! And, yes, it did!
Often these home dec kind of projects cover their seams with bias tape, but that seemed a bit time consuming and fussy to me. French seams worked fabulously! And now that you've seen the inside, how about a look at the pretty outside. And yes, this is for the biggest toaster I've ever seen!

I just have it over a small box, so that explains the saggy top.

A close up of the double fold bias tape that I did use to cover the bottom "hem".

 A close up of the machine embroidery. And you can see the machine quilting I did here. This was a great opportunity to practice my machine quilting skills. I used super thin batting and a bleached muslin backing, and the walking foot for great results!

Parting shot:

Wednesday, January 6, 2010

Etsy's Front Page

I was featured on Etsy's front page today! Never mind that it was at 4 a.m. and I was sound asleep!

Here's what all the American night owls saw, plus others around the world that might have actually been awake!


Lots of beautiful things here that my blue plaid clutch is nestled up with!

Wednesday, December 30, 2009

Tutu Fun

It seems I'm still Sewing.For.Others (SFO). This project though can't entirely be classified as sewing, as much as knot tying. There was a tiny bit of sewing... I sewed the ends of the elastic together to make the waistband... it took about 2 minutes, but I did break a needle in the process. Don't ask me how I did that!


I had all these leftover tulle strips when I decorated for my dinner party. You can see how I tied the tulle around the chairbacks and then inserted a glittery floral pick from Michaels to really dress it up. Well, I don't have any little girls directly in my life, but my daughter's fiance has a 5 year old niece that would love a tutu. You don't have to look far in the blogosphere to find a tutorial for tying the strips around a ribbon or elastic.

I opted for the elastic, and after about 5 minutes of tying, my attention wandered. Laura was around though, and she finished tying the rest of them and we have this adorable tutu, ready for the dress up closet!


We decided we like the raggedy edges
 
Don't worry sewing fans, the real sewing is about to begin! I know most sewists have lots of projects planned and even cut out in their minds, and I am certainly no different. I even have no less than 3 handbags in various states of construction as well! Today's non-sewing project involves pheasant. More on that later!

LinkWithin

Related Posts with Thumbnails