Thursday, July 28, 2011

Simplicity 2211 -- Put Me in the Zoo

I feel like I haven't done a lot of sewing lately, but I did manage to make the tunic top from Simplicity 2211, one of the lisette patterns.


I made view E which is the short sleeved version, and is shown on a live model on the front of the pattern. All along I was thinking, "Oh, what a cute button-front top." Imagine my dismay when I realized that it doesn't actually button. Those buttons are just decorations! Hmmm, somebody wasn't paying attention.


But first, have you read this book?
That's pretty much what I was thinking when I wore my new top today.
Seriously, though, I do kind of like it in spite of the fact that it doesn't actually button. Which is kind of a shame, because it's kind of hard to put on and take off.


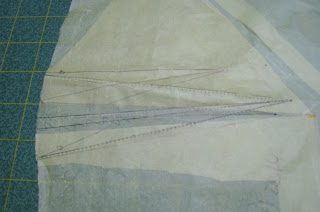
So, do I hear you asking about the changes I made? Well, first off, I did a tissue fitting, and then had an epiphany! I should really give the FBA (full bust adjustment) a go. Amazingly, it made it fit so much better!! Go figure. FBA's are the subject of today's Sewaholic post, and Tasia provides lots of links about it, so I'm just going to link to her post.


Since this was my first FBA, it was not without issues. Can you guess the part that gave me the most problems?
If you said, "the darts", you would be so right. Don't ask me why I had so much trouble, but it did. I think practice will help with that.


Oh, and if you know the pattern, you will notice that I changed the sleeves. I just wasn't feeling the puffy sleeves, so I put in regular short sleeves (that I got off another pattern that I am too lazy to go look up the number), and put a cuff to help downplay the dots. The trim really helps with that zoo feeling.


Close up

I'm doing some "secret sewing" that I won't be able to reveal for awhile, but (and I can't believe I'm typing this) I am starting to think about fall.

Tuesday, July 26, 2011

From Wilma's Recipe Archives -- Porcupine Meatballs

Greetings, porcupines! Never fear, no porcupines were harmed in the making of these meatballs. Porcupine meat is far too difficult to get what with those quills and all. (apologies to Patty, the Snug Bug who does the best critter greetings ever... I just couldn't resist!)


Well, there is clearly a reason it will take me a year and a half to go through all these recipes, as it has been a couple of weeks since I tackled another one. And there are a couple of things you will start to notice about her main dish recipes. One is ample use of canned soup. I think she may have gotten some of her best recipes from the Campbell's soup labels!


To make these meatballs:
1 lb ground beef, lean (I used 1.25 lbs as that was the smallest pack at my grocery, definitely a pet peeve of mine)
1/3 cup rice (used Texmati)
1 tsp salt
Dash of pepper
1/4 small green pepper, chopped
1/4 small onion, chopped
1 egg


Mix together. Shape balls. Brown and add 1 can of tomato soup, 3/4 can water.


Cook for 1-1/2 hours, slowly.


All ready to be mixed up, which I did by hand. I made the meatballs about 1-1/2 inches diameter.

Many of Grandma's recipes have minimal cooking instructions, and I've typed this one exactly as written. I tried to make it just to these instructions, but I ended up only cooking it for about an hour, and did have to add more water. She doesn't mention it, but it should be covered. The long cooking time does make meatballs particularly tender.

I chopped my green pepper and onion with a Pampered Chef chopper.

I love this tool because it gets things really minced, and I hate big pieces of stuff in my meatballs. Plus, Roland hates green peppers, so this is a good way to disguise them.


Since the rice was in the meatballs, I was a little perplexed as to what to serve with them, but I just made more rice and then opened a can of green beans. Kyle prefers the canned ones, and once he's back in school it will be back to fresh! Roland said they were really good, and he didn't even notice the peppers.

Tonight we're going to have the leftovers with spaghetti.

Saturday, July 23, 2011

Some Special Sewing

The conversation goes like this:


Laura: "Mom, can you make us a kind of waterproof cover for our metal shelf. We want to store stuff on it, on our patio, so it will need to be protected from rain."


Me: "Um, I think I could. Text me the dimensions and I'll search around for some kind of waterproof fabric, and let you know."


Off I go to my almost always go to first fabric source, fabric.com. And I find some stuff called polyurethane laminate or PUL. Here's the description from their website:
Description: PUL is a polyester/polyurethane laminated knit fabric with a laminate thickness of 1.00 mm. This fabric is waterproof, durable and has a slight crossgrain stretch. This product can be used in making diapers, changing mattress covers and applications that require waterproof fabric. CPSIA certified. Machine Wash Warm, No Chlorine Bleach, No Fabric Softeners, Dry Low Heat or Drip


It comes in lots of pretty colors, but they chose black. So 5 yards later, plus a 72" sleeping bag zipper from Atlanta Thread, I had a plan. Scroll all the way to the bottom for the finished product if you aren't interested in any of the technical mumbo jumbo.


From my last post, I may have given the impression that I never practice any new technique. That's not really true, and this project needed some practice. First, after purchasing some seam sealant from REI it had a diagram on how a tent seam looks (what one would use the sealant for apparently). Something like this:

If you are still with me, here's how it all came together. Needle used, a universal, I think size 80. Regular thread. Walking foot.

First I laid the fabric all out on the floor, and drew a 1/2" seamline on one side. Then, I placed the edge of the other side, overlapping to the chalk line and taped it in place. I had a helper.
Then, it took 3 passes to get the finished seam. The first one was basted, and frankly, the tape didn't stick well, but this was the only super long seam I would need to do. The other one had the zipper.
The second pass was pulling one side over the basted side so it looks like that little drawing above. Kind of hard to describe in words, and this picture is terrible. You are encasing the basted seam.

Finally, you flip it over, and sew the final edge down. Even with the walking foot, this stuff kind of sticks and pulls. I don't have a teflon foot though, or one with little rollers. It was worse with the zipper insertion. I forgot to take pictures of that though.
I also practice how the corner would come about with a little miniature.
Not pretty, but it didn't really have to be. I made it a little bit longer than the measurements so that they could put stuff on the top shelf.
I think it looks kind of like an odd shaped body bag, but here's what Thomas had to say about it:
Spent some time outside just now to put on the cover! It fits great and have a nice amount of extra room to put some stuff on top and some bigger boxes that don't completely fit on a shelf. Should be great!

Also, it fits perfect if I don't have anything on the top shelf, but I've got some moving blankets on it now, so the corners droop just a bit.


Success!

Wednesday, July 20, 2011

Kwik Sew 3614 Shorts

I never got around to blogging about these shorts, a second pair of Kwik Sew 3614. You can see the first pair here. To make the second pair, I tweaked the fit just a bit. They are perhaps just a wee bit tight in the waistband, but they aren't uncomfortable, so I think they're just fine. I give them a Wearability Index of 8!


The fabric is a cotton/poly blend seersucker from fabric.com which I underlined with a white cotton. I underlined for 2 reasons: 1) the fabric felt a little too lightweight for shorts, and 2) seersucker has a bit of stretch, and I thought it would give the shorts more stability as the day goes on. I didn't underline the waistband, but used the cotton (a single layer) as my interfacing. Oh, yeah, the pattern is Kwik Sew 3614 (duh).


Ok, now that I've gotten the boring technical part out of the way, let's get to the fun part. I hated the pockets on the first pair (which I do wear a lot, have 'em on right now), and the back was just boring. It's a wide expanse that could use some embellishment, right?


For the front pockets, I traced around a patch pocket that I really liked on a skirt that was headed to Laura, made a pattern, and voila!
Can you see it? I love the way it blends, but is still useful. For construction, I cut out 2 of the blue, and 2 of the white cotton, put them right side together, and sewed the curved edges. Turned them RSO, edge and top stitched the opening pocket edge and then lined up the side edges and top edges and edge and top stitched the bottom curved line. Easy!


Now for the back I wanted to try making welt pockets, and I decided on single welt. I've made bound buttonholes and so the step of practicing I totally felt was unnecessary. I also checked out some tutorials online, and consulted my Vogue Sewing Book and Singer Sewing Book, basically looking for the best pictures.


Then I decided to go for it! I had enough seersucker to cut out another back piece if I totally screwed up. So, how did it go? The welt part is easy. It was the pocket bag that was confusing me, and the first welt pocket is actually stitched shut. I'm not planning to actually use these back pockets, so I left it. And I'm still not sure how it happened, but it was a valuable learning experience. Here's how they turned out:


Can you tell which one is sewn shut? No? Neither can I. And I'm really happy with them. For placement, I consulted several pairs of capris and trousers that I currently own.


And here's how they look on me:
Kind of hard to tell, but I really like the detail. And for the record, the one tutorial that I didn't use because I remember she had one after I finished, was the one I should have started with. Sherry of Pattern~Scissors~Cloth writes excellent tutorials. She calls them jets instead of welts. Go figure. I'll head there first next time.


So, what about you? Do you throw caution to the wind with a new sewing technique, or do you practice first?

Sunday, July 17, 2011

Knitting a Bunny

I can't help it. I love to knit these little toys. And it's something to do in the evenings since I'm finding it too hard to sew anymore then. I think it's the light, which doesn't seem to be as much of an issue when knitting.


So, let's see... the count is 1 owl, 1 reversible cat/mouse, 2 balls (one still intact, the other... not so much... puppies have sharp teeth), and, introducing:


He's (well, I think it's a he) already a little dirty, as a couple of random body parts were snatched by my dog before attachment. That's life as a bunny, I suppose. Always on the lookout for the enemy dog.


Another critter is already in the works, and shouldn't take as long as Mr. Bunny who turned out bigger than I expected. Yes, the measurements are in the pattern, but you know, my perception of a flat measurement into a 3D animal is obviously a bit skewed.


Here's the whole family together:


It's probably about time I started giving them names, don't you think? If you have any suggestions, feel free to give them to me.


Oh, p.s. these are all from the creative mind of Susan B. Anderson.

Thursday, July 14, 2011

The Colette Crepe

First off, let me say that I love Colette Patterns and Sarai's independentness (clearly not a word) and design esthetic. My all time favorite make thus far is my Macaron. But. You know, not all patterns are everyone's style. I had some misgivings about the Crepe dress from the start, and it's not only because when I see the dress I always, and I mean always, start humming... "girls in white dresses with blue satin sashes, snowflakes that stay...". I skipped Gertie's Crepe sew along at the beginning of this year because I just wasn't sure.


But. I won the pattern in a blog giveaway from Miss Snug Bug, and well, I did feel a small obligation to make it then. I mean, I try to only enter giveaways for things I want, and not just to enter and win stuff (ok, I did that once, and I actually won... oops...  it wasn't a sewing blog). So, I bought a gorgeous blue gray cotton linen blend, and made the first muslin in March. Then it lingered. Then I made another muslin, I think in May. OK, come ON. It was time to make the thing.


I'm going to show you the pictures and then give some observations.


  • Construction-wise, its a beginner pattern.
  • I'm different sizes on the top and bottom, so fit-wise, there are issues.
  • Colette patterns are uniformly too wide across the chest (above the bust) for me.
  • This stiff-ish fabric makes the sleeves stick out too much. I shortened them a little, and could have done with a smidge more.
  • I had a heckuva time with the bust darts. I seem to remember Gertie covering this a lot during her sew along, and I should have gone back to see what she said.
  • I had to do a huge sway back adjustment. Should have done more.
  • The top is just not flattering on me. I'm too short waisted (or something) for that wide belt look.
  • Not sure the butter yellow was the right choice.
  • Linen is scratchy. I did underline the top, but should have made the facings out of a softer cotton.
  • I used a catch stitch to anchor the facings to the underlining.
  • I used a catch stitch to anchor the waist seam (covered with bias tape, but not folded over).
  • I made the pockets out of voile.
  • I wore a half slip for my skirt "lining".
  • The wrap coverage is GREAT!
  • The neckline needs something.
  • The back darts are too far apart, and are in a weird place on me.
  • I shortened the dress about an inch and a half (if I remember correctly).
  • I'm not one for a big bow in the back (or even knot) and besides, no one in my house can do a good bow (but me), and my arms just don't bend that way.
  • Gave it a test run today, and didn't feel too wrinkled.
  • Wearability Index: 7
All told, while it's not my favorite dress, I do like it, and if my weight loss plan actually works this time, I can just wrap it tighter.

Monday, July 11, 2011

Happy Birthday, Roland!

Today is Roland's birthday, and a day I'm always looking forward to. It's hard being the older woman (by only 6 months), and now he's back to being the same age I am!


The cake is another Grandma recipe. I'm not going to post the recipe unless I'm overrun by requests, but she called it "Summery Chocolate Cake". Not sure what makes it summery except that it appears to be a "light" recipe... you know, one of those that uses applesauce to replace some of the fat and the eggs. It appears to be on the thin side, and if it's worthy of a remake in flavor, I will use a smaller pan. Obviously we haven't cut into it yet, but the batter was delicious, and the frosting *ahem* was too.


In sewing news, I have finally finished the cutting out of my Colette crepe dress. We have an hour or so before we go out to dinner, so I think I'll go do a little sewing...

Sunday, July 10, 2011

A Refashion: But is it Better?

Normally, things don't get refashioned so quickly, but you may remember this:
I made it in May, and wore it officially the first time in June on our vacation. The whole time I wore it though, I just felt silly. Like I was wearing either a maternity top, or one that just felt too elementary school. I think a 9 year old would look adorable in this. Not sure if it's the style or the fabric or a combination of the two, but I just wasn't feeling it.


A remake was in order, and I knew just what I was going to do. A Frankenpattern combining the Claire cami for the bodice and McCalls 5522.


OK, we're friends, right. I'm only showing you this because I like you. So, be nice. Anyway, I know what the problem is. The top to just below the casing is where I cut it off, and that part of the Claire cami is longer than the McCalls top, and I didn't take that into account, so the fit is off. But I'm not going to go back and change anything. Nope, third time will not be the charm.
There's a serious buttoning issue. It's pulling for one thing, and for another, I can't comfortably button the bottom button. Now, I'm kinda working on that issue, but for the time being it now doesn't really fit. When we got ready to go out to lunch yesterday, Kyle gave me the look of horror, as in "mom, what are you wearing?!! and will I be seen with you?"


So I decided to try to "style" it another way. How about as a vest?
Um. No. Ok, it does address the buttoning issue, but for one, the necklines don't work. As a vest, the neckline is really all wrong. Kyle gave me another thumbs down, and I changed. One of the sewing bloggers has a "magic closet" (I can't remember who, if you know, please let me know... it's a great name for it) and I'm going to let this live in the magic closet for awhile. Either I'll lose some weight and revisit wearing this, or hmmm, maybe it will fit Laura.

Friday, July 8, 2011

A Little Cooking Challenge

NOTE: Cooking is really not my thing. But I am the primary cook in our household, so I have a shelf full of cookbooks. Recently, I was rummaging through said cookbooks trying to find something to take to a 4th of July party, and I came across the little "book" my mom put together of my Grandmother's recipes after she died.


Were she still alive today, next year would have been her 100th birthday. Wilma Emilie Janssen Lawton taught me to sew, and was a housewife extraordinaire. If you looked up the definition of grandmother, she would be it. I've decided to try to make all of the recipes over the course of this year and next. There are more than 90 recipes, but I have plenty of time as her birthday is November 2.


I started tonight. First, let me introduce you properly...


Wilma Lawton,
meet my blog friends. They are all fabulously talented, artistic and sweet.

And now, let's enjoy our first recipe (I am going to try to make these as close as possible to her original recipe):

Spanish Noodles
1 lb. coarsely ground beef
1/2 cup green pepper
2 small onions, chopped (I used about 1/4 of a large Vidalia onion)

Fry the above ingredients and then add:
1 can tomato soup (I used the Campbell's Healthy Request)
1 cup of water
2 cups of noodles
1/2 tsp celery salt
salt and pepper

Cover and simmer for 45 minutes and add 1 cup of grated cheese (I had a grated Mexican blend on hand).

That's it. Really easy, and while the cooking time seemed really long, the flavors all blended well and I was happy that I resisted the urge to add more spices. Roland went back for seconds, so it was a hit.


Next post will be back to sewing! I finished a refashion this morning.

Tuesday, July 5, 2011

In a Quilting State of Mind

Are you as relieved as I am that June is over with? I've been sewing lately, but have I ever mentioned quilts? I've made quilts on and off since, oh, 1982. But I like to actually finish things, and quilts originally, for me, took FOR.EVER. The first 2 I made were queen-sized, and hand quilted. But starting around 2008 or so, I discovered that now people machine quilted (please don't tell me it became popular before that... it's just that quilts were not on my radar). Besides, my kids had outgrown my sewing, and I hadn't rediscovered sewing for myself, so quilting it was.


But Patty, the Snug Bug re-piqued my interest with her gorgeous wedding gift quilt and she mentioned the Modern Quilting movement. Huh? Again, I was out of the quilting loop, and did some investigating. According to the Modern Quilt Guild, modern quilting is a new twist on traditional quilting. You can see their full definition here.


I bought 2 books:
and after looking at some gorgeous pictures, realized that I've been "modern quilting" for a couple of years now, and just didn't call it that. Here are a couple of quilts I made for my Down the Street etsy shop that have sold. I made them in 2009.


A table runner from a jelly roll (2-1/2" wide pre-cut strips for you non-quilters)...


And a string pieced wall-hanging:
Kinda wish this one hadn't sold.


Yes. Modern quilting before it was called that. Specifically.


Why am I rambling on about quilting? I have a good bit of quilting cotton, including fat quarters and strips and general scraps that is crying out to be turned into quilts. I have 2 bags of t-shirts from Laura that she wants turned into hip and happening t-shirt quilts. Hmmm, modern t-shirt quilts. That's what she wants. Definitely a challenge.


And an awesome UFO that needs, yes, really needs, to be finished. It's almost done, and why did I stop? It's complicated.


Oh, and yeah. Almost forgot. I just made a little dog quilt. For those spoiled rescue dogs we have. Here's a look at how we torture the poor creatures.
"Look at poor little us, forced to lay on the hot concrete. We've been out here for hours, a couple minutes, and we must come back in."

The reality is that these poor creatures pretty much lounge about on virtually every couch, chair and bed in the house. At this very moment, they are at opposite ends of the sectional, "watching" House Hunters with me. During the day, they like the chairs in the great room with its big window (so they can keep tabs on the evil squirrels). The chairs are actually kinda nice though, so they have little quilts on them.

This one was originally for sale in my shop, but nobody bought it, and now it's mine. It "goes" with the plaid, don't you think?

This is the new one. About 25" x 25". Look at the cute little doggie prints. And it really goes with the yellow chair I made it for.
The arm of the chair is a perfect support to be able to peer out at squirrels.

Wow, this whole post may have really been TMI about me and my quiltmaking journey. Be thankful I didn't take pictures of the first quilt I ever made.


Edit: I added the link to Patty's blog and the post about her gorgeous quilt!

LinkWithin

Related Posts with Thumbnails