Friday, July 30, 2010

Stripe Angst

For my next trick project, I want to try another vintage pattern. I bought this Simplicity pattern from eBay, because I love a good shirtdress, and I also love the raglan sleeves. But I've been agonizing over the fabric a little, and then decided to buy another stripe, mostly because it was on sale. I'm thinking that maybe wasn't a good reason. It's an Amy Butler twill and was a ridiculously low price at fabric.com. Hmmm, maybe there was a reason for that low price. People thought it was ugly.

Before you scroll down more and see the picture (oh, of course you've already seen the picture), I'm thinking of just using the stripe for the skirt, and doing a solid color for the "shirt". Maybe even in a cotton jersey? Maybe the light blue?

Oh, well, in the meantime, I know I'm going to need to make some alterations to the pattern, so I'll get to that and await your valuable advice.

Thursday, July 29, 2010

Butterick 5450

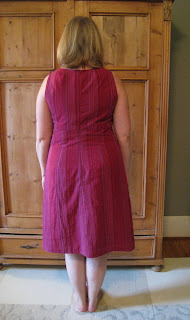
Is it gone? Do you still see them? I'm trying to put those shorts behind me, and thanks to those who were brave enough to say NAY. You were all right. I've moved on, and made a new summer dress, Butterick 5450. The pattern claims to be Fast & Easy, and yes it is. Only, I'm a notoriously slow sewer.

So, what do y'all think?
I did make a muslin of the bodice (well, the lining anyway), and made a small sway back adjustment. And, while I cut out a 14 for the top, I morphed it into the 16 for the waist and hips. I love the way it fits! I also moved the zipper from the side seam to the back and used an invisible one, and gave the dress a full lining because 100% cotton just kind of sticks. To legs, to cotton underwear. Is that TMI? Anyway, I used a bemberg lining that I had prewashed, so the whole thing is washable. Yay!

Oops, looks a little wrinkled. Forgot to say that I added an inch to the length, too. Forgive those glaringly white legs. I think I need a PSA at the beginning of the post reminding people to wear sunglasses when looking at these pictures.

Do you notice the stripes? Kyle says there is an elegance in the mismatching, and I'm going with that.

Beyond that, I think I'll be wearing this dress a lot, and I think it will be a great transitional piece to wear into the fall.
By the way, when I wore it yesterday, I wore the wedges in the "fall" picture instead of the sandals. I just liked that look better. My next project is a vintage shirt dress, and the fabric I chose has stripes. Wildly uneven stripes. What WAS I thinking?!

Tuesday, July 27, 2010

Stripes

What rich, gorgeous color on this 100% cotton Kaffe Fassett woven from Fabric.com. What was I thinking?

Like some plaids, some stripes are uneven, and in their unevenness make matching very challenging. Add in pleats and darts, and you might find yourself in matching hell. That's where I found myself yesterday, and I decided to let the stripes fall where they may. Possibly not the best decision, but I'll let you be the judge tomorrow when I finish a cute Butterick sleeveless dress.

Are you just dying to know which pattern? Well, I'll surprise you tomorrow, but I don't have too much left. The lining is completely made, so all I have left is the invisible zipper, shoulder seams, side seams, insert the lining and finish the armscyes, hem and voila. New dress. Hmmm, when I type it that sounds like a lot, but it's not really. Til tomorrow...

Friday, July 23, 2010

Simplicity 2370 -- Yay or Nay?

I've made my denim shorts, and am kind of ambivalent about them. Are they a true wadder? Not really. Take a look:
So, maybe it's my hips I'm ambivalent about, but in this picture they (the shorts) don't look too bad. I did end up making 2 muslins, and thought they fit pretty well by the second one. One design change I made was to change the large, single pleat in the front to 2 narrower pleats, essentially using up the same amount of fabric, but spreading it out a bit. I'm not so sure it helped or made it worse.

Something I learned about making a muslin: when you aren't 100% sure about the size, go bigger. The biggest alteration I had to make was to shorten the length of the center crotch seam. I shortened the front center seam a whopping 1-1/2", and the back one 1/2". I probably should have shortened the front one even more, maybe 2".

There just seems to be too much fabric. Is it the pleats? The too long center seam? The width (which I narrowed, by the way, after I had finished them)?

One major mistake I made, and shouldn't have, was that I forgot to staystitch the upper edges of the front and back pieces. Does it really matter, you ask? Heck, yeah! I couldn't figure out why the waist had "grown" so much after seemingly fitting pretty well with the muslin. I finished these yesterday, and when I woke up this morning, the lightbulb went off. It has to be the staystitching. Duh. A beginner's mistake.

I did do a superb job inserting the invisible zipper, though. So well, that you couldn't even see it in the picture. The bad news about it is that it's a side zip, and I didn't want to rip it out to make the legs narrower (lazy me), so my post production alterations are somewhat limited. Oh, and I love the waistband/binding technique, primarily because I love a narrow waistband.

No matter what level your sewing skills are, there are always things to learn with each new project. And as much as I love to see the perfectly sewn garment, sewing bloggers, show me your mistakes and wadders as well, so that I can learn from them, too!

Tuesday, July 20, 2010

Polka Dots and Muslins

After the boring skirt, I decided to go with something more fun, and what's more fun than polka dots?! This is still a work in progress, but after a very helpful post on Gertie's Blog for Better Sewing written by guest blogger Alyson Clair on sewing knits, I decided to tackle yet another knit project. Her post was about sewing knits without a serger, and while I have a serger, I find that my sewing is not really that accurate, so her hints and tips have been very useful.

I am solely using the serger for the long, straight-ish seams like the center back, and ultimately the side seams, plus the seams for the sleeves. When I use the regular sewing machine, I'm using my stretch stitch #9, and it's working like a charm. Ball point needle, of course. The pattern recommends stitching a second line if you are not using a serger, and this is where I go ahead and serge.

And now, I'm at a stopping point. The only thing left is to attach the loop with the belt buckle, the side seams, and the hem. I decided at the last minute to order some buckles from a shop on Etsy, and they haven't arrived yet (it's a lot of 6, so I'll have a few extra for other projects). This is where the muslins in the title comes in.

I can't believe it, but I don't think I have EVER made myself pants of any sort. Lots of skirts and dresses, but no pants. And if you read about my current body image crisis, then you can only imagine that my current inventory of summer shorts are a wee bit tight. Enter this pattern:
After looking through ALL the pattern books, and other independent patterns, these are the closest to what I like to wear. I'm going to make a muslin to get the fit just right, and then plan use the denim I have leftover from the "Meh" skirt. I'll let you know how it goes.

Are you partial to a particular pattern company? As I re-enter the garment making world, I'm finding that I'm less picky than I once was. Now I'm just going for the look, and if it's right, I'll give it a try. I'm saying this as someone who almost never used Simplicity patterns before, and tended to favor Vogue and McCalls.

Wednesday, July 14, 2010

A Skirt.... Meh.

I made a skirt. "Meh" is how it makes me feel, but I will probably wear it a lot.


Things I love about it:
  • the dark wash, lightweight denim.
  • the length.
  • the elastic waist and ease in wearing.
  • it took me about an hour to make. OK, maybe a little more.
Things I hate about it:
  • the elastic waist. I know, I love it, too, but it's the principle. I really love the look of a sleek fitting skirt, but right now, the ol' bod is just not cooperating, hence the hate.
  • the inside. This is kind of the equivalent of a beginning home ec project, and the inside seam finishing* would earn me a C- at best.
  • no pockets. It would be great with pockets, but I was just lazy.
The back, for grins:
About that seam finishing. First, I had decided to do nothing. Then I thought, what the heck, I'll serge the edges for a more finished look, but I won't change the thread because, well, I hate doing that, so white thread it is. Side seam #1, serged and fine. I start to serge side seam #2. Oops, run out of looper thread. Epic fail on the serger. I decide to just hack, er, pink that seam. Still, it looks like a 5 year old hacked it. Ah, well, I just won't wear it inside out.

Monday, July 12, 2010

Skirt Making

First, thanks for the birthday wishes. It was actually my husband, Roland's, 50th yesterday. I turned 50 *ahem* several months ago, and Gwen, you're darn right... it's the new 40 (oh, can't it be the new 30?!).

So, making skirts. How hard can it be? Actually, making a skirt is pretty easy. You don't even need a pattern. Really. It's the fitting. And right now, I'm having a wee bit of a body image crisis, which is frustrating me on so many levels. But I really want a denim skirt. You know, to wear instead of shorts during this hot, Georgia summer.

I picked a pattern, mostly because Simplicity patterns were on sale for $1.99 at Joanns, and this one had pockets:
Doesn't she look cute? Of course she does, because everyone who wears a size 4 looks cute, don't they?

A few problems I encountered... I don't like having my skirt be as wide as it is long. Blerg. And the denim, while lightweight, was not really drapey enough for the flippy skirt but I made it anyway. Even the cute, little tabs. But I didn't put the buttons on them because I decided for now a shirt would not be tucked in. I did use a lighter weight cotton for the pocket facings and for the yoke facing so those areas weren't too bulky.

Good sewer that I am, it's well made, and I'm even wearing it today in spite of my dislike for it, but there you go. Take a look at the side view:
It kind of tucks in around the thighs while I'm wearing it, just like on the dress form. It's not as noticeable if my shirt is out. Another problem with it is that it is actually too big in the waist, but I was so paranoid about it being too tight that I overestimated, even when I did the pin fitting. Blerg, again.

I've started a new walking campaign, to combat those pesky body image problems, and I'm going to try again. I bought some even lighter weight denim at Hancocks, and I plan to just make an a-line skirt with an elastic waistband. No pattern necessary.

Hopefully, I'll have happier news to report after that skirt is done!

Sunday, July 11, 2010

Wednesday, July 7, 2010

Simplicity 2362 -- Order in Sewing

Or How to Put in an Invisible Zipper when the Instructions Use a Regular Zipper

 Ok, I didn't really make that face when I put in the zipper, but if you are relatively new to sewing and have jumped on the invisible zipper bandwagon, then following the printed instructions will be darn near impossible, and I'm here to give you some order to the proceedings. (That didn't have anything to do with the face I was making. Oh, well.)

The main difference is that is it is easiest to put in an invisible zipper (IZ) first when your dress, skirt, outfit, whatever, is still two dimensional... or flat. With the regular zipper, most patterns instruct you to insert it at the end of the sewing process.

So, with that introduction, I'm going to outline the order that I put this sundress together, using an IZ. (Cross your fingers I don't forget a step.)

  1. Pleat back skirt pieces, and attach back yoke pieces to the skirt pieces.
  2. Insert IZ. Set the back aside.
  3. Make the front yoke piece.
  4. Make the front skirt piece with the pockets . In the Simplicity instructions, this is steps 24 to 29. (Don't you love the pockets on this pattern!)
  5. Attach the completed front yoke piece to the completed front skirt piece. Set aside.
  6. Make the shoulder straps (steps 9-11). Baste the shoulder straps to the back yoke where indicated (or where you like them, like I did).
  7. (optional) Pin fit the dress, by pinning the side seams, and the shoulder straps to the front. It's easy to try on and fit here, because you already have the zipper inserted. Yay! It fits!
  8. Sew the side seams, baste the shoulder straps to the front where you like them, and set aside. Don't twist those straps though or you'll be sad.
  9. Make the yoke lining as indicated, and insert it (steps 17-23, 32). The main difference here is that you are working with the entire dress in the way, but it really isn't that cumbersome. Also, I pinned and stitched the back center of the lining directly to the IZ so that I wouldn't have to hand stitch that part down.
 
And, Step #10... Hem!

For the record, I didn't eliminate any steps, but just reordered them. And did you see the bow at the top of the zipper? Well, I didn't like the way the IZ looked as it wasn't quite to the top edge, but not enough room for a hook, so I made a simple bow, and safety pinned it (yes, you read right) to the yoke, strategically covering the top of the zipper.


Also, even though this is getting kind of long, a couple of other notes...
  • I should have made a muslin of at least the yoke and straps, because I hated the way they felt and fit. The straps were simply too wide for my shoulders, so I narrowed them, and attached them more toward the center in the back. It involved lots of ripping out and resewing, as I decided to do this after the lining was attached. I didn't rip it off completely though. Picture of the shoulder strap here.
  • I made the pockets bigger where you put your hand in. They were way too skimpy. I also used lining fabric for the pocket facing to avoid that large print from showing through. Pictures here and here and one more here.
 In looking at the pictures, I'm wondering if the style and fabric make me look too young. Wait! That would be a good thing!

Monday, July 5, 2010

Butterick 5495 -- Cotton Jersey Knit top

I'm not reviewing my recent creations in order of being created, but this is the knit top that I mentioned in my last post. The fabric is a fun cotton jersey that I bought from Gorgeous Fabrics. (By the way, for those interested, that's where I got the green, black and white knit for my recently reviewed dress.)


Again, my experience with knits is limited, and this one is so lightweight and soft, it was like sewing on kleenex. However, that makes it sound like it was difficult, and it really wasn't. As for the pattern, I did do a little tinkering. Changes I made:
  • I chose the short version, and still took 3" off the length as I wanted more of a top, less of a tunic.
  • I traced the pieces (there are only 4), and started with a 12 at the shoulders, tapering out to the 14 as I worked my way past the bust to the waist area. The back piece is incredibly narrow, and completely utunic-like, in my opinion. Once past the bust area, I pretty much just took at the nipped in at the waist feature, straightening out the side seams. In the picture, you can see on my dress form it is still a bit tight, and that's how it fits on me.

  • The V. Holding up the pattern tissue, it didn't seem that low cut. Um, well, when I tried it on, whoa! I ended up whipping together almost 3 inches, and still wore a black cami underneath.

 Before I started, I read the other reviews on Pattern Review, and several mentioned the facings, but I didn't really mind how they were designed. You can see that I serged the edge, and hand basted it to hold it in place during the construction stages. This cotton jersey made a lovely crease, so perhaps that helped.


I'm not sure if you can tell in the close up, but there is a little loop that draws together the front, forming the gathers. It is inserted through teeny holes, and I didn't have any need to do any extra stitching to close up the holes. It fit in quite snugly.

All in all, I love this fabric, and will probably wear this quite a bit, and the gathers are pretty flattering over my currently roundish tummy.

Sunday, July 4, 2010

Happy Birthday America!

photo courtesy PDPhoto.org
On a sewing note, yes! I have been sewing! Just not writing about it here, but that will happen this week. I promise. Things I've recently made include a denim skirt, a knit top, and a sundress for a party tonight. Success-wise, I was 2 for 3, and the question is "why is it so hard for me to get skirts to fit right?" Darned if I know, but will explore that problem and my continuing sewing with knits issues.

Please stay safe today if you are out celebrating Independence Day!

LinkWithin

Related Posts with Thumbnails