Sunday, December 16, 2012

Caramels


Mmmm, yummy!

I had the weekend off from work and of course I have a long "to do" list of holiday-oriented things that should be done. I managed to cross of quite a few, so I'll label this weekend... productive.

One ambitious project was candy-making. I've never really attempted much candy-making, but I was seduced by pictures on pinterest, and chose 3 types that seemed totally doable. MinimIal ingredients, and I had all the tools necessary, including the candy thermometer. I've only taken a picture of the 200 individually wrapped in handcut wax paper caramels, but I also made a 3-layer peppermint bark, and English toffee.

So, I'll do a quick review and link.

The soft caramels (which, for the record, I pronounce "car-mel", you?). Easy. I followed the instructions to the letter. Turned out great! The only downside... those suckers take a long time to wrap. And you get sticky. But definitely yummy. On a scale from 1 to 10, I'd give them an 8 for taste.

Next up was a 3 layer peppermint bark.  Even easier to make. Melt some chocolate. Spread. Cool. Repeat 2 more times. Ok, there were a few more steps, but you get the drift. Downside: time waiting in between steps. My plan was to string the lights on the tree. Which would have been accomplished except the tree started seriously leaning and that project was abandoned. Taste rating: 10!

Finally, the English toffee. I had pinned a couple of recipes, but ended up using the recipe inside the Ghirardelli chocolate bar wrapper. Of course, I had used the chocolate in the peppermint bark, so I melted the chocolate chips that were called for in one of the other recipes. No downside to this at all except maybe it takes longer than you might except to reach 305 deg F. Taste rating: 15! It's that good. And sorry folks that might except me to gift this... nope. I'm keeping it for the family.

So. much. sugar.

Wednesday, December 5, 2012

Kitchen Fabric Art

A little more sewing has occurred, but, yep, it's still kitchen related. Perhaps this year should just be called the year of blogging about the kitchen, with a teeny bit of sewing thrown in. Or not.

Anyway, this was a project that I also started (and mostly completed this summer). A quilted table runner. My mom and I had purchased a kit at the Houston quilt show when we attended way back in 2009. Mom made hers earlier this year, and that inspired me to get on the ball, and get mine made, too.

The pattern is Table Art by Calico Carriage Quilt Designs, and is still available. The kit at the quilt show, had some fabulous fabric, that has kind of an industrial look, which completely goes with our kitchen design.
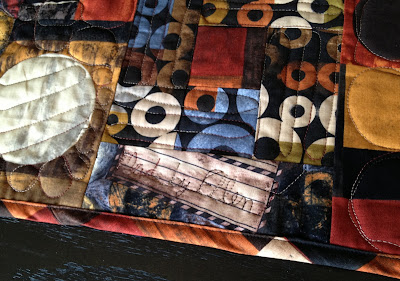
A close up:
The quilting was free motion, and pretty random at that. Different sections got different designs, but mostly it was straight lines on the circles, outlining the big circles, and the fabrics with "pictures" also were outlined. I used a variegated thread on the top. My bobbin thread was initially a quilting thread (no Ellen... don't use that!!!... wait... where were you when I quilted almost 2/3 of the thing that way) Oh, I'm back. Quilting thread in the bobbin completely messed up the tension and I just couldn't get it to look right. Thankfully, the part that looks the worst is the back which is resting against the table, and I can completely live with that. So much that I even "signed" it...

Monday, November 12, 2012

Window Seat... Finished

I had grand plans for showing you step-by-step how I made this window seat, and those all flew out the window when I got the full-time job in September. I'm settling in to the job, but still exhausted, so the best I can do is let you know that it is finally finished. Just in time for the holidays!!


The dogs both love it, but only Danny really likes to have his picture taken. The blue bolster bit is already covered with dog fur. The good news is that it is washable. The coppery front cushion is faux leather (aka vinyl) and just be wiped off should doggy paw prints (or worse) appear.

While I think it does look great (applause! applause!) I feel I should confess that there is some half-assed shenanigans going on in the parts that you can't see. If I paid someone to make it, I would be unhappy. As it is, I'm thrilled! Long live imperfection!!

Now I must head off to my destiny of ensuring that bridal parties around the southeast (and indeed, the entire country) look their very best!

Thursday, November 8, 2012

Road Trip: New Orleans, Part II

So, recapping the New Orleans trip... Thursday, driving to NOLA. Friday, helping build a Habitat house. Saturday, gutting a house.

Gutting? It's pretty much as bad as it sounds, but has to be done, and it can make such a difference to a family that wants to rebuild. The houses that were being gutted were flooded up to the rooflines and higher during Hurricane Isaac which happened just 2 months ago.

Our volunteer group was still using the organization of RHINO, Rebuilding Hope in New Orleans, this time partnered with the St. Bernard Project. We met with our group at the Braithwaite Auditorium, and then headed to the house. The owners were there, and planned to rebuild. According to our SBP representative, Alex, this was an "easy" one. The fridge and food had been removed, and, well, actually, all the other belongings had too (clothes, furniture, etc). All except one water-logged sofa. There was still running water in the house (running water in the pipes, I mean), and the owner had cleaned the bathroom as best she could, so we had indoor facilities. That meant a lot. Trust me.

Our job. Simple. Take a crowbar/sledge hammer to the drywall. Pull it down. Pull out the moldy insulation. Don't scream when you see cockroaches. Shovel the debris into a wheelbarrow. Dump into a trailer which is pulled to the end of the driveway where it was deposited for pick up later.
  

Cute frog clinging to the wall near the ceiling. We saw lots of these and tried to rescue them and toss them outside. They were hard to catch though.
Extended view of the frog. You can see that we tried to leave him a little wall to cling too, if only temporarily.
Blurry, pile o'debris

Our "facilities" sans walls. Yep, as we tore down the walls, we quickly realized that our privacy would kinda be compromised. Of course, we girls can be creative, so we made our own kind of privacy.

The owners were so grateful to have this job done, and they can get on with rebuilding.

Wednesday, November 7, 2012

Road Trip: New Orleans, Part I

Before I started my wonderful, but time-consuming, never able to do anything else but work and recover, full-time job, I had decided to go with husband Roland on one of our church's mission trips. Roland had actually planned this one, and one of his criteria for choosing the location of the trip was comfortable accommodations. Lo and behold, the RHINO outreach ministry out of St. Charles Avenue Presbyterian Church, founded in September 2005, 3 weeks after Hurricane Katrina, totally fit the bill.

Last Thursday, we arrived in New Orleans and checked into the Brent House Hotel, where all the volunteers are housed. We were treated to a dinner and NOLA hospitality at a home of 2 of St. Charles Presbyterian's parishioners.

Friday, we headed over to our Habitat for Humanity build that was partnered with RHINO. This house was almost done, but there was still work to be done. My contribution involved painting. First the concrete footings that held up the house, and then interior doors. I actually painted the doors with a couple of other folks from a South Carolina group, and we painted outdoors. In the heat and sun. Which had the advantage of drying the paint quickly.

Anyway, I do have some pictures...


 The house we worked on, a typical shotgun style home. See those curlicue decorative things up in the corners on the porch. I caulked around them! Never caulked before, but yes, it's really easy.


The concrete was poured on Friday which made getting up on the porch kind of challenging, considering the step planks hadn't been installed.
Roland was measuring and cutting the planks for the porch steps. He's the one in the gray tee-shirt. I wanted to document that he had all his fingers both before and after using the power saw.
Our group. Me on the left with super cute and sweaty hair. And those awesome khakis I'm wearing did belong to my son. Guess they're mine now.

So that was Friday, Saturday we did something entirely different. I'm saving that post for part 2.

Wednesday, October 3, 2012

Catching Up

Well, who knew it was going to be such an adjustment to working full-time? My hat is off to all sewing bloggers who hold down a full-time job and manage to also be prolific sewists! I'm exhausted after working 8 hours, and on my days off (which are not the weekend, but mid-week) I'm catching up on everything else but sewing. Like sleep, laundry, grocery shopping, ... you get the idea. Now that Roland is the stay at home spouse, we're in negotiations for a new division of duties, though, so fingers crossed that will all go smoothly. I think with a little hand holding, he'll even figure out what you do in a kitchen. And, truthfully, probably be even better at cooking than I am (which is a low bar, by the way).

With that out of the way, do you remember the saga of my new kitchen window seats? Way back when, the project stalled after I had made their muslin covers. There was fabric to choose, blah, blah, blah. I'm happy to report that I have one of them covered! And have started on the other, with kind of a plan to make 3 cushions into one. We'll see if it works. And the fabric? Nothing that I showed you at all. You see, with the window seat being primarily a dog perch, we decided on a faux leather from fabric.com that can just be wiped off. Voila!


Excuse the bad photo. It's kind of a coppery color, and really looks good with the painting on the wall (which you can't see). We're still waiting for the table to be delivered, so, well, that's all I have to say about that.

I've got some black knit from my stash ready to be whipped up into a renfrew, and though I have probably lost my mind, I'm going to attempt to do the Thurlow sew along hosted by Lauren of Lladybird fame. Click on the badge in the sidebar and you'll go right to the details. This will be a good excuse to get a great pair of trousers. I'm sorry to say that they will be ... black. As will a couple skirts I have in the queue. Do not come here for gorgeous prints. Well, at least not at the moment.

Oh, almost forgot! The lovely Denise at the Blue Gardenia featured me recently (well, back in September) in her "sew to dress" feature, along with an adorable McCall's pattern, perfect for my new shop girl persona. Please go take a look if you missed it previously.

I've missed my sewing and blogging friends, and will attempt to post now and then, but trust that I haven't dropped off the face of the earth, but am simply to tired to even type. And if you need a bridesmaid dress or mother of the bride dress and, the horrors, aren't making it yourself (hee hee), drop in and see me at Bridals by Lori in Sandy Springs, Georgia. Yes, it's the bridal salon in Say Yes to the Dress: Atlanta. I'm not on TV, though, so don't get all excited. Should that happen, believe me, I'll let y'all know!!

Also, I'm still reading your blogs... just can't comment as often because sometimes its just a quick read on my phone. Trust me, you all rock at all your projects!!

Sunday, September 16, 2012

Big News

Oh, so many plans to sew. I've traced the Sewaholic Alma blouse. And one of my vintage patterns. And then I get a call Thursday evening. That leads to an interview on Friday afternoon. Which leads to an offer for a job that I'm starting Monday!

Monday!!

That's tomorrow!

You read that right!

The job is in a local bridal salon not 10 minutes from my house, and I will be working in the Mother of the Bride/Bridesmaid/Special Occasion department. I'm really excited!! I've needed something to get me out of the house. As much as I love my Etsy shop (which will continue), and my Etsy online friends, and my blogging friends, I need to talk to live people face to face.

The downside:
You can only wear solid black. I had to do some emergency shopping yesterday, and you are seeing the results of the shopping plus me pulling out every wearable black item in my closet. I've set up this work closet in Laura's room, and now I'll have a work dressing room.

I've also pulled out several pieces of black fabric that I have, and there will be some sewing. I know it's not all that exciting, and of course, when I'm not working, I will probably not wear a stitch of black, so you will see color again. Soon, I promise! At least once my mind and my body get used to the routine.

Do you know that it's been 25 years since I've worked at a full time job? It's going to be a shock!!

Tonight though, we're headed out to a celebratory dinner. And I don't think I'll wear black!

Sunday, September 9, 2012

Happy 25th Birthday to my Baby Girl!

I think that must be a typo! How can she actually be 25?!!


Happy Birthday, Laura!


Fall 2007

June 5, 2010

July 6, 2012


And, for your listening pleasure, the #1 song September 9, 1987:

Friday, September 7, 2012

Red Dress Revealed -- Vogue 2692

Oops, I bet you didn't even know I was making a red dress! Well, I am. Or I did.

This is the pattern I used:
Hmmm, from the 60s, I think. I started this in May, I think and there is so much I've forgotten about the construction, but I do remember that I bought it from Denise, Miss Blue Gardenia herself!

Mine is red ponte knit, deliciously thick, but part of the reason I put it aside. It's actually quite warm, which makes it a great spring or fall dress, but definitely not a summer in Atlanta dress. And I made it with short sleeves. I think I used the long sleeve pattern, and used that as a guide for a short sleeve. Wanna see?

Necklace: Earlybird Creations
Bracelets: Amy Fine Design 
I did make a muslin, but don't remember much about the  alterations. Of course widening at the waist. The original size is a Bust 36, so I didn't have to do anything there. For some inexplicable reason, I lengthened the bodice, and now it is too long. Not really sure what I was smoking when I did that! I'm also certain that I shortened it. Oddly, even the 60s "mini" skirts are often too long for me. Was everyone super tall back then?

I made the recommended bound buttonholes. This is a Paris Original after all!
I am not the huge bound buttonhole fan that many other sewing bloggers are. For one, you make them first. For a skirt such as this, with somewhat unusual placement, if I were doing regular buttonholes I would have spaced them a little differently, or just made 3. My solution to that odd buttonhole placed so closely to the hem edge is to just leave it unbuttoned. There is a button under there, though.

I made the belt, but it is narrower than the pattern simply because I used a vintage buckle I already had in the stash and it was smaller. It makes the width about 1" which is good for me anyway. I also kind of made up my own belt making technique, using the thick black cotton pique from my Mad Men dress. On the back of the belt, I used a 7/8" wide satin ribbon, and even though the belt itself is curved I didn't have any problems with it.

 Yesterday, I pulled the dress off my dress form to finish it. Turned out all I had to do was finish the back of the buttonholes, sew on the buttons and hand sew the hem (which was already pinned up). Really? Yippee!!

Friday, August 31, 2012

Window Seat, Phase 1 Finished

I've officially lost track of how many window seat posts I've subjected y'all too, and I do apologize. This has been kind of a boring summer, sewing-wise.

Things are coming together in the kitchen, though, and we've made decisions regarding the rug, chairs and table (at least we had last night).

And the covering of the window seat foam padding with muslin is complete. The poor "texturized" foam got itself wrapped in some super thin quilt batting that I think I paid $1 for at a yard sale because I felt sorry for the poor woman that had been standing there all alone most of the morning. It was perfect. I'm not sure if you can tell in the picture, but I did not stitch the openings closed. Frankly, it just won't matter, and I'm kind of over it.

The big rectangle metal thing at the top of the picture is the modern, industrial-type light fixture under which the table will be. Once we order it.

And just think... once the fabric is ordered/arrives I get to sew it up all over again.

In the meantime, it's past time for me to finish a dress that I started in May. Seriously, it's not like it's a wadder or an official UFO. I just needed to try it on to check the hem, and it was hot outside, and there were always people in my house, and, and, and...

Wednesday, August 29, 2012

A New Project

A new project, but not a sewing project. Well, sewing will be involved, but mostly indirectly. Well, not exactly indirectly, but...

OK, that's getting too confusing. I'm starting a new blog. I'm keeping this one going too, but the new one is going to be less "all about sewing" and more "all about me". Yeah, that sounds a bit, oh, what's the word, self-indulgent. But that's the truth.

Let's review. Blog "A" (It's a Sewing Life) will continue to be active, and will continue to awe and amaze you with awesome and amazing sewing projects. Wait. What window seat covers? There will also be more actual sewing with the vintage patterns I'm selling over there on etsy. Gratuitous plug for Etsy shop. I've joined Sew Weekly, and will attempt to connect at least some of the weekly challenges with vintage patterns. I mean, what's the point of having hundreds of amazing (and ok, some less than amazing) vintage patterns if you don't actually use a few before selling them. Exactly.

Blog "B" (Project:Uninvisible) will definitely be more personal in that I'll be exploring ways to change my family role as angst and anxiety ridden "lost child" that I have brought with me from my original family to my current family. It seems that the empty nest has left me a bit more unmoored than is really comfortable, and if I am going to really explore my identity and role presently and going forward, I'm going to have to put it all out there. Warning: I'm going to try really, really, really hard not to censor myself, and I'll be putting some opinions out there that I suspect even my closest friends and family members (immediate family excluded) don't even know about.

So why am I bringing this up here, in this nice family friendly little sewing blog? Well, if I'm going to put myself out there and become truly "visible", then I'm going to need some friends, and I'm inviting y'all to drop by and see what's going on in this little ol' head of mine. Sort of a worldwide group therapy, if you will.

It's definitely a Work in Progress, true of blogs as well as sewing projects and Life! The first post is up, so if you want to follow along, you'll be with me from the start.

How about some art? Well, if you want to see it, you'll have to click on over to the new blog.

Friday, August 24, 2012

1970s Awesomeness?

Wow, where did the week go? So, my window seat still sort of looks like it did on Monday, though I have starting sewing its muslin. In the meantime, I go upstairs and unload boxes into the kitchen, then I go downstairs and work on my Etsy shop. And then sometimes, I just lay on the couch in a state of overwhelm-i-ness. I know this shouldn't be that hard, but it seems to be. Maybe I should decide to host a dinner party over Labor Day and that would give me some sort of motivation to get it all done.

Or not.

Yeah, what does all that have to do with the title of this post? Well. Sometimes I come across patterns for my shop that trigger memories. Sometimes they're patterns I've actually made before, and sometimes they are just patterns for types of clothing that I actually might have worn.

So, back when I was in junior high school (yes, this was what it was called before it was called middle school) in Dallas, Texas, in 9th grade (you didn't go to high school until 10th grade), I was on the drill team. Not the kind of drill team that flipped rifles around, but the kind that danced on the football field during halftime. The drill teams in Texas (maybe other states) in the 60s, 70s and maybe the 80s and 90s were patterned after the Kilgore Rangerettes (clicking on "source" will give you some more info about them).

I was in 9th grade in 1974 and there was a drill team for both the junior highs and high schools. My junior high was T.C. Marsh and we were the Matadors. And the drill team was the Cuadrilla. I just did a Spanish-English translation and it means group or gang. Hmmm, what a clever name. For the record, I was on drill team in high school too, but I'll save that story because this is getting kind of wordy, and you are probably wondering about what the heck pattern I could possibly be talking about.

You can buy it here!
Have you ever heard of a hop-in? Views 3 and 4 are sized for wovens, so our moms might have used this pattern, but without the collar, sleeves and pockets, and maybe a modest scoop neck. We voluntarily wore these outfits (without a skirt or shorts) to practice in during our early morning practices. Our colors were gold and white, so we made one side gold and the other white in an awesomely comfortable broadcloth type fabric, a la:
CUTE! Right? So we wore these to practice in before school, and if you were super cool and had long enough hair, you pulled your hair into a ponytail on TOP of your head, and then divided it into 2 or 3 sections and wound those sections around orange juice cans. Anybody? Did anybody else do this? My hair was too short, and I was never one of the super cool, so I had to settle for just wearing my hop-in. (I don't need to explain why we called them hop-ins, do I?)

Since I have already stunned you with the awesomeness, how about a picture of me in my performance uniform? A stunningly hot satin type outfit. Remember, this was in Texas. In September and October.
Oh, and do you see those little pom-poms on the hats? They would get tangled with the hat of the girl sitting next to you, or even worse, when we were marching in a line and got too close. Not pretty.

Doesn't that picture look instagram-y? Nope. Authentic 1970s!

Have a great weekend!

Monday, August 20, 2012

Sunday, August 19, 2012

Go Big or Go Home

Well, I have been a temporarily MIA blogger, but it hasn't really been that long. There just is so much swirling around in my head lately, that I seemingly have been incapable of putting words together in a line. I'll even let you in on some of the swirliness soon, but in little bits as they come to the surface in a reportable way.

One thing that I CAN share though, is the kitchen! It's done!! And while it was roughly 4 times more expensive than we had originally budgeted, we decided that, well, putting pretty over a crappy kitchen design just did not seem very appealing. So, we "went big". The finishing touches (i.e., kitchen table, chairs, rug) are still at their respective stores, waiting to be found and purchased, but the intrusive, strange people constantly in my house part, is done. And I'm ready to share! Roland has even done a video of stills, and set it to music, and so, sit back... and enjoy...


Monday, August 6, 2012

Window Seat, Part 4

Let's see, where did I leave off? Oh, yes, fabric choice. No choices have been made yet. That's how we roll here. Well, that's not entirely true. We've decided that probably, for the rug under the table, we'll just get a solid color remnant and have it bound. I think Georgia is the carpet capital of the USA and there are lots of places with remnants (or so I assume). We have purchased from one place in particular, so we just need to get our little selves down there. Rug? Well, the rug needs to go with the window seat.

In the meantime, there is work to be done anyway. If you've ever worked with this kind of foam, you know it is very grabby, so putting the covers on can be frustrating at best. To solve that, I'm making a muslin cover for each cushion that will more or less be permanent. The outer decorative cover will have a zipper so that it can be removed for washing. The muslin cover will not. It also won't be all that pretty. But it is easy to make.

I abandoned the newpaper "patterns" and just took each actual cushion to use as a template of sorts. I traced around the perimeter, added a 1/2" seam allowance and cut it out. Oh, doubled of course, since there are 2 sides.
Rinse and repeat, 3 more times for the 3 additional cushions. There are also "sides" which are 4" wide. I added up each perimeter length, and then cut strips that are 5" wide. Well, mostly I ripped, though I did cut random lengths from the scraps produced from cutting out the tops and bottoms. And that's it.

In other kitchen news, I'm still getting the odd (and by odd, I mean random) comment about the single/double sink poll, and I suppose I should let you in on the decision.
We went double. With a low saddle (which is the technical term for the middle divider). That's our actual sink. It's made from sil-granite which is 90% granite dust and 10% some kind of polymer. And that's our actual granite countertop. The faucet, etc has been installed, but I don't have a picture of that yet, because they quickly wrapped it in plastic for protection. We're to the painting stage now, so it won't be long now!!

Wednesday, August 1, 2012

How Do You Pinterest?

Is Pinterest even a verb? Anyway, I'm curious about your pinterest habits, and have concocted a quick poll about pinterest. No prizes, I'm just curious. I'll tell you how I Pinterest in another post.


Answer all that apply! And feel free to elaborate in the comments.


Tuesday, July 31, 2012

Window Seat, Part 3

Let's talk fabric, shall we? There are a bazillion fabric sources for home dec fabric, both online, and, here in Atlanta, in real actual stores. I guess people change their curtains a lot here. Who knows. I've probably been to the majority of them, since our house came with, well, no curtains at all. Sure, blinds galore... no privacy was compromised...but no curtains, drapes, valances, well, you get the picture. So I made some. Lots in fact. For almost every room in our house, until I completely burned out.


Wait. Aren't we talking about the window seat fabric? So, in light of all the sources, and the fact that I just didn't have the energy to schlep around in the heat, and also, I didn't feel like clicking and comparing, I turned to my favorite online source, fabric.com. One of the great things about this place, is that you can purchase swatches, and it was totally worth it to pay 75 cents to $1.75 for 16 swatches. Oh, and they're a generous 8" x 8"! I'm not going to show you all 16, but here's what we've narrowed it down to.


We're thinking of using 2 different fabrics, one for the center section, and a solid that will frame that section and go up against the window. Set #1:

Sophisticated and pretty.


Set #2:


Abstract and fun. That last fabric would end up as a throw pillow. Also, the solid gray would work here to.


Not sure if you can see the labels in the pictures, but all of them, except the black with circles, are recommended to be dry cleaned. Pshaw! We have 2 dogs, and they will undoubtedly be lounging on the window seat, gazing out the window and their nemesis, the squirrel. These covers will need to be washed!


Never fear though. Of course I threw them all into the washing machine and gave them a spin. And they all came out looking great! Especially the solid ones. No shrinkage. The swatch with the flowers frayed quite a bit, but a serger will take care of that.


We're still debating, so feel free to chime in with the set you like the best with a nonbinding vote. Once we choose, I'll need to order both the fabric and some upholstery zippers, but there's another important step that I'll tell you about in a day or 2.


Stay tuned!

Sunday, July 29, 2012

Window Seat, Part II

This window seat is a multi-step project, and I've decided to show you step by step what I'm doing, rather than just a big reveal. There is even a video today for your enjoyment. Not sure how much information I'm actually imparting, but you can see what I sound like.


Anyway, recapping, so far I've bought the foam and made the pattern. The next thing to do is to cut the foam into the shapes that I need. Remember that my window seat is fitting into the bay window and that's giving me fits  the opportunity to make 4 cushions to fit onto the platform, kind of like a puzzle. Here are 2 of the 4 positioned onto their designated foam piece.
By the way, I'm doing this project in the kitchen reno area, basically to keep as much dog hair away from the foam as possible. It's like a magnet for the fur!
I traced around each pattern piece. Note that I also marked the perpendicular line on the side to help guide the knife. OK. Are you ready? I've made a video! This has taken me literally hours to make and then figure out how to add the little title slides at the beginning and the end (which really just flash the info at you). Clearly, I have room for improvement for my movie making skills.


Whew! The electric knife really does make the project so much easier. After I finished cutting all 4 pieces, I did have to make some adjustments to make it fit just so onto the window seat.


Next up: Fabric selection.

Thursday, July 26, 2012

Window Seat, Part I

Sewing is going to happen again, but I've been a little overwhelmed this summer with a number of things and probably #1 of those things is the kitchen renovation. It was started in mid-May, and here we are, almost to August, and it's still not finished. Cabinets, countertops and the sink faucet are in, as well as the new floor (which happened before all those other things).


One of the fun details we decided to add was a window seat for the bay window. It has turned out to be kind of an odd shape because of the depth of the window and the width. We wanted it to be useful for seating at the table, and since you need to be closer to the table while you eat, it's bumped out a bit in the middle.


I'm going to make the window seat, but it's definitely a bit of a challenge due to the shape. In spite of the odd shape, I do want to say that home dec sewing is some of the easiest you can do, perfect for beginning sewists. Basically, if you can sew a straight seam, and do a little math, you can decorate your home with better fabrics and at a considerable cost savings.


Oh, and there is no fitting (well, on a body anyway)!


Let's get started!


Step 1 is decide on the thickness of the cushion. We're going with 4" thick which gives it a nice expensive and custom look. I've purchased upholstery foam at Joann's before, but with the odd widths, I hit the interwebs, and ultimately found the best deal at OnlineFabricStore.net. Have y'all heard of that shop? It's new to me, but it seems to be chock full of home dec supplies.


I ordered 2 pieces of foam: 24" x 108" and 30" x 54". There's a method to this madness, but look how it arrived:
Quite compressed! That's just one piece, as I had the epiphany to record this process after the first one was unwrapped. Annndddd unwrapped:
These are going to need to be cut into shapes. Yes, shapes. Apparently the easiest way to do the cutting is with an electric knife, so that was ordered and has also arrived. I'm going to start with covering the cushions with muslin because it will make the fashion fabric slide on much easier. More on that in another post. Let's not get ahead of ourselves!


Remember I mentioned odd shape. I need to make a pattern, so armed with newspaper and tape, that's what I did today.
There will be 4 cushions total. The center front will be pointed on both ends and 24" wide. If you can see the rulers in the picture, that's kind of the outline. There will be a rectangular cushion center back against the center window. Then in front of each smaller window on the side will be a cushion that is kind of an odd shape.


That's enough for today. Mr. Sewing Life is not quite sold on the shape of the 4 cushions, so he'll be signing off on this first. Really, there's not a lot of choice.


Next up: the cutting of the foam. Maybe maybe I'll try to get a video of that happening.

Wednesday, July 18, 2012

Fun With Mod Podge, Part I

Why did I not know about this stuff before? Well, I knew about it, but I didn't KNOW how great it could be.


Let's back up though. Are you on Pinterest? Do you pin and pin, or repin and repin, never to look at your boards again? Do you say, "oooh, how cool" or "I'm going to make that tomorrow" and then never do? Well, I've got a DIY board, and I'm going to attempt to actually make some of the things that I pin. Are you ready for this? It may or may not be sewing, but it's sure to be crafty!


OK, another thing though. Let's see a show of hands for everyone who calls it Modge Podge.


What did I make, you ask? Something for the sewing studio, and fabric was involved. Initially discovered on the interwebs by my real life friend, Elizabeth, decoupage light switch covers seemed like a wonderful idea, and once I saw the tutorial on the Jones Design Company website, I was so in!


She (Emily) suggests scrapbook paper, book pages, wrapping paper, or even... fabric! I was in luck because, well, I have a ton of fabric scraps, and a dislike for the boring plastic light switch covers. So, here we go...


In the tutorial, she paints on the Mod Podge and then cuts the corners. That's a lot of stickiness, so I did the cutting pre-podge. By the way, the whole thing is about 1/2" bigger than the switchplate.
Here you go... all the tools, plus added stuff from my table. Podge painted on plate and fabric.
Fabric on, necessary parts cut out. Check out the original tutorial for more specific steps. Then more podge painted over the fabric to seal the whole thing.

Not a perfect match with the wall, but way better than the old, well...not white... beige?... plastic switch plate. And hey! Fabric covers for the switchplates in the sewing studio (which you still haven't really seen... my apologies).


I'm sold! It took more time to choose the fabric than to actually do the podging (is that a word?). Well, not counting the drying time, but obviously I could move on to other projects while that was happening.


Go ahead... make something fun that you pinned, and show everyone!

LinkWithin

Related Posts with Thumbnails