I certainly feel like this flower girl dress project has been hopelessly drawn out, but I really do hope to finish them today. But before I end up with an incredibly long final post, I wanted to share a couple of more thoughts on the construction.
I decided to make the skirt portion first, as you all know from my ramblings on the tiers, mostly because I was waiting on the batiste for the lining I had ordered online to arrive. In the pattern instructions, they have you construct the bodice first and then set aside. With that out of the way, back to the skirt.
When you are making tiers on anything, you want them to be even, and that starts with the stitching line and where you measure it from. You start with the second tier down, and I measured from the raw edge of the waistband to the raw edge of the tier to make sure it was straight, using the placement markings as my initial guideline. For the 3rd tier, I measured from the stitching line of the 2nd one, to the raw edge, as you can see in the picture.
The top of the pic is the hem of the stay or underskirt to which you are attaching the tiers or ruffles. I have already hemmed it so I didn't have all those ruffles floating about. I clipped the seam allowance as necessary as you can see, which brings me to my next tip. Don't get clip happy! For one of the tiers, I decided to pre-clip before I started pinning. The result was that I had too many clips and it stretched out too far, resulting in my needing to do a lot of pinning and squooshing it all back together to avoid tucks and puckers.
You can see all my pins here, and it simply resulted in making an already slow sewing process even slower, as I pulled each pin before I got to it. Luckily, I only ended up with one tiny pucker, which, ssshhh, I just left in. Here's a preview of how the tiers are starting to look:
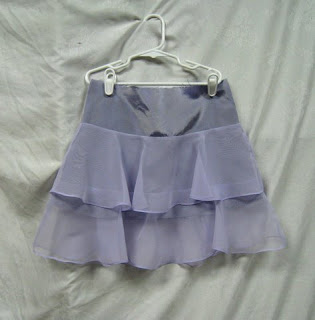
Do you see the sheerness below the bottom tier? I've already decided that I'm going to need to add a row of taffeta behind it, as I think the underskirt/stay is simply too short. I believe the original pattern is designed for the ruffles to be made of a non-sheer fabric that matches the bodice, but we veered away from that. Which leads me to my next point about the bodice. The pattern has you use the same fabric as the stay (here, the taffeta) as the lining for the bodice. For my design that would result in some pretty ugly seam allowances showing through the sheer organza. I basted the organza to the taffeta and treated it as a single fabric and used the cotton batiste as the lining which I think will be far more comfortable on what could be a hot June day. I hand basted, to avoid major slippage and stretching, seen here.

It's kind of hard to see, but the right side shows the organza pinned to the taffeta, and the left side, the basting. My next post should hopefully detail my final technique and construction challenges, and then the reveal. I'm seeing the girls on Saturday, so I'm right on track with this project (laughing nervously about all the other projects yet to be started).


beautiful hem!!! I've been sewing for a long time and i still think rolled hems are the hardest!! yours looks beautiful!
ReplyDeleteThese dresses are coming along beautifully!!! You are doing such a great job with this difficult fabric!
ReplyDeleteLooking good!!
ReplyDeleteThanks for your posts on this dress. I am working on a dress for my eight year old. I love your fabric choices. The type of fabric gives me great guidance. The dresses are beautiful! Great work!
ReplyDeleteI am a little confused on pattern pieces 7 & 8 for size 5. It looks like the tiers are attached to lining instead of material of bodice. Is this true?
ReplyDelete