Showing posts with label Cake Patterns. Show all posts

Tuesday, July 2, 2013

Tiramisu #2, the Amex Dress

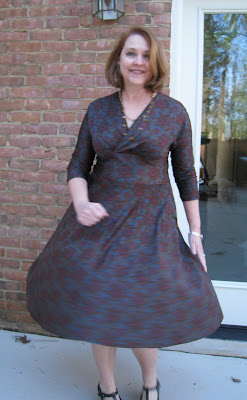
I've finished my 2nd Tiramisu knit dress, and I'm calling it the Amex dress, not because it was super expensive, but because the fabric reminds me of the green American Express card, and I won't want to leave home without it.


But when it was initially finished, it should have stayed home. It didn't, and when I wore it the first time, I was actually pretty mortified that it looked as horrible as it did.

Exhibit A, Tiramisu 2.0:
It doesn't look that bad on the dress form, although you can see the incredibly drooping hem at center front (and yes, it does that at the center back as well). You also can't see well that I added an approximately 1-1/2" band at the hem because I wanted it a little longer, and that from the midriff on down, it hung like a sack.

The bodice is a smidge short, but I can live with that. The midriff was too short (something I did on purpose and totally regret) which drove me crazy in wearing. So... how to fix these issues when I only had a small pile of scraps left over.

Introducing the Tiramisu 2.1:
I happened to have scraps of a Michael Miller interlock knit from the same colorway used in another project. Let's go to the bullet points:

  • I'm living with the too short bodice. Will print out the revised bodice pieces for my next version.
  • Cut off the skirt at the seamline between skirt and bottom of midriff.
  • Added a 2-1/2" wide strip of the "new" fabric to create a belt-like look to the bottom of the midriff. Used a 1/2" seam here.
  • Took in the side seams beginning at the midriff. A bunch. Didn't take photos, but angled down from the midriff-bodice seamline toward the waist approximately 2". That adds up to 4" per side! Maybe a little more.
  • Trying to preserve the pockets, I took extra width out of the center front and center back of the skirt, using a 2-1/2" seam allowance per seam.
  • Reattached the skirt.
  • The pockets looked terrible with the new, more snug fit. Sewed them shut, serged off the pocket bits.
  • Put the dress on the dress form, measured up from the floor to get an even hem, and used my coverstitch to hem.
End result: it's not perfect, as I would have preferred a solid color, and a bit more length both to the bodice and overall, but it is now a dress I will definitely wear. My previous experience with this fabric is that it will continue to shrink, so it probably has a limited shelf life as it is anyway, so I'll just enjoy it while I can.

With a belt:


Wednesday, June 26, 2013

Hummingbirds Complete

The Hummingbird Sew Along is continuing on its steady pace, as I pop in now and then to check up on the goings on, and then make my green top and "orange"* skirt on my own. *the "orange" refers to the style of skirt on the pattern, a la "view B", and obvs not the actual color of skirt that I made.

Here ya go:

The top is super easy to make. Except when you choose a lovely, but soft and tissue-like jersey that was like sewing with kleenex. You can't see it in the picture, but my top stitching around the neck and sleeve bindings is terrible. I used my coverstitch machine, which I clearly need to practice with way more.

I hemmed the peplum, using my regular machine, replacing the regular needle plate with a straight stitch needle plate which helped immensely!

For the skirt, I had originally planned to use some blue twill from my stash. As I just washed it today, that obviously didn't happen. What did happen was that I was perusing my closet, came upon a dress that I made 2 years ago, but rarely wear because I hate the bodice. But I love the fabric, the floral border print you see above.

The dress:
The full skirt provided an ample amount of fabric, but I did need to cut upper front side piece from some saved scraps. Bonus... it was already hemmed!

And so this happened:
(I tucked the top in, so that you can see the skirt better.) I did fall smack in between the 40 and the 45, so I went, as advised, with the 45. When I did the try on, first pinning, then basting, I ended up with an 1-1/4" seam allowance (about 1-1/2" at the waist. I'll adjust my pattern pieces accordingly, keeping in mind that my twill has no stretch, and my hopefully soon to acquire black ponte knit might have a little more.

Oh, and I think I would like just a smidge more length when I make this version.

Monday, May 27, 2013

New Pavlova Skirt & Renfrew #5

It's a holiday weekend here in the US....wishing everyone a thoughtful Memorial Day here. I have the day off, and with family scattered far and wide today, it's me and the dogs. I briefly considered shopping, but decided to play the anxious recluse instead. I do suffer from time to time a bit of free floating anxiety, mostly as a result of things beyond my control, and there are several facets of my life right now that fit that description.

Anyway, enough with the soul baring... a few weeks ago I made Pavlova circle skirt #2 from some wonderful cotton shirting from Gorgeous Fabrics. Yesterday, I finished my 5th Renfrew t-shirt, this time making it sleeveless with a modified cowl collar. The fabric is a modal knit from fabrics.com, which was like sewing on kleenex, and just about as sheer. I've got a white cami underneath, and see this top more as a winter layering option. We'll see.
The only changes made to this version of the skirt were to make the waist slightly smaller, and the length a wee bit longer. Oh, I did make the belt, too... for another dress. 

And the dog... he would not leave me alone, and was in every picture, mostly trying to lick me in the face. And my attempts at the spinning of the circle skirt pic... impossible because he apparently thought it was some kind of game wherein he was required to jump on me. Good thing he's cute!

Monday, May 20, 2013

Last Mini Me Made Vacation Day

But not the last post about it. I definitely have ways to drag this thing out. For instance, the whole adding links thing. Edit: I've, with a little help, have attempted a few links. Fingers crossed.
But more than that, the last two days have debuted some new stuff.
Let's start with yesterday (Saturday). Side note...sometimes the weather does not turn out to be what you're expecting when you pack. It turned cool and rainy, and I really wished I had packed a pair of jeans. I didn't, so there was some layering and borrowing involved.
Top is a brand new Sewaholic Alma made on a white with red polka dot quilting cotton. In spite of what appears to be pulling across the bust, I love the fit. The skirt is a refashioned Colette Crepe. Black cardigan for warmth, and raincoat draped over my arm, Laura's (though it used to be mine).
We're visiting the Udvar-Hazy Air and Space Museum.
Today (Sunday) was the main graduation for George Washington University.
Lovely weather.
This is the dress/jacket that I made to wear. Covered up with a stunning green raincoat. Shoes you haven't seen before... More on those another post. Well, frankly more on the whole outfit, complete with better photos.
Walking the grand puppies. Post graduation meant another outfit change. Me wearing my pavlova top with a RTW skirt. I wouldn't have chosen this combo if I wasn't out of other options, but I do kind of like it.
Synopsis complete. I'll add pictures to the Flickr group tonight, and work on some of the links in the next couple of days.
Stay tuned, and have a great day!

Wednesday, March 27, 2013

Pavlova Wrap Top, Redeemed, AND...

BANGS!!

You know what... thank you all for all of the votes on the bangs vs. no bangs debate. Bangs won, and really, I really wanted bangs anyway. Plus, it's only hair, right? I can always grow them back out. Check out the awesome red. Huge shout out to Freddie at Jamison Shaw Hairdressers in Atlanta. He is a genius with color!

Oh, yeah. And I made another Pavlova wrap top today. This is one that I'm proud to model. A few notes about this one:

  • Fabric is a rayon jersey from fabric.com. Super soft and thin enough to wrap successfully!
  • I narrowed the neck/collar area by placing the back section that goes on the fold 1/2" over the fold. Did that make sense?
  • I added 1/2" back to each back side to make sure the muffin area was sufficiently covered.
  • I lengthened both the front and back 1-1/2". Could have added even another 1" to the back.
  • IT'S NOT BLACK!
  • The skirt in the picture is the Pavlova circle skirt.
A Marilyn Moment:

The dog shot. What are those pups behind me up to?

Sunday, March 24, 2013

Twirl It, Baby!

What's the best part about a circle skirt? That's the twirling fabulosity, of course!! I finished my Pavlova skirt (position 1) Thursday, just in time to get to work (and wear the skirt). That means it's black, so don't get too excited about this reveal. Before I show you pictures though, how about a few details.


  • Fabric is a black gabardine. A great fabric, nice and drapey, that feels lightweight, but does have some sponge-y thickness (this came into play making the "waistband")
  • I was in a hurry, so the seam edges are serged.
  • Hurrying continued, so the hem is the folded over twice, top stitched per the instructions in the pattern.
  • The waistline stretched, and while it was wearable, kept slipping down during the workday.
  • I fixed the above problem by stitching, at the waistline, a 1-1/4" wide elastic on the inside. I'll be wearing that skirt a lot!!
Now, the pictures... the pocket:

The skirt:

Looking professional (no, I can't wear the jacket at work, except to arrive. C'est la vie.):
The twirling (thanks, Ashley, for the great picture-taking!)

I've got the next Pavlova circle skirt cut out, and it's not black!! Hall.E.Lu.Jah! And I'm giving the wrap top another go, this time in a soft, thin, drapey jersey.

Wednesday, March 20, 2013

Pavlova Wrap Top #1... Finished!

I'm such a sucker for a sewing competition. It takes the sew along to the next level, really, and totally keeps me engaged. I've finished my first wrap top, and I have to admit... I'm a little disappointed. Not with the pattern, or even the sewing, or the fit. Steph warned us... a thicker sweater knit might not be suitable. That's essentially what I used.

It was in a free bundle from FabricMart Fabrics, so I'm not even 100% sure of its contents, but there IS something synthetic in it. The ribs are stiff, and didn't want to cooperate under the needle. But after reading about Steph's crinkle linen version, and how the ties in her woven top didn't stretch, and she tied it in the back, I think maybe MAYBE this one will work.

OK, enough disclaiming. No picture of me in it... just on the dress form (I don't call her anything, but perhaps she does need a name).
 Wrapped and tied in the back. For the record, I made the size 35 straight up (i.e., no alterations at all).
Tied in the back. See the size of that knot? It's a whopper. I swear this fabric didn't feel that thick in a single layer!
Tied in the front. It barely reaches on DF. On me, yeah, reaches even less. And it's really thick in the back (not pictured).

Bottom line... it's going to have to hang out in the magic closet for awhile. Lucky for it, we're approaching hot weather time, and it's more of a spring/fall thickness. Definitely not summer.

And, I'm hoping tomorrow to finish the skirt. No promises on that though.

Tuesday, March 5, 2013

It's the Pavlova, People!!

Um, and Mad Men week 5? I'm sad to say that I'm just not that into the Mad Men Challenge this year. I finished my black skirt, which I'll reveal once I get some photos taken of it, in action. And I love it! But it's not going to be part of the Mad Men Challenge. I do still plan to make a shirt dress, and have some great fabric for it, with muslin (bodice only) made yesterday. More on that when I have a bit more time.

But what am I Super Duper Excited About?!! The Pavlova! Got mine in the mail yesterday... 


You can see that I'm in the pink house! Strawberries, yum! If you're in the pink, let me know... if I'm not already following you, I'll be sure to add you to my reading list.

Ah, the life of the working girl... that's all I have time for this morning, but be sure that there will be lots to talk about in the coming weeks!

Have a great day, y'all!


Friday, February 1, 2013

Tiramisu, the Paisley Edition

Tiramisu #2 is finished, and I'm calling this the Paisley Edition because, well, there are paisleys all over it. Are paisleys a thing? Singular? Plural? Nevermind.

This is a full length dress (as opposed to my original tira #1 which should be called the Peplum Edition). I took the changes I made after finishing #1 and essentially ended up with a size 30 vertically, and a 35 horizontally. Yep, short and wide...that's me. Forget about the cup size... don't even know where that ended up.

And you will notice the sleeves. 3/4 length, which is my favorite length. Basically made by making the underarm seam slightly more dolman-like. I did add the binding for a neat finish, and used only 1/4" seam allowance for the underarm to midriff because it seemed like they would be a smidge tight. They are perfect now. I actually made the piece for the sleeve separate from the bodice, but cut it all in one. Now it will be easy to choose the sleeve length, cut and go.

Oh, and I didn't gather the underbust seam, but made 3 little pleats. It's kinda hard to tell from the pictures, but I really love the end result of the pleating.

I also didn't hem it, which makes me a little twitchy, but I also don't think I want it any shorter. So the pictures... you would not believe the static electricity. Even after rubbing the inside of the skirt and my legs with a dryer sheet. Some spinning:

Wednesday, January 23, 2013

Naughty Knits

So, I'm in the process of making Tiramisu version 2. It will be awesome. It should be done. But I suspect every sewist worth her (or his) salt, has had best laid plans go awry. A snip here, a rip there, a miscut piece. And where the hell did the facings go, right? And you only had 30 minutes and wanted to get to step 12!

Let's back up. Version 2 is going to be a thicker jersey that some of y'all would call beefy. For the record, I had that term. I love a steak any ol' time, but I don't want to wear one. I'm going to go with spongy. Which behaved in a rather unexpected way when I stitched the center front seam of the skirt. With the lightning stitch, which is a bitch to rip out, by the way.


Yep. The edges are supposed to be even. It's the bias. It's the fabric. I even used a walking foot. Ok. Fine. I put it aside to do the back, with a decision to baste first. As I basted, I decided that really a straight stitch would be fine, because I didn't have the movement when it basted. And this seam is just hanging. No real stretch needed, or even wanted really.

So, I just spent 40 minutes ripping that lightning bolt stitch out, and it's ready to re-do tomorrow. Let's see if I can finish (or get closer to finishing) tomorrow morning before work.

Have you ever had a fabric do something unexpected?

Wednesday, January 16, 2013

It's Out of the Oven! Tiramisu -- Done!

That title should probably say, Tiramisu Version 1... done! Yes, I will make more (or at least one more in the very near future).

I've been following along with the sew along, and probably averaging 30 minutes a day, but just haven't managed to sew every day. You do what you have to do, right? Initially in the sew along, I was ahead of the game, but once the actually sewing commenced, I was a couple of days behind, and that proved to be beneficial, because I was prepared for some tweaking that I may have to do. As it turned out, I ended up having some major tweaking of that underbust seam, and spent about 2 hours Sunday morning getting it right. Well, almost right, but right enough that my next version will have a cleaned up pattern piece and should, fingers crossed, work right off the bat.

So. Pictures. With commentary beneath them. And at least a couple will be posted to the Tiramisu flickr group.

  •  Black, but my work uniform color. A cotton knit from fabric.com
  • It's a top. Duh. I had about a yard of this knit, so that's all I could get, and I'm fine with that. Some of y'all might call it a wearable muslin, but I hate that term so let's just go with version 1.
  • I cut out the 35C with a 35 waist.
  • Ended up raising the underbust seam of the bodice about an inch in the center to about 2 inches at the sides.
  • The gathers worked better for me in the center. That was deliberate and not a mistake.
  • I haven't done the actual checking, but the top of the midriff piece ended up cut at about the size 30, grading out to the 35 at the natural waist.
  • ACK! I have red hair now! When did that happen? ;)
  • After seeing these pictures I might go back to bangs.
  • Oh, the top. There is one issue with the neck binding that is a mistake on my part. Will be rectified with the next version.
  • Because I had to raise the underbust seam, I had to shorten the edge of the front sleeve. It worked, but in version 2, I'll shorten the back sleeve edge and lengthen the front to make them proportional again.
  • It basically means that it feels a little weird in the armpit area, but doesn't look bad. Only I will know that.
  • I'm debating on narrowing the midriff band about half an inch.
  • Ultimately, I think it will work better as a dress. It definitely needs the weight of the skirt to pull the bodice into the proper place. Scroll down a bit for my solution.
  • Back shot. Um, there will be a little tweaking. Yep, I do see the drooping of the top midriff seam.
  • Ah, yes, the belt. This is how I'll wear it probably 100% of the time. And even though we have to wear all black at work, we're allowed to have a little fun with accessories.

Tuesday, January 8, 2013

Pre-Heating the Oven

The Tiramisu sew along has begun (see button in the sidebar for more info). Amazingly, I'm a little ahead of the game. I had the weekend off, so took that opportunity to do a little "pre-heating" as it were. It turns out, that was basically the instructions for Day 1 of the sew along. Good news for me, is that time-wise, Steph is many hours ahead of me in Australia, so this gives me the "class", essentially, the day before.

Of course, I've already broken some "rules". And by rules, I mean, that 1) I'm making a top, 2) out of shorter yardage, 3) I didn't use the cutting out guideline, 4) oops, I've already cut mine out, and 5) I'm not putting everything in a box. Actually, the box is a GREAT idea, and one I've used before, and will use again. It's just for this project, for me, it won't be necessary. Now, if I decide in the middle of this project, to start making my dress version, then, yep, into a box or a shopping bag the various pieces will go.

Anyway, my timer is about to ring and off I'll go to work, but here's a picture of the way I laid out and cut my fabric. While I flaunted the "rules" of the layout, note that I did pay strict attention to the way the pieces were laid out in relation to the stretch/grainline. That's one rule I'll NEVER break.


Friday, January 4, 2013

The Tiramisu Sew-Along

This time I mean it. I'm going to do this sew along. I got the pattern for Christmas, so that's a check. I have fabric. Check. The only question is do I have time. It's 30 minutes a day. Clearly I should (should is of course the operative word here) be able to handle it.


Sewingcake

It starts Monday.

LinkWithin

Related Posts with Thumbnails