Wednesday, December 29, 2010

The Grown Up Macaron

One of the worries that I (and others that might fall into a "more mature" age bracket have), is that it's possible that certain patterns are too youthful. Several Colette Patterns might very well fall into this youthful category, but I think fabric choice can be the key to "age appropriate". The Macaron is one that might be too youthful, but you be the judge here:
(Please ignore the snow white legs. I bought these great grey tights, but just wasn't feeling the whole, get dressed for the photo shoot thing.)

Some details: the main fabric is a "almost black" Italian stretch wool herringbone, and the lining is black silk habotai, both from Gorgeous Fabrics. The contrast is the tie silk from Gail K's in Atlanta.

I made some changes, but it's been a while so let's see what I remember.
  • Added 1" to the bodice and 3/4" to the midriff piece.
  • Started with a size 6 or 8-ish at the shoulders and graded up to a 12-ish. I cut 1" seam allowances for the skirt on the size 12, but ended up sewing a 5/8", so maybe we'll call it a size 13.
  • Lengthened the skirt by 1-3/4" and had a 1" hem.
  • Fully lined, interlining the yoke pieces and lining the rest. I used the facings, too, for extra neckline stability. Bound the sleeve seams with bias cut contrast silk.
  •  Did not use the contrast fabric for the midriff, but instead used piping for a little definition. I think it makes me look taller and thinner (please leave me this delusion).
  • Finally, moved the zipper from the side to the back.
 I'm sure that I probably made some other tweaks to the fit of the bodice, but like I said, it's been awhile since I made the muslin. Oh, the sleeves. Yeah, they were a bitch to be honest. I'm not sure what it is about my arms and the way they connect to my body, but I've had some issues with patterns recently. Anyway, they turned out ok, but it must have been magic, or some supernatural sewing skills that I possess.

And look! Pockets!

Tuesday, December 28, 2010

Life's Thread

First, I want to say that I hope all had a merry Christmas if you are so inclined to celebrate. My holiday was memorable, but to say it was merry would not quite be true. I've debated about this post, and thought about it, and even woke up in the middle of the night "writing" it in my sleep. I just can't write more posts about sewing though as if all is well in my life when it simply isn't. So, let's rewind back to my last post.

That post was on December 16. Yep, the dress was almost finished. Actually, I've worked on it a little bit more, and it just needs to be hemmed. Fingers crossed, that will happen tomorrow, and pictures will follow. I'm loving the dress, and can't wait to share it with you. But then December 17 happened. Now, when you think about why a holiday might not be so happy, it seems perfectly acceptable to say that grandpa had a heart attack, or auntie had a stroke, and everyone would be sympathetic and sad. So, why is it so hard to talk about mental illness?

The thread of sewing has passed from my grandmother to mother to me, but I also have the thread of mental illness passed along the generations. Mental illnesses can be just as "inherited" as high cholesterol, some cancers, or blue eyes. And there is a stigma surrounding mental problems that has always bothered me, because somehow it makes me feel that I can't share a very significant part of my life. While I'm thankful that it is not me that I'm referring to, this time the thread struck so very close to my heart, as we had to admit our son to a psychiatric hospital on the 17th.

I won't go into all the details, because they aren't really mine to share. He was discharged 5 days later, and we are all still struggling with finding some answers and how best to help him. He is attending an outpatient program now, but all concerned are not sure that the particular program he is in is really the best fit. And here I thought finding the right college was hard.

Anyway, the focus of this blog will still be sewing and crafty projects, but the occasional update will happen. I think it's important that mental health issues can be discussed, just as we talk about other health issues. But you know, having a crafty sort of hobby can also be very therapeutic. I mentioned my new found hobby of knitting (remember the glowing ball of yarn?). Even more than sewing, knitting in its repetition and hand movement has proven to be extremely relaxing to me. If only I could convince Kyle to give it a try. He has started to play the piano again to help reduce some of his anxiety. (See kids, don't stop your lessons too soon... )

So, prayers and positive thoughts are always appreciated, and I'll find the camera soon and show off my dress and my almost sweater in a day or so!

Thursday, December 16, 2010

The Macaron Bodice

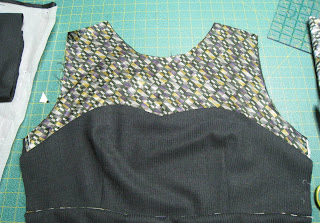
I'm almost finished... just need to construct the skirt lining, do some inner hand sewing on the lining, and hem. In the meantime, I thought I'd give a rundown on how I attached the yoke front to the bodice front. Basically, if you've sewn a princess seam, the technique is the same, otherwise known as the Right Side Together method (RST). That's my name for it anyway.

1. Stay stitch each piece just inside the 5/8" seam line. Do this for the lining, too, if you're lining.
2. Clip the yoke front seam allowance (SA) almost to the stitching, about 3 times on each curved section. Clip the bodice front and lining at the center.
3. On a flat surface, pin, RST with the yoke on top.
4. You can baste first, or just go for it and stitch. Slowly. If you are lining, then sandwich the bodice front/yoke front/lining, and stitch again. Important: DO NOT sew your lining all the way to the side seams, but stop about 3" from each side.
5. Cut some wedges from the seam allowance of the bodice front and lining to help it lay nice and flat.
6. Check your stitching. I needed to do a bit of ripping and resewing. It happens.
7. Press and admire!


Piping note: I used my invisible zipper foot and it worked out so well. The cording I used is super thin (I know that's the technical name). I think it's crochet thread, but I've had it at least 22 years, and used it to make piping for Peter Pan collars for Laura's smocked dresses when she was a baby. OK, I'm rambling.

Tuesday, December 14, 2010

Macaron -- Early Production Notes

Kind of a sneak peek here. I've been working on the Macaron, and wanted to share a few notes. First, the contrast fabric. I had already purchased a fabulous stretchy wool from Gorgeous Fabrics for the body, but felt like the yoke selection could make or break this dress. After browsing online, I really wanted to feel some fabric, and ended up at Gail K's, a local fabric institution. Ordinarily, you are completely ignored as you browse there, but this time, Gail (although not THE Gail K) almost immediately approached me. I had a swatch of the gray wool, and after explaining the design, she immediately led me to this:
It's silk. And you may be noticing that huge white flaw down the middle. Well, apparently, this is silk to make ties out of, and the owner must have gotten it for a song, because it was only $4/yard! And on top of that, everything in the store is 20% off til the end of the year. And it was a perfect match. But.

I think you get what you pay for. Or, it's just silk. Anyway, it moved and grooved all over and in the end, I used a Pro-Sheer elegance fusible interfacing on the yoke pieces to stabilize it.

Second. Biggest design change is moving the zipper from the side to the back. So, I constructed the back, and have inserted the invisible zipper. [Basically, the pattern instructions call for constructing the back and front bodice, then sewing the shoulder seams. I just went ahead and attached the skirt as well.

All pieces cut out and sorted.

Third. The pattern calls for the yoke and bodice sewn together in an interesting, flat, from the right side fashion. Kind of top stitched on, if you will. I did it more conventionally, right sides together, staystitching each piece, and clipping curves where necessary.
Fourth. I'm lining the whole thing. With silk apparently, but I'll have to confirm that. For the yoke, I'm simply underlining, basting the silk to silk, and treating it as one piece. I'll use a French seam for the shoulders. I'll explain how I'm doing the rest of the lining in another post.

Fifth. (I didn't really mean for this to get so long) The midriff piece in the original design is the contrast fabric, but I've decided to use the wool, and made piping from the yoke silk to outline. OK, I think that's it. Have a look:

Sunday, December 12, 2010

Department of Random

Well, checked in on my blog today, and what to my wondering eyes did I see, but 100 followers! Yippee!

I really do love my followers and their insightful and supportive comments. And I promised a giveaway, which I will do. Um, just not today. I can't even decide what to get my closest family members for Christmas, much less organize a giveaway for my favorite readers. But have patience, and it will happen.

I've been working on cutting out the Macaron pattern, but I've been distracted, so it's slower going than usual in the cutting out department. And yesterday, I felt compelled to bake. Not any gifts, mind you, but I'm going to blame Christine and her Sweet Treats Saturday feature on her delightful blog. If you click on Sweet Treats it will take you directly to her blog, and the recipe for the Brown Butter Toffee Blondies, which I followed faithfully (except for the walnuts, we don't like them too  much here). And this is what I got:
Guess who likes the gooey center pieces the best? Trust me, they are DE-licious!

And in cold weather news, those of you who live in real cold weather areas, please promise not to laugh. Well, ok, laugh if you must, but it's been snowing here in Atlanta today:
I can hear you laughing. ;-)

Friday, December 10, 2010

The Art of Muslining

Do you muslin? Is that even a verb? Back when I was a skinny, little thing I didn't. I just whacked away at the pattern, trusting the measurements on the envelope. But then much time past, and now that I'm "more mature" so to speak, my body has lumps and bumps and measurements that certainly fall across several size ranges as I go top to toe.

But having said that, I still resist, and I don't do it with every garment. The Mondo top... nope, no muslin. The Lady Grey coat, 3(!) muslins. Actually, I find that even though the lovely Colette Patterns are more "true to size" than the Big 4, I still cross the size ranges, AND the designs are more fitted, and they especially need to be muslined.

[And aside, since I'm on the subject, my idea of muslin is not to make it wearable. Oh, no. I think wearable muslin is a misnomer anyway. If you are making a garment out of some kind of fashion fabric, even cheap, expendable, fabric, and you have the idea that you might wear it out in public, then I call that simply practice, and it certainly has its place in sewing... I've done it, too.]

So, yeah. Here's the pattern that is up next:


And here's what the muslin looks like on me:
Kind of like an ill-fitting nurse's dress, truth be told. I was going to make it out of green satin and sequins, but the direction has totally changed now, and I think I'll surprise you. The point of this post is to say "reading" a muslin takes some practice. I'd say I'm an advanced beginner at this point. Some things I've learned:
  • First, check out Pattern Review to see what quirks others have discovered. Might save some time if you're looking out for a particular issue.
  • Cut out one size to start with and go from there. Did I do that? No.
  • I don't really have narrow shoulders, but rather the area under my neck and above the boobs, in between my arms, is kind of narrow.
  • Sleeve fit/armscye fit is really difficult. Even for pattern makers. This length looks right for me, but I'll have to add the hem.
  • Colette Patterns are notoriously short bodiced, and short in length.
  • Don't get obsessed. You can over fit a pattern.
  • This muslin is misleading. I have actually redone the front yoke to take into account the narrow chest issue.

And... I'm ready to cut. I'm not going to use the muslin as pattern. I am going to make the seam allowance of the skirt and the midriff pieces 1". My fashion fabric has a bit of stretch, but I want some leeway. I'm also going to put the zipper in the center back and not the side.

That's it. I learn a lot from each muslin I make, both about the garment construction and about my own shape. I can't wait to get started on this dress. Finally. Of course, there is all that pesky Christmas stuff that must be done this weekend, too, so I'm not sure how much sewing I'll get done.

Wednesday, December 8, 2010

Whoooo Doesn't Love...

... adorable little knitted owls? I just couldn't resist trying to knit one of these little owls that I saw when flipping through the Holiday 2010 issue of Knit Simple. Designed by Susan B. Anderson, this pattern was rated Intermediate, but I forged ahead with, what I think, was a pretty decent result. Sure, there are some pretty obvious flaws, but I still love the little guy. By the way, family, this book is on my wish list:

And without further adieu,


And I bought the coolest fabric today at the greatest price! Sharing soon...

Monday, December 6, 2010

Are You Sewing? Knitting? Shopping?

... or all 3? I'm doing all 3 right now, or should be anyway. I'm not really into the shopping this season, but suddenly I will be. Remember those lists I mentioned in the last post? I've made one! Who I'm buying for... but the "bought" column is suspiciously blank. I'll get to it. Really, I will!

And the sewing? I'm on my second muslin of the Colette Pattern Macaron. I did the first muslin way back at the beginning of October, so picking it up this weekend, I had kind of forgotten some of the things I wanted to change. Nevertheless, a couple more tweaks and I'll be ready to start.

But remember the glowing ball of yarn? I really made it into something, and gave it away as a gift. To a knitter! I know that sounds crazy, but wait, there's more! I even felted it! With a front load washing machine! So, if you don't know about felting, basically, you knit something up out of 100% wool, and then shrink it in the washing machine. I've done it accidently to one of Roland's beloved sweater vests. Oops. And according to instructions for felting, you need a top loading washer so that you can stop and check the felting process.

But I don't have one. After searching around the interwebs, I found a blog, Fiber Geekery,  that gave me hope (and some instructions). Back to the beginning though. First, I followed a pattern in this book:
The pattern is to make a felted knitting needle case, and includes some sewing! I ended up first with this:
The finished measurements were what was required, but I didn't knit nearly as many rows as was in the pattern. I think I should have gone for all the rows, and not worry too much about the measurements.

Then I put it in a zippered pillowcase, and threw it in the washer with 9 tennis balls and 2 towels. I used my quick wash cycle on hot with a cool rinse, and no spinning. It took 3 cycles to get the desired effect, and even though it turned out a little smaller than I wanted, like Tim Gunn advises... I made it work.

felted piece, with a wooden button from Australia

 inside view, batik fabric plus 3 rows of pockets

 rolled up

More sewing, knitting AND even some shopping (which I won't be able to show you yet) to come. Have a great week!

Friday, December 3, 2010

List Making Season

Did you hear? It's the Holiday Season! And if you don't do it any other time of year, this is the time that making lists seems to be the most important! Full disclosure: while I'd love to be all inclusive, I celebrate Christmas, so this post will be skewed toward that point of view. Simply substitute Christmas with the holiday that you celebrate.

So, back to the lists. There are Christmas card address lists that will need updating, gift lists, wish lists, menus and grocery lists galore. Calendars that need updating with parties and events. So much to do! And I have not even made the first list yet... but I can't say I haven't been warned:

Tuesday, November 30, 2010

Singing in the Rain

First, a health update for Kyle. My cranky toddler 20 year old is MUCH better and has several asthma fighting drugs on board. Also discovered that he has an ear infection. Fun.

Now for the real fun! The rain coat is finished and I love 90% of this Amy Butler Rainy Days raincoat pattern. Everything except the sleeves which are apparently drafted for stick people. Laura is thin, and the sleeves are too snug for her. I made the medium which is actually bigger than her measurements. She's between a small and a medium, so I went up, thinking she would get enough ease to wear actual clothes under her coat. No. So, I've brought it home to rip out the hems on the sleeve and bottom and hopefully there's enough seam allowance to get a little extra room. I'm strongly considering adding a gusset to the underarm area for a bit extra room as well. But don't you want to see it? How about a video?


And some stills:


And by the way, for readers of my blog, if you use the coupon code SEWINGBLOG15 you will get 15% off either of my shops, Jenna Belle Designs or Down the Street Creations.

Monday, November 29, 2010

Thanksgiving Road Trip

I understand for security reasons, many bloggers don't want to let the world know when they're traveling, and I was feeling the same. So, this past week, I was actually not in Georgia, but had flown north to Virginia Beach with husband, son, daughter and son-in-law to celebrate the holiday with Roland's brother and his family.

We tend to be homebodies on Thanksgiving, but this young man,
our nephew, Aaron, is heading to Afghanistan next week. He joined the Marines 2-1/2 years ago, and has already been to Iraq, but this time seems far more dangerous. He wanted everyone that could, to come join the family for Thanksgiving, and a bonus early Christmas celebration, and we were happy to do just that.

We made our flight plans back in early October, way before the current TSA hoopla. I'm happy to report that no one in our group experienced the full body scanners, or the dreaded pat down. In fact, I think we made it through security in Atlanta in record time.

All went great in Virginia Beach, and we consumed massive amounts of turkey, pie, cookies, cinnamon rolls, and real Italian meatballs and spaghetti sauce. Unfortunately, Kyle had a cold which got progressively worse, and last night, after landing in Atlanta, and fighting the traffic at the airport, we found ourselves staring at this:

Yes. That's the kind of thing you see in a hospital. In an ER. Kyle had been having trouble breathing the entire weekend, and we had even visited Urgent Care in Virginia Beach, but as in the past, he got worse instead of better. We finally left about 2:30 in the morning, and we headed straight to the 24 hour McDonalds for cheeseburgers. Yum?

Well, they were yum! And today was all about catching up with mundane household-y kinds of things. Happily we have food in the house now! Tomorrow we might even have clean clothes!

Friday, November 26, 2010

Another Giveaway!

... And it still isn't mine! This one is from my friend, Denise, the Queen of the Blue Gardenia. Head on over to her blog, The Blue Gardenia. You will not be disappointed!

In raincoat news... it fits. Sort of. The sleeves are a little tight for her, so I'm going to take it home and attempt to remedy that. She can wear it as is, but fits best just over a tank top which sort of defeats the purpose of making it a cold weather raincoat. Pictures soon, as you just won't believe how cute it is. And if you want some of your own super duper raincoat fabric, it's on sale until Sunday night at Gorgeous Fabrics, and comes in chocolate brown, black and navy. (I've already bought more black for me, so go ahead and shop!)

I hope you all had a marvelous Thanksgiving (if you celebrate), and are working your way through your leftovers now!

Monday, November 22, 2010

Raincoat Update

I've been sewing like mad, trying to finish this raincoat by tomorrow. It was going great, until I got to the sleeves, but more on that in a minute. First, a little about the topstitching. Topstitching is obviously pretty much straightforward, but one thing I do to keep the bobbin thread from showing is this:
Thread that little "finger" on your bobbin case, if you have one, and it adjusts the tension on the bobbin thread without messing with the little screw on the case.

So. I was all set to brag about how marvelous this pattern is (and I still think it's marvelous.... but) until I got to the sleeves. Thank goodness for Gertie's Lady Grey Sew Along! I used this post as a stepping stone, and modified it to work with this kind of coat/fabric.

I used a 100% cotton bias strip because I didn't need any bulk for the sleevehead. (Oh, first I skipped the gathering stitches called for in the pattern instructions. Well, not quite true. I stitched them, and then when pinning in the sleeve noticed some BIG problems.) Like Gertie says, pull on the bias strip, and push on the fashion fabric. But not too much. The goal is to utilize the bias strip like a gentle elastic, allowing it to do all the gathering work. You're trying to avoid puckers.

This worked pretty well with the lining fabric. It worked OK with the raincoat fabric, but let me tell you... I love this fabric! It repels water like nobody's business. But. There is absolutely no stretch at all, which means you just can't make it do what you want it to. I'm afraid the sleeve is not set in that perfectly. I'm hoping once the lining is in, the bulk of it all will make any imperfections in the sleeves less noticeable.


A couple more peeks:
The picture isn't that fantastic, but I wanted the harsh light so you can see the details in the black fabric.

The back view with the hood, and some of the topstitching detail.

Now, everyone keep their fingers crossed that it fits! Of course, I should have/could have made a muslin, but I wanted to give her the finished coat this holiday. With her living 3-1/2 hours away, that makes it a little more difficult when there's a time crunch. I'm feeling optimistic!

Sunday, November 21, 2010

It's Giveaway Time!

Oops, fooled ya! Not mine. At least not yet... 7 more followers to go. But Victoria of 10,000 Hours of Sewing is having a giveaway to celebrate her one year Blogiversary. Actually, she's having SEVEN giveaways, so it will definitely be worth your while to check them out! They start tomorrow.

Saturday, November 20, 2010

Another Coat?

It's true! My next current project is another coat, but this one is proving to be pretty easy. I'm making Amy Butler's Rainy Day coat, and I'm making it for Laura. She's young, she's hip, she's trendy conservative. I thought she might opt for a funky laminate print, but no. She chose black. A high end, raincoating fabric from Gorgeous Fabrics, but black.

She's applying to graduate schools, and everywhere she's applying is in a much colder climate than she currently lives in, so I decided to add some warmth to this raincoat by quilting the body lining with this:
I've done a bit of machine quilting in the past, and this really isn't difficult. There are a couple of ways to go about it. The easiest way is to simply pre-quilt your fabric before you cut it out, but where is the fun in that? No, I cut out my lining pieces, and then proceeded to quilt them.

Some tips. You want to have your batting a bit larger than your pattern piece because it tends to draw up just a bit as you quilt. I'm only using batting and the lining without a third layer, as the edge of the lining is folded into the hem. Then there are the darts, front and back. I didn't want the extra bulk from stitching the darts in the batting, so I just cut them out and "sutured" them together. Like this:

This keeps the 3 dimensionality effect caused by the darts, but eliminates any bulk. Then I marked my quilting lines, and "basted" the pieces together with quilter's safety pins. These little pins are purposely bent to make them easy to use. To mark the fabric, I used a 24" long quilter's ruler, and marked diagonal lines every 2" using a chalk pen. I'm not sure the exact name, but it's like a little pen, with a chalk compartment and a little wheel on the bottom where the chalk comes out.

Are you just dying to see the lining fabric? Here it is, a Joel Dewberry home dec fabric from fabric.com that is a wonderful weight 100% cotton.
Make sure you mark before you pin, or it can be a real nuisance. Because this is lining, and will only be seen in limited amounts, I didn't obsess over the distortion caused from the darts, or the mistakes that I made. Especially the line that was marked 3" apart. Egads! Doing the machine quilting can become kind of zen like as I just made my way over the fabric, stopping just into the seam allowance (which was marked). I want to be able to trim away the batting easily in the SA.

Another cool tool I used was some quilter's gloves that have rubberized tips that help you guide your fabric. It's amazing how slick cotton can feel as you try to manuver it. (Ignore the dirty fingertips, please.) I think rubber gloves might work just as well. And almost forgot to mention, but if you have one, a walking foot makes this job so easy, and really does minimize the drawing up and "crawling" that one fabric can do over another one.


Tomorrow I plan to cut out the outside raincoating fabric, and could possibly have it finished by Monday or Tuesday! I'll be seeing her over the Thanksgiving holiday, so it would be great to deliver it in person.

Thursday, November 18, 2010

New Hair

Thanks for all the coat compliments! I love getting comments, and y'all in the sewing blogosphere are so sweet and supportive! I'm planning a giveaway when I hit 100 followers, so if you're just a lurker, hit that follower button and join the fun.

Anyway... I've been contemplating a new 'do for several weeks now, and after seeing the back of my hair in those coat pictures, what with the 3" long dark roots and all, well, today was the day. Plus my hairdresser had an opening when I called this morning. So, off with it!

And, it only seems fitting what with the Royal engagement announcement and all, that its kind of Princess Diana-ish.

Wednesday, November 17, 2010

Lady Grey is So Finished!

Do I look happy? Well, I am! On Sunday, I was actually kind of hating this coat. Sewing fatigue, maybe? But I did something really simple, and it totally changed the look and the way I felt about it. What is it you ask? I simply topstitched around the entire front edge, lapels and collar. That's it. You see, I hadn't done any topstitching, but this left the front edge and lapels weirdly poofy and no amount of ironing was going to tame them. I had even understitched the facing up to the lapels and around the neckline. But, no. Anyway, it's done and I've blogged a lot about alterations and muslins and the process, so today, just a few observations and some more pictures.

Gratuitous gorgeous sunny fall day picture. Too sunny really to get good pictures.

 I'm happy with the fit for the most part. And enjoyed the tailoring process.

There is still that wrinkle across the back, in spite of the sway back adjustment. Oh well. I'll live.

Hard to see in the picture, but each belt loop has four lines of topstitching. The first two were kind of uneven and I was too lazy to make new ones, so I added 2 more lines of stitching and I kind of like the effect.

I added those really big snaps instead of buttons and I love them! With the giant belt loops on the back, I'll always wear the belt, so the button would be hidden anyway. I'll save the 3 I bought for another project.

The biggest flaws in the sewing are on the inside and it's pretty much a hot mess. Puckery princess seams, wonky hem, sleeve lining was too short,and I just added another band of lining.

And the lining is Hot! It's Pink! It says "Look at ME!" Oh well, again, I'll live. Most of the time, curious onlookers will only see a glimpse anyway.

And that's it! Curious about more of these posts?
Muslin #1
Muslin #2A
Muslin #2B
Cutting it out
Pad Stitching
The Interfacing

And I think that's it. How about some more pictures!


Saturday, November 13, 2010

My Mondo Top -- Vogue 8151

If you watched Project Runway this past season, then you must remember the Jackie Kennedy challenge, and Mondo's tee and skirt outfit that won.


From the moment I saw it, I knew I wanted my very own Mondo top! How do you feel about knock-offs? I feel like, it's ok, if you're making it for your own use. It's not like I'm going to make lots of them and sell them. I also feel like home sewistas are often inspired by designers and RTW fashions. How many times have you seen something in a store, and said "I can make that"?!

Anyway, I already had Vogue 8151, and with just a couple of modifications, I had made myself a Mondo top.
I used a Michael Miller cotton interlock knit from fabric.com which is super soft, with a nice, beefy weight. These knits shrink quite a bit, so be sure to prewash if you purchase any. The sleeve on this pattern is already 3/4 length, so I just determined where I wanted to cut it, and added seam allowance to the cut. I did shorten the length by an inch.

I also made the neckline more of a boatneck, though it could have be made even more so, and I didn't use the neckband in the pattern. I simply serged the neck edge, and folded it over 5/8". I was worried about matching the stripes just a bit with the dart, but didn't have any problems.

I'm not the only one who wanted a top like this! Laura wanted one, too, and I made her one in black and white. I lengthened the body an inch for her and left the sleeve length alone. I also made her one size smaller (the "B" size). I haven't sent it to her yet, so fingers crossed that it fits.


Thursday, November 11, 2010

A New Baby


My Etsy friend, Holly Anne, had a beautiful baby boy yesterday, so in honor of her and Cohen, I want to share this fun video. And to my own children, when you have your own babies, this could very well be what I want to do with them.

Wednesday, November 10, 2010

Something Different

You know that I have Etsy shops, and sometimes I actually do some work on them. Usually it's purses, clutches and the odd quilt now and then, but a couple of months ago, Roland actually did a little marketing for me, and pointed one of his colleagues in my direction. She's Jewish, and apparently when Jewish children reach a certain age they receive a prayer book. Traditionally, covering this prayer book would be an elaborate cover handmade by the mother or grandmother.

Well, this mom is a corporate attorney, and is, well, by her own admission, not crafty at all. This is where I come in. Her son didn't want anything traditional, and I think you'll all agree, there really is nothing Jewish about this book cover at all.


Roland found the hockey fabric at G Street Fabrics in Rockville, Maryland on our trip there this past September.

A clarification about my yarn ball for Karin: I didn't spin this yarn, I merely wound it into that marvelous ball. I'm probably at least a few years from actually spinning yarn, if ever, but thanks for thinking that I'm that clever. It made me smile!

A parting shot:

LinkWithin

Related Posts with Thumbnails