Showing posts with label crescent skirt. Show all posts

Saturday, May 12, 2012

My Name is Ellen and I'm a Sewaholic.

This post has SO much to cover and I'm sorry it's on a Saturday when, according to my stats, y'all just don't read blogs. Well, be that as it may... let's start with the mini photo challenge for Me Made May. An ugly place. Sad, but I didn't really leave my house yesterday, so I went trolling for said "ugly place" in my house. Found one.
Eeeps, please tell me you have a closet like this in your home. See that red bag in the lower right hand corner? I made that, oh, 20 years ago for Laura (you can see the "L", right?) to haul around her little girl stuff. It probably still has little girl stuff in it, I didn't check. Let's take a better look at my outfit though, and I'll tell you what I'm wearing.
Top: Sewaholic Renfrew Blue
Skirt: Sewaholic Crescent skirt... new!
OK, the new crescent skirt had some alterations, but this is my 2nd one for me, so I'll just direct you to the post for the first one, since I used the same traced pattern pieces. I've lost  misplaced the envelope, but I could probably guess that it says not suitable for plaids. Pshaw, I say! Well, not really, but I did try to make it work. You can see they kinda sorta match along the side seam, and if my hand wasn't in the pocket, you would see that the pocket (which I had to piece because of a fabric shortage), also kinda sorta matches. Where the trouble comes is in the yoke. Exhibit 1:
The curved seams in the side fronts and backs are just NOT going to match completely. No way, no how. But I can live with it, and I'm mostly going to wear my shirt untucked, so there you have it.


Let's just get today's outfit(s) out of the way, too. I'll call this:


Day 12


Did I mention we're about to renovate our kitchen? I think I did. Anyway, it's got to be emptied, and this morning my job was the pantry. After breakfast, I just got right to it, and, guess what? My pj's are "me made" (well the pants anyway).
Look. Empty pantry. Hmmm, don't think I'd brushed my hair yet. Those pjs are mostly self-drafted. You'll be happy to know that just before lunch I managed to shower and get dressed for, you know, possible lounging around on a Saturday afternoon. Or more likely, emptying a couple more cabinets at least.


The dogs let me squeeze in between them for this picture of me in my 2nd Renfrew and the denim mini skirt I wore on day 5.


Have a wonderful Mother's Day!

Monday, June 13, 2011

Love the Crescent Skirt!!

I finished my second crescent skirt at least a couple of weeks ago, and this was one for my daughter. I used Anna Maria Horner Little Folks Voile, the Diamond Mine Ink pattern which is a fabulous fabric to sew on. I lined it with poly blend batiste since the voile is slightly sheer. I've blogged about this skirt on numerous occasions, so what do you say we just look at it!


Finally, a little Me Made June. Yesterday was just a post vacation recovery day. We went out to lunch before Laura and Thomas headed back to Nashville, and the rest of us just hung out. Perhaps a little laundry was done. I had taken this dress to the beach, but didn't have a chance to wear it, and it's just a bit louder than my usual style. I made it last summer and yesterday was only the second time I had worn it.

Today, it's back to business as usual. That meant vacation laundry and grocery, with a side of a bridge class that I had previously signed up for. The bridge class (and me made June) meant that I was a bit more careful with what I threw on for the day. I made this top last year from a Liberty scarf that I bought at Target. The skirt is from Talbots.

Tuesday, May 24, 2011

Crescent and Shorts

The crescent skirt is finished!! Actually, I finished it yesterday, but I'll do the full reveal when I give it to Laura and can get some pictures of her in it. I love the voile fabric. It almost feels like silk. But about the zipper. I might give this technique one more try, but I'm just not happy with the outcome. It does look ok, but it's not really hard to get way better results. And I do love the crescent skirt, and how flattering it is, and how easy it is to make (zipper aside). A sneak peak of just the zipper:

If you're participating in Me Made June, you're probably well aware that June is just around the corner! The gaps in my wardrobe are screaming, so I've been sewing like crazy! I won't show you everything before June, because there could be some boring days full of repeats, but suffice it to say there are a couple of "not my usual style" kinds of things that I'm really loving!

One thing I will show you, that I'm pretty excited about is the pair of shorts I just finished. I haven't really made any pants successfully, so I was a little nervous about this project. I chose Kwik Sew 3614, and read the reviews on Pattern Review. Several said the pockets pooched out, but I got my cocky sewing attitude on, and thought "not MY pockets". *sheepishly* Here's ya go:

I used some cotton twill from my stash, that has a teeny bit of stretch. I felt like these were kind of going to be a "muslin" of sorts, and while the fit is pretty good, it does need some tweaking. For one, my next pair will have some different kinds of pockets. I've got a cute idea for them, so stay tuned for that. Next, the shorts are a little big, so taking in on the sides will be necessary.


I think I'll also attempt some welt pockets for the back on my next pair. And I'll make them a skosh shorter. Finally, there's the issue of the rise. Here's the skinny. I traced the size Large. But I have a super short rise in the front, so after tracing the large, I had the tracing tissue over the pattern, and simply traced the XS (yes, EXTRA small) waistband line, extending it out to the side seams. I took out an inch in the back to help the side seams match better. And it still seems like there's a bit too much fabric at the crotch level. If I pull them up as high as they want to go, they are an inch over my belly button. Oh, my. So, a bit more tweaking there, but that's it!

I'm loving the waistband, too. I don't/won't usually wear my shirts tucked in, but this doesn't really look too bad.

Finally, I finished a top today, that I'm not 100% sure about, but I'll talk about it tomorrow. Do you want a sneak peak though?

Friday, May 20, 2011

Crescent Skirt Zipper Insertion (with lining)

I'll be the first to admit it, I had trouble with my zipper with crescent skirt #1. I'm embracing the imperfection the resulted, and yeah... "I meant to do it that way!" But it was with eager anticipation for the sew along to get to this step, so I could have some visual aids, and I think I know where I went wrong. Nevertheless, I'm going slow, and definitely "sewing along."

Like yesterday, for those of you that are adding a lining, I thought I'd give you your own visual aids of the lining with zipper. The instructions are no different, so I'll just point you to Tasia's post for today (Crescent Sew Along #20) for the words.

And for the visual aids (aka, pictures):
Ready to sew side 1. Note that my center back seam has NOT been sewn yet.

Turn your lining inside out to prepare for side 2.

After sewing (I swear I rotated this picture when I edited it, and for the life of me it won't stay rotated), inside view. I have now gone ahead and sewn the center back seam up to the bottom of the zipper. If need be, I'm a whiz at ripping out stitches.

Right side out view. Can you see that the bottom of the facing doesn't line up? I'm reasonably certain that my daughter won't ever wear her skirt inside out, so I can live with it.

Hope these pics help!

Thursday, May 19, 2011

Crescent Skirt Lining

First, for those inquiring minds, the red floral fabric is rayon shirting purchased from my usual go-to online source, fabric.com. It comes in several colorways, and right now is on sale for $2.99 a yard, so don't delay! Clicking on the link should take you right to that fabric.

The Crescent skirt lining. I'm not a "oh, I have to line everything" girl, but for this version of the skirt I'm using a voile, and it is a bit sheer, and decided to line it for practice as well. You youngsters may not remember this, but we all used to just wear slips. Anyway, Tasia gives a good description on how to line, but I have a couple of pictures.

You eliminate the pocket for the lining, and she devotes an entire post to the technicalities of how to do such a thing. I'm lazy, and this is how I did it:
 
I folded the pocket on the fold line, slipped it into place under the front skirt piece, pinned it all down and whacked away. Notice that I folded up the hem allowance because you want the lining to be shorter than the skirt (duh).

Otherwise, I pretty much followed her steps. I serged my seam allowances, and serged the edges of the center back. I only sewed up about 4" at the bottom of the center back because I haven't yet decided which blue zipper I'm going to use and they are different sizes. I did go ahead and hem my lining because I find it easier to do it without lots of extra stuff in the way.

This is how it should look at this point in your sewing:

Wednesday, May 4, 2011

Getting Ready

The queue is long, June is coming, and I'm heading out of town for 10 days! Do I have any "me made" shorts? No. Do I have a "me made" beach coverup for our June vacation? No. I'm 100% sure I'm not making my own swim suit. At least not this time around. And I'm "participating" in the jeans sew along. Well, the denim is pre-washed, and measurements have been taken.

This week has been all about the prep work. I have 3(!) things cut out, and interfacing has been fused for all 3. Somehow, even using a press cloth, I ended up with:
My iron seemed coated with stickiness,and you can even see some threads glued on. Yikes. But it only took a couple minutes, and look:

So, what do I have cut out? Two things for Laura... a crescent skirt, and a cute button front dress from a 70s vintage pattern. And a top for me. Look at the pile:
And doesn't Laura look cute in her muslin? I haven't seen pics yet of her in the skirt, but she says it's perfect. Yay for that.
I'm completely caught up with the crescent sew along. Exactly caught up even (never mind that I've already finished one... I'm doing this one with the group). I think I'll pack up the skirt and finish making it at my mom's.   I'll post these next pictures in the flickr group, and Laura please chime in. Rick rack, or no rick rack. I have it on the pocket area right now, but I'm thinking of it for on the waistband, just on the curved seams.


Whew! That's it. I'm out of the house most of tomorrow, so no sewing... just packing.

Thursday, April 28, 2011

Crescent Skirt -- Finished

Well, I realize I'm supposed to be "sewing along", but I'm kind of in a rush, so I just forged ahead. I'll be making more crescent skirts, because I really like this pattern, and the sew along might just catch up with me. Hmmm, that sounds a little braggy, but I have been sewing for awhile. And, even more importantly, I'm going out of town next Friday for 9 days, and that means no sewing. Well, maybe no sewing.

OK, crescent skirt. I made one major-ish change after the muslin, and two small-ish. The small-ish changes were going down one size (that always makes a girl happy, right?), and using view B instead of view C. The major-ish change was to make the center front and back "points" on the yoke less pronounced. Like so:
Not sure how much you can tell from that picture, but I shortened the fronts and backs 1/2", and curved out that bottom seam line, and then added the 1/2" to the center front and back skirt pieces. Worked like a charm. It's not all that noticeable in the finished skirt. Actually, most of the details aren't noticeable because the print is too busy. The fabric is a rayon shirting from fabric.com.

Straight up, I've stolen Patty's signature superhero pose because, frankly, I think it's awesome, it makes my arms look great, and gives me more waist definition to an otherwise kind of rectangular figure. The pattern is extremely well drafted, and the instructions great until... well... the zipper insertion is kind of confusing. In theory, I got it. In practice, it didn't seem that hard. But, it just didn't come out how I wanted it to. In the end, I "made it work" because I didn't want to start over (read, I wanted to finish it today, and I had a headache). I'll definitely be at least following along when Tasia gets to the zipper during the sew along. Or, I'll just put it in my own way.
It really is centered, but I apparently have issues when getting dressed. I don't think the zipper is actually supposed to show, but this one does, and I'm really glad it's only a 7" zipper (oops another change, but I have a ton of 7" zippers).

A skirt confession: last year, I hated every skirt I made, and I had an irrational fear of them being too tight. Consequently, none of them really fit right. This one though, fits greats and has pockets! Great pockets!
Don't I look happy (headache and all)?

What do you think of the shoes? Unless you like them, I don't really want to know, but I bought them in the mid-90s in Spain, and I'm thinking they still work today. The heel is a little chunky, but it works for me. And they're patent leather. And comfy to boot.

Tuesday, April 26, 2011

Musday

I wanted to drop off some pictures of a couple of different muslins I'm working on. I'm right on schedule for the crescent skirt sewalong, as today was the fitting of the muslin. Initially, I identified 2 problems with my skirt (or maybe it's my body). First, I made view C, which is the longest, but I think it's too long. Easy fix there, and I remeasured with view B. Not sure I'll go quite that short, or somewhere in between. Feel free to speak your mind about this.

The second problem was the length of the waistband/yoke. I have what I suppose is called a low rise in that the length between waist and crotch is on the short side. Of course, with a skirt, that isn't really a factor (like it will be with the jeans sew along), but I was feeling like the waistband point ended at an awkward spot. I made a tuck all around, shortening it by about 3/4" just to see how I liked it. If successful, I was going to more precisely adjust each pattern piece. But take a look:
A picture is worth a thousand words here, and I think the original waistband looks better on the hips. I think I'll soften the center "point", shaving off a bit and rounding it to eliminate the pointing at an awkward spot feeling. Otherwise, I'll leave those pieces "as is".  What do y'all think of the length? I think the shorter look is better. It's a little loose, too, so I may go down a size. The only other change is that I'm using a 7" zipper as I have quite a lot of them, and they work just fine.

The other muslin I made today is the bodice of the Colette Pattern crepe dress. I think a few tweaks will make it work great. When tracing, I started with the 8 at the shoulders, angling down to the 12. The shoulder area is still a touch wide, so the 6 might even be better. I'm going to review some of Gertie's fitting tips from when she did her sew along earlier this year, too. A couple of other complaints... there is a bit too much fabric under the bust. An easy fix taking some of that extra up in the darts. The side darts are too high, but just a smidge. The back is simply too long, so a swayback adjustment is in order there. Because it's a wrap dress, I feel like there is some leeway with the back, and I don't want to overfit, and not have enough to wrap around the caboose.

Thursday, April 14, 2011

Bits and Pieces

Just want to clear up some old business, and get ready for the new, so let's reflect:

Over the Top Challenge officially ends tomorrow, and on the 16th we switch over to the Bottoms Up Challenge. You can go to the Over the Top blog to sign up for the Bottoms Up if you aren't already in the top challenge. Perfect timing, I say. Here's the top tally:
1 pj top, 3-1/2 tops (the 1/2 being the RTW that I hemmed) plus a bonus top for Laura = 5-1/2 tops made. I have a couple more that I hope to get done by at least the end of April, if not sooner.

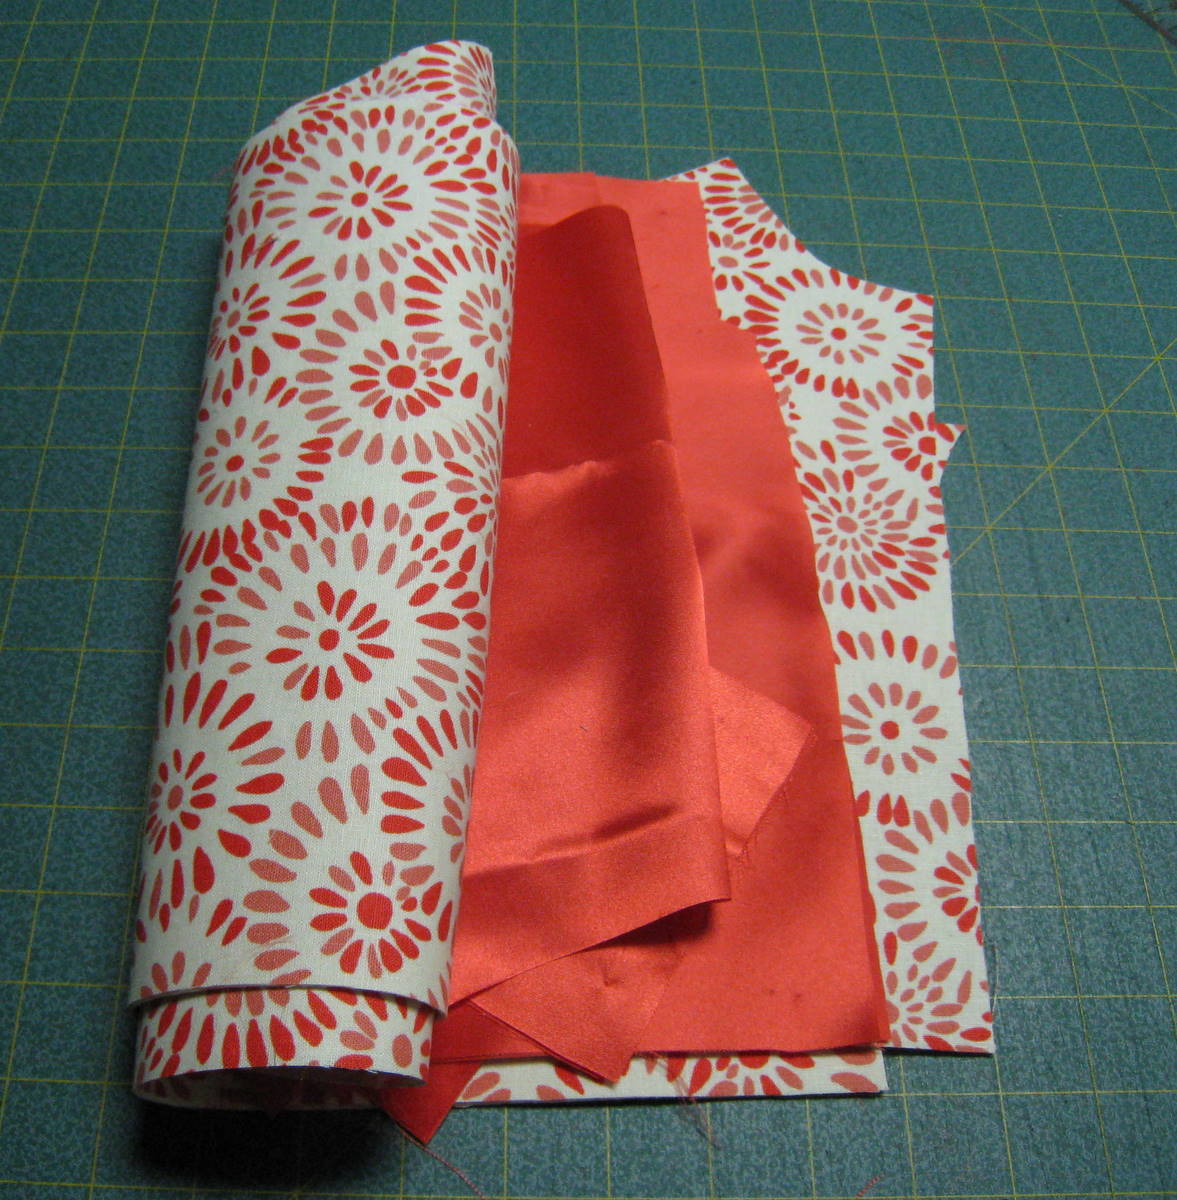
The RTW jacket sew along (click on the badge for more info) is moving along. My fabric has been block fused, and the pieces cut out, ready for sewing. It's conveniently bundled as recommended:
BTW, that's a new lining. The original lining I had chosen was too sheer and you could see the print through it.
The crescent skirt sew along (click on that badge) is about to begin next Monday (deadline for anyone filing taxes in the U.S., so some of you might be really busy this weekend). I've bought fabric for at least 4 or 5 of these skirts, but this is what I'm starting with:

You're thinking... "wait! Isn't that already a skirt". Well, indeed it is. I wore this in 1978 as an overskirt to the bridesmaids dress I wore in my cousin's wedding. She's now been divorced for years. Anyway, that's vintage Liberty of London cotton that will flatten out nicely and give me plenty of fabric I think when I take off the waistband that's about 10" around. Ok, maybe not 10", but it's shockingly tiny. Look at this fun detail:
Those are buttons down the front that I'm going to incorporate into the skirt by simply sewing it closed, leaving the buttons as details. And it will look great with my new chambray top!

Moving on, I've bought 2 voiles from the Anna Marie Horner collection (which I'm lazy and didn't take photos of), and several pieces of rayon shirting from fabric.com that have washed up gorgeously. The rayons have a wonderful drape and aren't too bulky for the gathering. Oh, here is a picture of a couple of them (the red will be a dress for Laura). Danny approves.

Then there's the jeans sew along (I'm wondering if I could somehow parlay these sew alongs into a kind of profession... are there professional sew alongers. If there are I want to join.). Oops, got sidetracked. Anyway, I have my patterns, but no denim yet. I do have some notions though. The jeans buttons? 12 of those babies for $1.80 at atlantathread.com.
I'm not planning to make 12 pairs of jeans (or even 3), but I do have that option now. And plenty of topstitching thread.

This post is getting kind of long, but the next section was named by Kyle, and he calls it $#!%@% My Mom Makes. First up, is a favor for a friend who will be turning this into a pillow:

And finally, a little knitting project from Itty-Bitty Toys. I'll let the pictures speak for themselves.

LinkWithin

Related Posts with Thumbnails